Mark Rios
Member
- Messages
- 797
- Location
- Central CA
I finally got it put together last night. I'll put a blade on it and set up the bearings today. I still feel that this machine is way, way, way more of a saw than my old G0555 and probably more than I will need or can use (while I'm here at this property anyway) but it's nice to have a top notch machine.
The blade guard wasn't too dificult to get aligned and working properly as was mentioned by Sam Blasco and others. Thanks for the pointers on that.
However, while cleaning it up and putting it together, I found some fit and finish items that are a little disappointing.
First, here's a full pic of the machine to fulfill my obligation to Tyler and the Pic Police. Tyler, please accept my apologies for not getting it up sooner. Please tell me where to send the fine.

The On/Off switch is the first thing that I noticed that was kind of wonky. Mounted very noticeably crooked. This will not, nor anything else that I have to post (so far), potentially affect the performance of the saw but I was expecting a little more QC from this highly touted manufacturer.

The next thing that I noticed was, after cleaning off the table of the rust preventative, there is a handprint stained into the table. Someone put their hand on the table (signed it? ) before the rust preventative was applied apparently. I've scrubbed it with steel wool and WD40 for 20 minutes or so and this is the best that I could get it. It's much easier to see in person than it is in the pic.
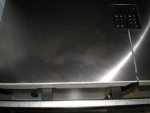

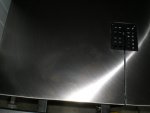
Also, in the near left corner of the table, the grinding/surfacing marks are still raised considerably and can be felt quite readily. That area didn't get smoothed down apparently.
The next thing was the blade hole cut-out in the center of the table. As you can see from the pics, the back of the hole is very noticeably curved. A penny will fit in the space between the edge of the hole and the plastic filler. And speaking of the plastic filler, it's really kind of a cheesy part. Has anyone else noticed this? It sags between the corners so that I am unable to level it with the table. If the corners are flush, the middle, between each corner, is below tha surface and material can hang up (not safe). If I raise it until the middle is flush, the corners are all above the table surface. I'm thinking of making one out of wood.
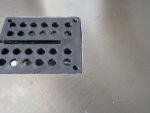

One other thing, directly under the handle that raises and lowers the upper wheel, there is a very small dimple(?) where it looks like a piece of welding slag fell on the table and left a very small hole. There is a small raised nub that I will have to sand/file down so that it doesn't stick up.
Anyone have any thoughts or opinions on these items? Not life changing or anything like that but a little disapponting for $2400 (on sale).
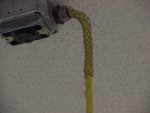
And question, if I may? I've attached a length of cord to the saw. The 10 gauge construction cord is approximately 9/16" in diameter so it's too big for the grommet provided but too small to be snug in the plastic nut so that the cord is hanging by the wire ends on the wiring block instead of being supported byt the cord/nut grommet. This isn't a manufacturing issue by any means, just something I've run into because of the size of the cord that I'm using.
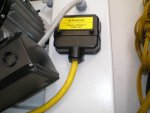

Anyone know where I can get a grommet of a different size or some other means of wedging the cord into the nut? I could wrap black tape around the cord and use the tape for a grommet of sorts but tape doesn't really last that long in this application. I'd drill a hole and physically attach the cord to the machine before I used tape.
Thanks very much for you opinions and thoughts.
The blade guard wasn't too dificult to get aligned and working properly as was mentioned by Sam Blasco and others. Thanks for the pointers on that.
However, while cleaning it up and putting it together, I found some fit and finish items that are a little disappointing.
First, here's a full pic of the machine to fulfill my obligation to Tyler and the Pic Police. Tyler, please accept my apologies for not getting it up sooner. Please tell me where to send the fine.

The On/Off switch is the first thing that I noticed that was kind of wonky. Mounted very noticeably crooked. This will not, nor anything else that I have to post (so far), potentially affect the performance of the saw but I was expecting a little more QC from this highly touted manufacturer.

The next thing that I noticed was, after cleaning off the table of the rust preventative, there is a handprint stained into the table. Someone put their hand on the table (signed it?


Also, in the near left corner of the table, the grinding/surfacing marks are still raised considerably and can be felt quite readily. That area didn't get smoothed down apparently.
The next thing was the blade hole cut-out in the center of the table. As you can see from the pics, the back of the hole is very noticeably curved. A penny will fit in the space between the edge of the hole and the plastic filler. And speaking of the plastic filler, it's really kind of a cheesy part. Has anyone else noticed this? It sags between the corners so that I am unable to level it with the table. If the corners are flush, the middle, between each corner, is below tha surface and material can hang up (not safe). If I raise it until the middle is flush, the corners are all above the table surface. I'm thinking of making one out of wood.


One other thing, directly under the handle that raises and lowers the upper wheel, there is a very small dimple(?) where it looks like a piece of welding slag fell on the table and left a very small hole. There is a small raised nub that I will have to sand/file down so that it doesn't stick up.
Anyone have any thoughts or opinions on these items? Not life changing or anything like that but a little disapponting for $2400 (on sale).
And question, if I may? I've attached a length of cord to the saw. The 10 gauge construction cord is approximately 9/16" in diameter so it's too big for the grommet provided but too small to be snug in the plastic nut so that the cord is hanging by the wire ends on the wiring block instead of being supported byt the cord/nut grommet. This isn't a manufacturing issue by any means, just something I've run into because of the size of the cord that I'm using.


Anyone know where I can get a grommet of a different size or some other means of wedging the cord into the nut? I could wrap black tape around the cord and use the tape for a grommet of sorts but tape doesn't really last that long in this application. I'd drill a hole and physically attach the cord to the machine before I used tape.
Thanks very much for you opinions and thoughts.
Last edited:


 You might even be helping out another member who buys one in the future, by nudging them to take a little closer look and make some changes... Who knows?