Temporary farm shop

Darren Wright

Administrator
Staff member
Messages
20,168
Location
Springfield, Missouri
At the farm, we’ve got a 3 car garage/barn that my wife’s grandpa built about 30 years ago. I started to clean it out this weekend and got to thinking about what all that would need to be done to turn it into a usable shop. It’s about 24’ x 40’ with 8’ ceilings.
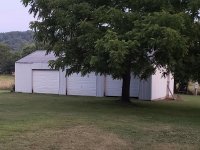
765767B0-37E3-4866-A637-67406F060D28.jpeg

My wife has made it clear that she does want a garage to park in, so a new shop will get built, but I have permission to do what I need to with this one for now.

I think without too much trouble I can get the garage cleaned up and seal/insulate it to be a pretty decent garage/shop in the mean time.

As you can see from the first pic, the yard slopes right up to the doors. One of the first jobs for the tractor is to regrade some of the yard and add drainage away from the front of the garage.

164D6CF2-B269-4ED6-BED4-12496C228685.jpeg
It needs a new electrical feed, lights, and wire/plugs throughout. Install new windows on the back, and gutters added to the front and back again.
 
I think it would make a great temporary shop space! It looks like it needs insulation. Would you also do that? Now that Glenn's shop build is winding down to arranging furniture and hanging pictures, I am feeling a void. I hope you can fill that with a nice building transformation into a shop space.
 
I think it would make a great temporary shop space! It looks like it needs insulation. Would you also do that? Now that Glenn's shop build is winding down to arranging furniture and hanging pictures, I am feeling a void. I hope you can fill that with a nice building transformation into a shop space.
Yeah, I plan to insulate, do some osb on the walls, and steel panels for the ceiling, insulation for the ceiling also as it goes up. New electrical throughout and lighting added, there's only a couple of garage door openers for lighting now. The Hardie Outdoor wood boiler isn't that far away. I may add the lines to add a heat exchange off of it for keeping it warm in there. We'll be getting a larger propane tank soon, which will be installed behind the garage to be more central to it, the house, and future shop.
SPACE!!!!
Not much yet, but working on it. :) There is just a lot of "stuff " to go through. Her grandpa says to take what I want and throw away the rest, but my wifes aunt and uncle see value in everything in there, so it's a balancing act at this point.
 
I'd make it my shop and build her a garage.
If it was just for woodworking and such, it's certainly big enough. For my final shop I'd like to be able to pull equipment in to work on. I was looking at 10' and 12' doors, maybe taller. Most likely a lean-to on one side to park the RV under. Space inside will be divided to allow for different uses/hobbies. I've been looking at some of the all steel buildings that are built locally and go up in a day or two once the foundation is ready.
 
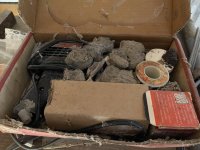
I spent half a day Saturday cleaning dirt off the floor and knocking down mud dobbers nests in the center bay, I filled two 5 gallon buckets with dirt and nests. I can’t n see concrete again.

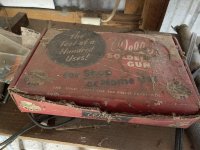
So just how thick are the mud dobber nests? I came across this old soldering iron still in the original box.
218A3B1A-B25F-4B9F-928C-004B1A273CBA.jpeg

When I opened t. :)
22009A20-25B0-479B-883D-0060EB54C660.jpeg

I probably have knocked down at least 500 nests so far off the trusses and shelves, two more bays to clean.
 
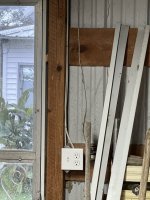
Spent some time running wiring for lighting. I added a light switch by the door.
D82CA6ED-B2BD-40D8-9DC1-49D1B5119990.jpeg

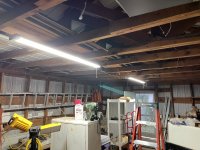
the led shop lights showed today, I got half (3) of them up. I need to pickup more wire to finish up another outlet.
ABDE5862-0D5D-4660-B20F-A908FBD84167.jpeg

I’ve been pricing out materials to get it insulated and walled up inside. Most expensive part was metal for the ceiling, but remembered we have a huge stack of tin behind the barn that came off it when it’s roof was replaced. I think my wife will like the rustic look anyway.
 
Not much progress other than picking up steel wool and spray foam to start plugging holes to keep mice out of the walls. I still need to clean up the last bay.

We did lose one leg of the electrical to the garage this past week, which happened to be feeding the camper. Tried swapping out the main breaker at the house, but no luck. I had voltage at the sub panel until a load was applied, then it dropped to 0 volts. After some moving of metal panels along the back walI, I fount two splices in the main feed. I could hear one sparking when the lines were moved, so killed the power, and swapped out the splice lugs. Both were pretty corroded, but that fixed the issue.

I was supposed to have a guy come for a perk test on a new septic system this week. Called him today to get an eta. It seems he wants me to dig the holes, so now waiting on getting the tractor back from the dealer. :doh:
 
start plugging holes to keep mice out of the walls
Well.. good luck with that I suppose. the steel wool will definitely help anyway but finding all of the holes is a bit of hunt the wumpus.


Perhaps also a half dozen of these and some stale cheese in strategic locations.


I fount two splices in the main feed. I could hear one sparking when the lines were moved,
That's.. mildly terrifying.
 
Yeah the real challenge is finding all of the holes. In old buildings especially but even new there seems to be a thousand places the little fellows can sneak through. It would be pretty cool if it wasn't so dang annoying hah.
 
Looking at video, one would say that the more peanut butter the mouse eats, the fatter it gets, so it shouldn't pass through previous bigger holes.;)
I guess that the result would have been even more surprising if the mouse could have a good grab on the floor with its paws.
 
Stainless steel wool costs a bit more, but doesn't rust and disappear in humidity and plugs mouse entry holes forever, but spray foam works too. They don't seem to like the taste of spray foam.

Charley
 
Top