The "Next" Workbench - I Think I'm Done

Aug. 28 Updates

First an OT question. I knew this was going to be a drawn out deal. Do you guys prefer that we go back and continue adding like I'm doing here or do you prefer new threads for different stages of the same project?

Now, I have favored BB ply for my shop cabinets due to the light color but the regretful spike in cost is still on. The top and end panels of the bench are MDF so I changed my plan to MDF for the drawer cabinet and shelf.

And on with the show . . .

I reached the point of needing bench drawers nearby and so, I'm back on the bench project for a bit.

Here's the bottom shelf parts getting BLO'd. Pic shows cutouts for legs and recesses for leg bolts.

J-bot-shlf-BLO.jpg

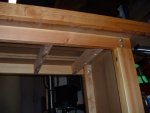
Here's the support frame in the bench base.

K-bot-shlf-supports.jpg

The bottom shelf is in two parts, the seam is over a cross brace and is hidden by the upcoming drawer cabinet.

L-Bot-shlf-2-parts.jpg

Looks like so.

M-Bot-shlf-in.jpg

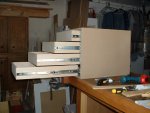
Cut up the carcase parts and rabbet 'em.

N-dr-cab-prts.jpg

I tried a different approach to carcase glue up as far as sequence . . . why? I don't know. I like the old way better but this looks . . . experimental(?).

O-dr-cab-glueup.jpg

And the carcase (there will be a recessed solid back) goes in here till the full overlay drawers get done. The gap between the top of the carcase and the bottom of the bench top is to allow spoil that falls through the dog holes to be blown out.

P-dr-cab-in.jpg

The empty shelf to the right of the cabinets will be a place to set 'whatever' in lieu of a tool tray while I am working. On to the drawers. I'll post pics once completed.

P.s. end panels show up in this thead: http://familywoodworking.org/forums/showthread.php?t=5136
 
Last edited:
I like adding on to the same thread because anyone looking at it for the first time or anyone looking back on it can find the build from start to finish. Looking good Glenn! You may not need to build a next one for your final one. This might do it. Would work for me.
 
Looking good, Glenn. As to the thread content, I Highly prefer everything pertaining to a particular project to be a continuation of the Original Thread, including all the subsections, etc., instead of having to try to find other threads somewhere to see some part/parts of a build up. It is much easier to remember ONE thread title and find it, than several titles for subsections, especially when you are going BACK to see something that was posted quite a while previously.
 
Last edited:
With my bad memory, I like haveing it all in one thread so there can be a review if there is some time between updates.

Your bench is looking good. Can't wait to see it when its finished.
 
The reason I want to get on with it is I made the boards by machining down 2-by lumber that I bought green and stacked and dried. Despite 6 weeks of drying time the wood still moved quite a bit during jointing, planing, etc.

By the way for those of you thinking this is a good way to save money on material; its not. I ended up with so much waste that I could have gone to the lumber yard, bought real wood and broke about even. A few more pieces to go.

I had such a stud laying around when I built a mobile lumber rack. I used the piece in question as the top most piece connecting the A-frame units together. I jointed one side flat to give a reference in order to joint correctly angled bevels. There was so much twist that by the time I got done it was close to the original 1 1/2" on one side and maybe 3/4" - 1" on the other - and the other end was the same but opposite. I figured it'd be stronger if I left the other "face" untouched.

I appreciate the bench posts - I'm planning a bench construction for next year - I just scored a nice little haul of free maple from a coworker's fallen tree that will be made into a bed and a bench when dry.

What are those black plastic bench dogs called and where did you get them?
 
Glenn, your bench seems to be coming along nicely! I have a similar bench that I put together and the top is 5/4 maple on top of a sheet of MDF. My dog holes go through both and they have done great (5 years now).

To Mark: the plastic bench dogs can be found at Rocklers
 
Drawers in carcase - sans fronts

I used 22" glides and built 21" drawers to allow a sort of over-extension. This lets me to see into the entire drawer 'insides' while standing at the bench. I hate losing stuff in that back few inches of the drawer. I'll build the false fronts after I sand an seal this stuff.
 

Attachments

  • drawer-unit-no-fronts-2.jpg
    drawer-unit-no-fronts-2.jpg
    106.8 KB · Views: 143
Drawer Unit in Place

I think I've beat this thread enough but wanted to at least complete the drawer unit before I felt the tale was done. Forgive the brief post but I really think this thread is done.

Here's the drawer unit. MDF as the BB ply price crisis is still alive and well in my area. Three coats of shellac and a quick paste wax (so the dust blows right off . . . yeah, right).

Q-Drawer-Unit-Done.jpg

Here's where he lives. It is a separate unit setting on a thin piece of rubber pad to keep it in place while the drawers are opened and closed. I didn't want to attach it in case I change my mind about which side it should go on.

R-Drawer-Unit-in-Place.jpg

I had planned for the drawers to open in such a way that I could see into the entire drawer while standing at the bench; mission accomplished.

S-drawer-Unit-in-Place-Open.jpg

Now to fill them with my measuring and marking stuff, chisels and other goodies that I am always reaching for when at the bench.

Thanks for going along for the (long, long) ride :wave:.
 
That is a very good idea for the drawers to extend completely out of the cabinet. I always have stuff pushed to the back that never gets used because I forget that it is there. Good job on the bench.

Allen
 
That really turned out nice, Glen, and I'm sure that with all it's weight and built in rigidity, it will withstand MUCH more racking stress than you will ever have a need to put on it. :thumb: This is one "TOOL" you should really enjoy using.

I'm curious as to how many cross members you decided to put on the top of the base unit to support the table top, (besides the end rails).
 
Glenn, all I can tell is your bench is very sturdy, looking very good, very useful.
I'm impressed. Have fun with using it.!!
 
Glenn,

Great job and I enjoyed the WIP very much. Thanks for taking the time to share this with us. Those drawers came out really nice and were very well though out.
 
Very nicely done Glen! I like full extension glides - they make the drawer totally usable. The finish looks great! Best looking MDF I've seen!
 
Glenn,

Thanks, they look great. I think am going to make mine wider and go with 2 thinner drawers at the top. I have some BB in stock, but may use for MDF finished like yours just because it looks cool.

I really like you idea of being able to see the entire drawer. I have some extra slides but they may not be long enough to do the extra drawer extension.

I still am NOT very good and installing the drawer runners. I got a little better on my router table drawers, but definitely do not have a repeatable process down. But, that's another thread.

Thanks again.. it great to be able so see other people work and get ideas.
 
I'm curious as to how many cross members you decided to put on the top of the base unit to support the table top, (besides the end rails).

The example I worked from used cleats down the length of the front and rear rails. Having had some experience with MDF sagging I chose front to back supports. There are four front to back supports 1 1/2" x 3" on edge making a total of six supports including the leg pieces. The trick here is to miss the dog holes ;-)

Pocket holes and glue to attach at the front and rear. Recessed 1/4" lags to secure the top (not glued). This method of top attachment allowed me to shim the top (like you might do with a router table) and get it as flat as possible.
 

Attachments

  • Top-Supports.jpg
    Top-Supports.jpg
    106.8 KB · Views: 56
Last edited:
Top