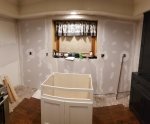
Time for another round of kitchen updates - glass shelves installed!

Thanks guys
I get worn out just reading about it, lol. You're hustling on this project. :thumb:

You need a day job to get some rest. That's an awesome rebuid.

David

I am needing a break, but also just want my kitchen back. I had planned to get everything taped/mudded today, but my wife has other plans. I guess it's her birthday or something like that, so gonna go do what she wants to today. ;)
 
Well, took my wife on the town for her birthday today. Breakfast, lots of shopping, Lunch, more shopping, a concert (our grandson's), and dinner with all the family. Got home and had an hour and a half, so got things taped and mudded.
2018-12-11 23.28.35.jpg 2018-12-11 23.28.46.jpg 2018-12-11 23.28.48.jpg 2018-12-11 23.29.03.jpg

Tomorrow night I'm hoping to get some of the upper cabinets installed on the side with the stove, mostly so we can re-install the microwave/vent to be able to use the stove again. Only places that really need more coats of mud will be around the window and the end near our dining area, maybe some touch-ups where the tile is going, but mostly cutting out bubbles and re-filling, the rest gets covered with cabinets and tile.
 
You would do really well flipping houses. :thumb::thumb:

LOL, Let's make that plan B, if punching keyboards doesn't work out. ;)

We did look at doing it years ago, even got our real estate licenses, but timing wasn't right with kids and other expenses we had. Not sure I've got the energy to do that now, but did get good returns on our first few houses, which has helped in the long run.
 
Last night was mostly watching the Chiefs lose by one stinking point, but that's how it goes sometimes. I did get another coat of mud on and started on some cabinet assembly.
I'll be looking forward to seeing more about your experiences with the assemble-yourself cabinets. If ours ever get replaced, I suspect that's the way we'll go.

I'll try to get more pics as I'm assembling these, this is one of the upper cabinets and quality is decent on this brand (Cabinets to Go). The connectors are probably a bit on low end side, accurately placed and seem to work OK.

The backs have a 1/4" panel attached with a plywood frame, slides into some dados and secure to the top and bottom pieces with some inch screws.
2018-12-13 23.41.25.jpg 2018-12-13 23.41.29.jpg

The cabinet sides are plywood, as are all the box parts, and have rabbets for receiving the top and bottom pieces. The face frame comes assembled with the door attached. It also has rabbets all the way around to receive the cabinet box. There are some metal L brackets that reinforce the attachment of the face to the box too.
2018-12-13 23.47.56.jpg 2018-12-13 23.48.09.jpg

The instructions are pretty basic, no written instructions really, mostly drawings. I've gone ahead and used glue on all the rabbets/joints, there is some looseness in the back assembly, so I've clamped this one to tighten things up, but will probably use some 18 gauge brads on the rest to speed things up as well.
2018-12-13 23.49.25.jpg

The shelves themselves look to be plywood, but may be with the particle board fill every other layer, a cheap way to make the ply thicker. I'll have to look on the other edges to see if there is grain in those layers. The cabinet sides don't appear to be this same material, can see the grane running different directions on them in pic 2.
2018-12-13 23.48.05.jpg

I haven't assembled any drawers yet for the lowers, but the boxes are all solid wood, using dovetails. Again, no glue is mentioned in the instructions, but I'll be using it. Drawer fronts look to screw on. Bottoms are about 5/16" thick or maybe a little thicker and fit into a dado. Soft close drawer slides included.
2018-12-13 23.49.40.jpg

Also they have soft close hinges on all the doors.
https://www.youtube.com/watch?v=RNku5D_Eu3w
 
Last edited:
Cool. :thumb: I believe Cabinets To Go was one of the brands I was looking into when I was thinking of re-doing our cabinets.
 
Cool. :thumb: I believe Cabinets To Go was one of the brands I was looking into when I was thinking of re-doing our cabinets.
If you've got a local store, take accurate measurements of your kitchen in and they can do a plan for you for free. I found they have several items that don't show up on the website, such as fillers, scribe moulds, etc. that they sell. We also found that some of the same colors they have for painted cabinets are called by different names, but are indeed the same color, so there may be items that are listed under one style of cabinet that works with other styles. Ours was even able to provide a sherwin williams paint code for matching the color of cabinets to be able to paint trim and such that they don't sell.
 
Well, as with many projects, things go slow at first, then they get easier as you start getting the hang of it. Spent a good part of last night getting two cabinets up on the wall.
2018-12-14 23.17.08.jpg 2018-12-14 23.17.28.jpg 2018-12-14 23.17.43.jpg

This morning I started with some quick assembly of a couple of other upper cabinets and then let them dry.
2018-12-15 10.30.39.jpg

While those cooked I took the original face frame for the sink, and the cabinet that was bought for the 18" frame and doors up to the shop to make a 12" tall cabinet. As mentioned before, the cabinet place doesn't make a 30" cabinet for a farm style sink, so they sold me a 30" sink cabinet, and an 18" upper to use the doors from to make one. It still needed another 2" filler on the face frame to work with my sink I bought.
2018-12-14 23.20.20.jpg 2018-12-14 23.25.50.jpg

I chopped up the original frame, then used a shim piece on the table saw to chop off the parts I didn't need for the filler.
2018-12-15 10.35.45.jpg 2018-12-15 10.38.55.jpg 2018-12-15 10.42.43.jpg

continued...
 
That filler got connected with some pocket screws. along the joint as well as at the ends.
2018-12-15 18.37.33.jpg 2018-12-15 18.37.38.jpg

I still need to make an internal frame to support the sink. Also need to go pickup a new garbage disposal as the old one is getting pretty clanky, might as well do the deed while I have room to do it.

The rest of the 18" cabinet was cut down to 12" to go above my microwave/vent hood. The back got a new filler.
2018-12-15 11.03.33.jpg

I pried out the plastic connectors, then used the cut-offs clamped on top of the shorter pieces with new dados to use as a template for the plastic connector locations. I drilled through them for the locations, then sized them to 3/8", and reinstalled the connectors.
2018-12-15 11.52.28.jpg2018-12-15 11.54.16.jpg2018-12-15 11.57.02.jpg

I did the same for the face frame parts and here is the assembled cabinet.
2018-12-15 13.15.31.jpg

Once I had it assembled I could hang it and the other cabinets I glued up this morning. I still have two more upper cabinets to assemble and hang, but have some drywall patches still in progress on that area.
2018-12-15 17.55.17.jpg 2018-12-15 18.00.27.jpg

Tomorrow I will be starting the lower cabinet installs.
 
Feel like I mostly worked on getting a functional kitchen sink all day today, but did get the floors filled where the laminate floors stopped. As un-even as our kitchen floors are, I know I'll have to do some shimming to level things out, so filling in the voids will make that easier.

As mentioned, the sink was priority today. I picked up a new garbage disposal. Had to shut off the water and re-do the water lines. I did away with the water arresters at the sink end as I've got a whole house one installed in the utility room that seems to do the job. The faucet is actually one I bought for our laundry room that I hadn't installed yet, I cut off a scrap board from a salvaged fire place mantel I had at our old apartment, which was already finished, to mount the faucet to. The sink manufacturer required a 2x4 frame below the sink to support up to 200 lbs. I'm getting some matching paint for the cabinets, so will touch those up when I get around to painting.
2018-12-16 22.10.48.jpg 2018-12-16 22.10.58.jpg

More importantly, I got a couple of small cabinets assembled to support the caffeine booster, as Brent's tag line says, "Programmer = Organism that converts caffeine to code." ;)
2018-12-16 22.40.43.jpg
 
What is the water arrestor? Haven't heard of this gadget. You da man. This remodel is looking great! Mama will be happy and really proud of you.
David
 
Top