Wall Mounted Quilt Rack

glenn bradley

Member
Messages
11,550
Location
SoCal
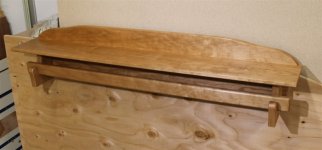
A friend's sister does quilting. We talked about a rack back when I didn't have the shop finished and I completely forgot. Time to catch up.
Got the required specs from her and got approval on design number 4.
Quilt Wall Rack 1 (0).jpg
As always wood selection comes first. Like many materials, cherry comes in a variety of colors and figures. I found a couple of similar looking boards that will yield the parts.
Quilt Wall Rack 1 (1).jpg
Rough blanks.
Quilt Wall Rack 1 (2).jpg
I milled to thickness and general size. The shape of the end brackets will let me cut around some pitch pockets in these blanks.
Quilt Wall Rack 1 (3).jpg
I rough the shape out at the bandsaw. Clean it up a bit with some rasps and cut the bottom of the rail notch like you would dovetail waste.
Quilt Wall Rack 1 (4).jpg
This gets me here.
Quilt Wall Rack 1 (5).jpg
I have done a lot of Greene and Greene stuff. During that journey I picked up one of these double round overs. I find the 1/8" and 3/16" radius cutters handle most of what I need.
Quilt Wall Rack 1 (6).jpg
The bit comes with a variety of washer/spacers that allow setting for your material thickness.
Quilt Wall Rack 1 (7).jpg
I use a bit of scrap to set the height and keep the leftover washers in a bag that fits in the tackle box cubby assigned to this bit.
Quilt Wall Rack 1 (8).jpg
The purpose of the bit is to allow you to round both sides at once while always routing down hill. If you've seen much G&G style stuff you get why this is helpful. At any rate, I end up here. If you've ever wondered what you would do with a parrot vise, this is one thing. A little hand work and I end up here.
Quilt Wall Rack 1 (10).jpg
More to come.
 
I've made several quilt holders
Always use cherry but no where as fancy as yours
I keep the template for the walls so I can put one together if I want to make a quick project
Your design is much nicer but above my skill level

I believe I took a picture of Amish made hangers and just copied
 

Attachments

  • D9C38AAB-C03C-480D-A90B-B45437362433.jpeg
    D9C38AAB-C03C-480D-A90B-B45437362433.jpeg
    123.1 KB · Views: 13
  • BF6890F2-3C67-4C6B-A976-34DD0107897A.jpeg
    BF6890F2-3C67-4C6B-A976-34DD0107897A.jpeg
    149.8 KB · Views: 13
Nice ones Allen. Yours are essentially the same and seeing your work I do not believe mine are above your skill level at all. I just had a few "gotta haves" from the client. I did make a hardboard template for the side/bar supports so I too can make others more quickly in the future. It is getting this thing shipped to Arizona that will be the stumbling block if anything.

Here's a dry fit shot, still in the rough.

Quilt Wall Rack 1 (11).jpg
 
Great looking project, Glenn!

When I saw your post, it reminded me of the first project I ever made with something besides inexpensive pine: a wall mounted quilt hanger. As soon as I started milling cherry rather than pine, I never went back!
 

Attachments

  • Shaker-01b.jpg
    Shaker-01b.jpg
    133.9 KB · Views: 8
  • Shaker-01c.jpg
    Shaker-01c.jpg
    89.9 KB · Views: 8
When doing long fair curves I find it best to bandsaw and rasp one, then use that to make a template, and do the other end using this template.
Quilt Wall Rack 1 (12).jpg
I happen to have a domino. Otherwise I wold probably have done this as a stopped groove with a spline.
Quilt Wall Rack 1 (13).jpg
Quilt Wall Rack 1 (14).jpg
Quilt Wall Rack 1 (15).jpg
Quilt Wall Rack 1 (16).jpg
I had to make a couple hundred mile drive this morning so I am done early for the day. I'll pick it up tomorrow.
 
this post reminds me of when LOML and I were still fairly newly weds. and LOML came out to my shop and asked me if I could make her a quilt rack and I said sure, what's a quilt rack. So after researching it I found several examples. Most of them had room for 3 quilts. I showed em to her and she said yes BUT she wanted one with 5 bars and a Drawer so I took the dimensions off of one and drew up my idea and she loved it. That was close to 40 years ago. It sits in my bedroom with about 8 quilts pilled on it.
 
I can see that once your new shop was ready, you went full throttle with ww. to catch up with all the pending projects. Good job on this one as it couldn’t have been different !
 
Nicely done. Quilt making and display is a far more popular avocation than many realize. These are good seller. There used to be a guy who made and sold many in the area. I never got into it because I felt our market was not big enough for two of us.
 
I will use a domino at the junction of the bracket and the top. This is more to prevent twisting than anything else.
Quilt Wall Rack 1 (17).jpg
Quilt Wall Rack 1 (18).jpg
I mark the layout on tape to make clean up easier. I clamp a scrap to act as a stop for the middle-o-the-panel mortise.
Quilt Wall Rack 1 (19).jpg
Quilt Wall Rack 1 (20).jpg
And she fits together like so; although still upside down :).
Quilt Wall Rack 1 (21).jpg
And now a PSA break . . . remember to unplug your tools before changing or handling cutters please.
Quilt Wall Rack 1 (22).jpg
I will use mechanical hangers and fasteners. The hanger mounting screws will go through the back and well into the brackets that support the weight of the payload.
Quilt Wall Rack 1 (23).jpg
cont'd . . .
 
You can see here why I left the rod as a rough blank.
Quilt Wall Rack 1 (31).jpg

This lets me mark right off the piece.
Quilt Wall Rack 1 (32).jpg

I settled on a 3/8" deep notch in the rail
Quilt Wall Rack 1 (33).jpg

I then knock the sharp edges off at the router table.
Quilt Wall Rack 1 (34).jpg

Quilt Wall Rack 1 (35).jpg

A little hand work and I am ready to start applying finish.
Quilt Wall Rack 1 (36).jpg

One coat.
Quilt Wall Rack 1 (37).jpg

Two coats.
Quilt Wall Rack 1 (38).jpg

Probably one more and then a paste wax.
 
Last edited:
My original design included piercings on the top trim. I moved away from this but now feel the look is too plain. I will add some ebony accents.
 
My original design included piercings on the top trim. I moved away from this but now feel the look is too plain. I will add some ebony accents.
I think I would have routed a 1/2 grove on the shelf about 1/4 was from the back for a plate grove, I have seen that done before. I know it late for that but if you ever do it again, JMHO.
 
I think I would have routed a 1/2 grove on the shelf about 1/4 was from the back for a plate grove, I have seen that done before. I know it late for that but if you ever do it again, JMHO.
I asked about a plate groove. No interest from this client. Definitely something to include in a generic "for sale" item though. (y)
 
Top