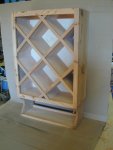
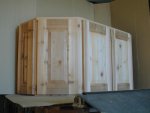
A small arch top wine cabinet

Thanks for the input Allen!:wave:

Nancy's vote sealed the deal for #2 with Ted and Glenn reinforcing that direction. :thumb:
We can only send sorry 'S :rolleyes: out to Vaughn and Rennie but thanks for the opinions.:wave:

The story.......
John S. has had me build things for his other house in Corpus Christi, Texas which is near the beach.
towel rack (1).jpg
This towel rack was above the toiletta, and below, a vanity for the sink.
He will have his carpenters there build the toe kick and set the vanity on it.
vanity (2).jpg

He gets the projects from me and then he puts wax on them. His choice of wood is western red cedar for the doors, drawer fronts, stiles, rails and trim.


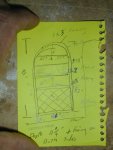
He always hand draws a sketch with dimensions. He does well enough with his sketching but knows I can't reproduce his drawing,:doh: like the one in post #1

Arch and parallelagram 009.jpg

He accepts what I build from the drawing. His measurements are accurate, I just need clarify the final resting place for the piece and consider the concessions that need made. He is good at the measuring but inexperienced in considering the inconsistencies that are not visually evident when measuring. Even though the concrete block is 10" thick and the sheetrock is 5/8" thick on each side of the block we cannot assume the measurement from (outside to outside) the sheetrock face to sheetrock face measures 11 1/4". In theory it does, but most workers did not read that book!:eek::rofl:

Due to the hurricanes that occur in the gulf certain building standards have been added. The situation that presents itself for our concern is the concrete wall that has an opening for a pass-through and a smaller opening to be used as a wine cabinet, open to both sides.

Scan0004 (365 x 600).jpg

More later,
Shaz:)
 
Last edited:
Since this kind of project has a one shot at correctness, I recommended that John make a template of the actual hole on stiff wrapping paper or cardboard and bring it to me.

Corpus is about 3 1/2 hours away from me.

He did and from that I could proceed. Remember..."Divide and conquer".

#1 We talked about the height of the deck top above the wine rack section. That needed to be at the height that worked for he and his wife, like a counter top height. They intend to have a piece of granite or marble dropped-in between the outside walls of my cabinet and the rails I will run at the top of the wine rack.

#2 I figured that for the casing above the arch to flow well that top shelf would feel good at the actual diameter (Center of the circle) of the arch, especially since the diameter was about 42", the height from the top of the arch down to the top shelf would be about 21", a nice size.

Understand how we arrived at a project we can handle...We have eliminated the problem of "What to do with the top by addressing it as one specific space to deal with", #1 (Pearls here!:D)
We have determined the necessary height for their "counter top" (#2) thus we have divided the project into a bite size piece ( the top arch, and the bottom wine rack...) what remains between the top shelf and the counter top is #3.

Now all that was left was to determine the needs they had for the space between the deck top and the underside of the top shelf.

John said a wine glass rack would be nice. "No problem".
More later,
Shaz:)
 
:wave:That is some flim flam computer stuff. Thanks to someone for the Topic review, newest first, in my "Reply to Thread. A great help as I attempt to reply with continuity.:thumb: Has that feature always been there?
If you don't know what I am talking about no problem.:)

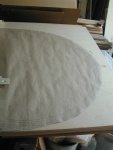
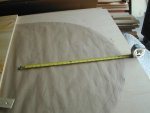
John S. brought me a full size template he traced on heavy brown wrapping paper, cut on the lines. I determined to figure my outside dimensions from that starting with the arch.
arch top wine shelter001.jpg
arch top wine shelter002.jpg
Since the wall into which the cabinet was to be set was about 11 1/4" thick I figured I needed some slide in tolerance.

The casing was to be about 3" wide, so I figured I could have a space of 1" on each side of the cabinet (between the cabinet and the concrete wall), cover the cabinet plywood edge grain and still over lap the wall about 1 " with the casing. I will try to decrease the tolerance for slide in from 1" either side to about 3/4" total if possible.

I decided to determine my perfect width for the finished cabinet by finding out the workable radius for the arch to fit the template he brought.

#1 I measured the horizontal width at the bottom of the template and the same thing at a point about 6' up, in each case marking the center of that measurement.
#2 I struck a line all the way from the very bottom of the template to the top of the arch off those center marks.
# 3 A horizonal measurment of the template width was taken. The answer was 42"plus or minus 1/8", or 21" left and 21" right of center.

Since the curved top seemed to be that of a circle rather than an elipse

#4 I proceeded to measure down 21" from the top dead center of the arc, on the center line to determine my radius and the center point of my circle, one and the same.
arch top wine shelter002.jpg
 
Having a transition from arc to the straight vertical walls of the cabinet on the inside of this unit is of utmost concern for me. Having called around to some of my suppliers, I found out they only had 3/8" bending plywood in stock.

It comes 4'x8' or 8'x4' depending upon whether you want a 4' high circle or an 8' tall column. I needed the more than 48" piece to curve as the circumference of my arch was more than 48".

Considering the thickness of the bending board I set about to scribe arcs that would indicate 3/8" increments of bent plywood, thinking that I could assess the the final curve I wanted to achieve by working it out on paper first.
attachment.php
 
Man, you're at it early this morning, Shaz. :)

Glad to see you found the Topic Review feature. I never knew until now that it could be hidden. :eek:

Quick question...where do you buy your plain brown wrapping (layout) paper?
 
hey shaz, great idea on the paper template.

i see you are taking your time to do lots of preliminary measuring and figurin, that is good, somethin i need to do more often....:doh:


i'll be watchin
chris
 
Man, you're at it early this morning, Shaz. :) If I am up early and you are responding:huh: WHAT THE HECK ARE YOU DOING UP IN THE PACIFIC TIME ZONE?:rolleyes::rofl::rofl::rofl:
Glad to see you found the Topic Review feature. I never knew until now that it could be hidden. :eek: Went though the whole theater thread not realizing it as an option:dunno:, maybe I just never scrolled down far enough.:doh::doh:Nin come poop!!!:doh::D

Quick question...where do you buy your plain brown wrapping (layout) paper?
Hi Vaughn :wave:, I don't know where John S. got that stuff, but it is heavy duty. I will try to find out. Shaz :)

hey shaz, great idea on the paper template.
Hi Chris :wave:, Thanks,
It is a great alternative to numbers, especially when we have distorted shapes.

i see you are taking your time to do lots of preliminary measuring and figurin, that is good, somethin i need to do more often....:doh:

From the looks of your kitchens you are well on your way.:thumb:

I have learned from some craftsman far better than me, the importance of preliminary work ups with measurments and story poles. I have a friend I learned much from, Gary Baird is his name. He spent about 3 serious days work on story poles for a kitchen, didn't cut a board. His work is always top of the line, plus he is as kind and stong as a gentle Ox.

It has become a very important part of the job for me.


i'll be watchin
chris

Since the arch in the concrete is not perfect I needed to determine the largest size arch and still have "slide in" space around my cabinet. I decided to make the arch close and planned on using a 2x12 to elevate the the whole cabinet, applying a wide apron under my cabinet sill to cover that added 1 1/2" and more.
Thus, with the vertical center line at about 91", (measuring the opening's floor to top dead center of the arch,) my plan was to make the cabinet 89 1/2" tall, and elevate as needed.:D

I figured 3 thicknesses of 3/8" bending ply glued together would hold it's shape with no skeletal support, but I did not know. My intent would then be to add a 1/8" piece of birch to bring the arch into visual continuity with the rest of the birch plywood box. See wrapping paper drawing.
Shaz
 
Last edited:
Hi Allen :wave:,
I am always in awe when I see something I have been unaware of, but to others, these things may seem common place.

The bending plywood is just that, plywood made to bend,:doh:a marvelous product for work or play:rofl:. You will see that it is the product in this case that is most incredible rather than the actual method of bending it. Thanks for you input, makes me think I have someone interested in stuff that interests me.:thumb:

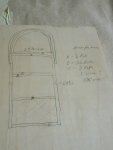
This is a little sketch I did to determine a material take off.

Arch and parallelagram 007.jpg
Once the width was determined, (I am figuring 11 3/8" should work:dunno:),
I wanted to rip everything at the same time.
You can see in the rough sketch we have pieces lettered A, B and C.
It was done to determine the number of 11 3/8" X 8' rips I needed to make the box with shelves and the arch.

A= 1/2 rip (less than 48" but more than 32" [crosscutting at 32" or less would give me 3 pieces from an 8' rip and thus would be considered 1/3 of a rip, an important considerations when designing and ordering.])
This will provide one piece that is exactly the width of shelves "B" plus the thicknesses of the sides, (2 pieces of plywood lettered "C").
B= 2 1/2 rips (2-8' pieces and 1/2 more) These will provide 5 pieces for shelves.
C= 2 rips These will provide the 2 sides.
This little sketch also show the "The Secret" of the arch. The "How to make this whole box line up" as one unit.
What information do you get from the drawing above the wine rack?
Do you see another way to create a box with an arch top to fit into the given hole?:dunno:
Shaz :)
 
I didnt know they made plywood specifically for bending.
years ago I assisted someone hanging wall pannelling, some type of exotic zebra striped stuff. His dining room and living room shared a common wall that was a curved wall.
We cut something like 1/16 slits every half or 3/4 inch to make it bend easier.

Im not really up to date on such great products as bendable plywood, but if its made in different species, it will open a few more doors for me I never knew I had. thanx.

no other way to form an arch 12 inches wide, unless you wanted to use a 8/4 thick stock of cedar and bandsaw the shape in wide boards and glue them all up. Thats alot of cutting, sanding, would need
6 pieces of half arcs for each side.(I tried to make fancy legs for an outdoor table last year, picture 14 inch wide, 1.5 inch thick curved candy cane type legs on each side. After a frustrating experience with someone elses bandsaw, I threw the project out of my vision as to not aggrevate myself anymore)
 
Last edited:
I didnt know they made plywood specifically for bending. I am glad to be able to share something of value:).
years ago I assisted someone hanging wall pannelling, some type of exotic zebra striped stuff. His dining room and living room shared a common wall that was a curved wall. Bet that was interesting!
We cut something like 1/16 slits every half or 3/4 inch to make it bend easier. Some call that kerfing the backside. There is a simple rule of thumb for the distance between the kerf to get the desired radius. Guess what? I forgot it!:doh::rofl: But, it is out there.:D

Im not really up to date on such great products as bendable plywood, but if its made in different species, it will open a few more doors for me I never knew I had. thanx.
The plywood is made in different species, however not as you may be thinking. It is made to be bent, then, if you want exotics or a specific wood, veneers are sold and used to surface the bent form..
an (8).jpg
This is a photo of an curved ceiling I did about 6 years ago. It is cherry veneer applied over a bending plywood surface, which was first affixed to a form created inside the cabinet itself.


no other way to form an arch 12 inches wide, unless you wanted to use a 8/4 thick stock of cedar and bandsaw the shape in wide boards and glue them all up. Thats alot of cutting, sanding, would need
6 pieces of half arcs for each side.(I tried to make fancy legs for an outdoor table last year, picture 14 inch wide, 1.5 inch thick curved candy cane type legs on each side. After a frustrating experience with someone elses bandsaw, I threw the project out of my vision as to not aggrevate myself anymore)
Hi Allen :wave:,
NIce to see you thinking and retaining wisdom from the past:thumb:.
We can learn alot from things that don't work.:D Had my share!:doh:


The project...
Don't get too locked into exact measurements in the early stages of the planning. By exact I mean 1/16" shy or stong a 1/32".

My point of reference for the arch (center point) will be on the top surface of the top shelf, in the center, horizontally between the two sides. This means that in the picture


the center point of board "A" ,( on the top surface,) will be the center of the circle, and since board "A" is 3/4" thick, the edges of that board (board"A") will be the first 3/4" in the transition from the upper half circle to the lower straight vertical wall. Anybody beside me understand that? :rofl: If not I need try rephrase myself.:D
Shaz
 
i think i am following you shaz. although it's always harder to follow something till you can see it for real. i find many times i over explain myself to clients and they are left standing there wondering what i am talking about.

C
 
its clear. The bent plywood will sit on top of shelf A and then begin its curve to the top center. Shelf A will sit on top of the walls as opposed to being attached on the inside of the walls as the middle and bottom shelves appear.

No plywood will overlap the outer edge of shelf A. Shelf A (outer edges)will be flush(or almost flush) with the wall?Am I close?
 
Last edited:
i think i am following you shaz. although it's always harder to follow something till you can see it for real. Totally agree! i find many times i over explain myself to clients and they are left standing there wondering what i am talking about. Hi Chris :wave:, I know exactly what you are saying! Even after what sounds like the perfect explanation we are sometimes left with that blank stare!:eek:
Actually, it has been me with the blank stare in many cases:rolleyes::rofl: ,
often feeling like a deer in the headlights.:D
Thanks for your input Chris!
Once it hits you, it will all snap together immediately, and from there you will be off making improvements to the plan in no time.:thumb: S :)

C

its clear. The (2 layers of) bent plywood will sit on top of shelf A and then begin its curve to the top center. Shelf A will sit on top of the walls as opposed to being attached on the inside of the walls as the middle and bottom shelves appear. Hi Allen :wave:, That is correct. The way you describe it is much more concise. Thanks!

No plywood will overlap the outer edge of shelf A. (Look once more at the funky sketch on the block of wood, and rephrase this sentence)

Shelf A (outer edges)will be flush(or almost flush) with the wall (C) ?Am I close?
Yes, very warm, and getting hot, (remember playing that game as a young one?:D) thank you for explaining it as you see it. You are understanding it and helping others with your way of conveying your view.
S :)

The story continues..........
Using the top surface of the top shelf (A) as the diameter of the circle (arch),
I played with the hand made compass to determine the best radius (within about a 1/2" at the closest point) to the edge of the brown paper template, in the curve. Once this was determined I could run vertical lines to the floor using the inside radius of the 3/8" outtermost piece. Those lines will be the outside of the walls (C) of the cabinet.
Lots of words:doh:, once you see it, it will be easy to understand.:type:


The outter most layer of bending plywood could be left long (the full 8' length) and used to attach to the walls (C) below the arch.


Sounds to me like it should work.:huh:
As can be seen in the drawing, only one more shelf will be added to the space between the wine rack and the shelf at the arch top diameter. This additional shelf shows 2 layers of 3/4" material. The bottom of those 2 layers is actually going to be the glass rack, it is just not noted like that in this picture.
 
I was actually kinda wondering how youd keep that plywood in such a neat fine bend. Running it lengthwise down the entire side would only trim 3/4 of an inch off the width of the rack itself, not a big deal, and then Id guess you can really firmly attach the outer sheet of ply to the walls with screws and glue? (the inner two semi circles of ply would only run to top of shelf A, but would be held in place firmly by the outer sheet which will run the entire height)

It doesnt seem too diffiicult when someone like you knows what they are doing.

Hey, this could be the funniest post in FWW history, maybe I could suggest the wine glass shelf section. (I already hear laughing), cut 1.5 inch pieces the width of the shelf, not lengthwise, then rabet out each piece, like an L shape, then attach them opposite each other under the middle shelf, allowing enough room between each two pieces to fit the stem of the wine glass easily. Put in as many rows as you can fit, voila, wine glass holder.
 
Last edited:
I was actually kinda wondering how youd keep that plywood in such a neat fine bend. Running it lengthwise down the entire side would only trim 3/4 of an inch off the width of the rack itself, (Correct) not a big deal, and then Id guess you can really firmly attach the outer sheet of ply to the walls with screws and glue? ( Hi Allen :wave:, You are correct once more, the fasteners however may be dictated by the thickness of the layers and sometimes staples will suffice in lieu of screws) (the inner two semi circles of ply would only run to top of shelf A, but would be held in place firmly by the outer sheet (very good to this point, thanks!) which will run the entire height) The full length of the 8' bending plywood only extends down about 18" on each side of the "C" vertical wall, past the diameter of the arch.

It doesnt seem too diffiicult when someone like you knows what they are doing. Hopefully, this thread will encourage some to feel comfortable enough to try a similar project, knowing the basics, and knowing they have backup when they are in doubt.:D

Hey, this could be the funniest post in FWW history, maybe I could suggest the wine glass shelf section. (I already hear laughing), cut 1.5 inch pieces the width (depth) of the shelf, not lengthwise, then rabet out each piece, like an L shape, (Keep that energy pumpin'!:thumb:) then attach them opposite each other under the middle shelf, allowing enough room between each two pieces to fit the stem of the wine glass easily. Put in as many rows as you can fit, voila, wine glass holder. Great thought and basically correct.:thumb: Do a story pole and see if it works.

The story continues.................
With the take off made I can rip my pieces on the tablesaw to 11 3/8", just 1/8" wider than the measurement of the concrete wall calls for.
I need 3 rips of the bending board plywood and 6-8' rips of the 3/4" domestic birch plywood, which hopefully will thicken back up to 3/4".
Since I am using an accurate fence on my table saw, I feel safe cutting this amount at the rip setting on my table saw. If my saw were not so precise (in my mind) I would rip 2 extra pieces at this width at this time.
Shaz :)
 
Top