Acorn wedge tenon help

Messages
9
Location
Southern Indiana
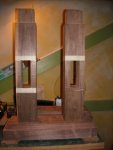
Hi! My materials are dictating design!
I hope someone may be able to lend some insight on this. I am having difficulty finding information on elements of an "acorn" style wedge tenon. Landis has a short blurb but not too much.
I am not going to be able use a "tusk" thru the shoulder of a large tenon because of checking so I am switching to a "horizontal" type.
In Landis's book he states two 1" holes should be drilled at opposite angles.
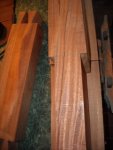
The legs are 4" across. I really do not want the wedge to extend past the leg itself. So I am thinking of turning a cylinder of mahogany, and then cutting it lengthwise at an angle making two wedges. I then will dress them up to look like, well an.....acorn :D
I need to determine what angle and size to create the holes me thinks :huh:
Anyone here ever done such a thing or have any insight? It would be much appreciated...
Thanks,
MSH
 

Attachments

  • DSCN0034-1.jpg
    DSCN0034-1.jpg
    72.9 KB · Views: 71
  • DSCN0006-1.jpg
    DSCN0006-1.jpg
    81.2 KB · Views: 61
  • DSCN0010-2.jpg
    DSCN0010-2.jpg
    67.7 KB · Views: 48
Hi Michael :wave:,
Just ran across your thread. You are into one fine project. Did you solve this one yet?
You are doing some serious brain work on this one:thumb:.
If I were you I would start with a 1" dowel, drill a hole in a 4"x4" post at about 10 degrees. then fill it with a dowel, then drill another hole from the opposite direction at a 10 degree angle and see if that is anything you can use or gleen off before you turn your mahogany dowel.
I'm still a bit unsure of the exact use, how it should work when done and
all things about basic mortise and tenons. :eek::eek: I understand the cutting the dowel lengthwise at an angle.
I do know that "big oaks from little acorns grow".:D Those are someone elses words, not sure whose.:rolleyes:
Keep us posted of your progress, this has caught my interest. Thanks!!
Shaz :)

Does this help.:dunno:
for Mike Hammer (590 x 488).jpg
 
I am going to be using some West System epoxy and hypo + some small guage needles to try and ingect the epoxy deep into the check. In doing so I am going to try and stay with the origional design.
The way I see the thru/wedged working is leverage against a surface. If I go horizontal (like the acorn style) the wedge itself would only have the edges of the leg to register against, about 4" being the width of the wood.

So if the epoxy can strengthen the end of the rail sufficiently, I would have the upper and lower portions of the leg to register the "wedge/tusk". This would make the wedge much longer and I think as far as "racking forces" are applied this would be better. Plus if worse comes to worse I will make\find new rail material.
I like the acorn idea, but it really would not be the best for this application after some thought. Plus the check is on the underside and will never be seen.
I ordered the syringe & epoxy from Lee Valley and as soon as it arrives I will give a try.

As far as the build itself. Well, I could not find an easier first project so I went with this :rofl:
Man, I think my hat size may have increased from the brain-pan workout with this bench. I started on the tail vise this weekend while waiting on the LV order. There is so much going on at one time.
I do thank you for your reply also and will post an update here as I move along!
 
Hi Michael :wave:,
Your choice sounds like a very viable option and one you seem to feel good about! That is very important. :thumb: We are all learning and thus when a plan feels good, that makes it worth the trying. Anxious to see how you progress with this build. Don't be a stanger!:D
Shaz :)
 
Top