Preparing for Ipe furniture build

Ya know, every once in a while that high schooler might hit one over the fence...even against the Yankees. ;)

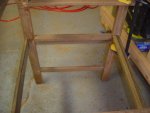
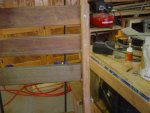
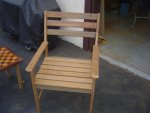
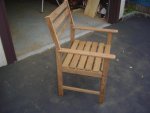
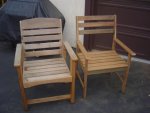
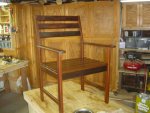
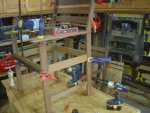
The chair is looking real good, Allen. More ambitious than any flatwork I've done.

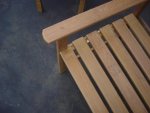
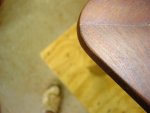
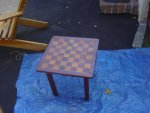
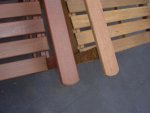
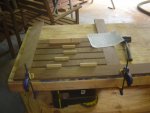
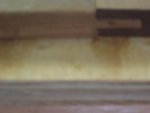
One possible fix for the chess board corners would be to cut a saw kerf following your 45º miter cuts (essentially enlarging the gap that's there now), then fill the gap with a slice of contrasting wood. You could turn the error into a feature.

ya know, that is a great option, never even thought about it.
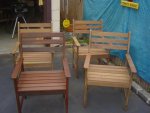
Its tough to just cut a slice out of this stuff, but I could cut an oversized piece to fill in whatever I cut out, and keep trimming or sanding till it jammed in snug.....thankyou for the idea. I used the recommended finish for Ipe, messimers UV made especially for Ipe decks. I coated the top before, wanted to see how it looks all coated up. If the gaps are still too noticable, I will cut out a small triangle end and put one in on each side of it to make it look like it was an intentional design. Wish I would have had this idea before I coated it........thanx again.
 
Allen, making a thin slice might be easier than you think. Hopefully this will make sense...

Assuming your tablesaw has a full kerf blade, then the width of a cut that it makes is 1/8" wide. So...you'd need a strip of wood 1/8" thick to fill the gap.

You could set the tablesaw fence 1/8" away from the blade, but that's a difficult and dangerous cut, especially if you don't have a zero clearance insert.

A safer way is to have the 1/8" thick strip come off the waste side of the saw blade. First, take a board that's 3 or 4 inches wide and rip it, just barely trimming off the edge by the blade. (This squares up the board.) Next, move your fence 1/4" towards the blade. When you rip the board again, the "waste" part of the cut (to the left of the blade) will be exactly 1/8" thick. As I said, this is assuming you have a full kerf blade.

If you're using a thin kerf blade, then you need a strip that's 3/32" thick. Same process, just a different fence setting. After the initial "squaring" cut, move the fence 3/16" towards the blade, and the result will be a "waste" strip that's 3/32" thick.

I hope this makes sense, and is of some help.
 
easy enough, but Im not sure I want to make any cuts in the angles of the table edges.
Its off so slightly, I could really mess it up, and cutting this stuff is not easy, Id have to use a hand saw on the table top. (Im cutting curves with a metal use only jigsaw blade)
I tried something different tonight. I put some wood filler in one tiny spot, and I died it dark walnut to almost match the color of the ipe.
Ill see how it looks tomorrow.
Ipe naturally will split over time outdoors, not effect its integrety, but will crack(check?) a bit, so something so small wont really be noticed.
I zoom in with a camera and show it off.
I really do appreaciate your idea, something to keep stored in the back of my pea brain.
 
I completely understand, Allen. It does have a pretty high risk factor for messing something up. Sounds like you've got a good handle on it anyway with the filler. As you said, this will be outdoors, and will get weathered over time.
 
assembly is complete of the first chair, and all the design flaws are evident, but I will not change anything on this chair till I complete other 3(where I will change things) and table.
I secured all MT joints with #305 0.75 inch SS screws and 1.25 SS screws in wider pieces.
The 2 design flaws Im not happy with, the arms need to be cut longer and touching back leg(no space) and the front seat slat either needs to be cut wider in rear of slat to match others, or all slats will be inset level with seat supports, and Id raise all four supports 3/4 of an inch to keep seat at same height.
I kinda preferred the look of the slats on top of supports, but Im open to suggestions before I start cutting other 3 tomorrow.(I will cut front seat slat longer in back to match other widths)
BTW, I glued the left side of the chair together this morning with TB3, after carefully cleaning all joint areas, and drying good, when I came home 5 hours later, the joint was so solid I went with TB3 on all joints.(and one screw through each joint)
Vaughn, all pics are mixed, but I used plain minwax woodfiller, Zar Walnut stain after it dried, and it sealed the seam pretty well. I took a pic best I could of the seam now, Im content with it now.


The chair next to the Ipe one is redwood, a design I basically copied.
I had my wife and neighbor sit on the chair, and they said it was comfy enough, and Im sure with a thick quality cusion on the seat, it will be fine.
Simple is sometimes best. I avoided all curve cutting with the Ipe, it isnt much fun, and my bones couldnt take the torture.
Im doing this for exactly 2 years now. I started building "stuff" last week in August 2006.No help, noone to show me anything. Im not embarrassed of any mistakes or posting the pics of my errors. Id be a fool not to accept any advice from people here that have 25 times the amount of experience, and it would be foolish not to use the wealth of info I can find on this site.
(the redwood chair on the left is at least less than half the weight of the Ipe chair, but my wife can lift the ipe chair so its not unbearable)
 

Attachments

  • wood stuff 073 (Medium).jpg
    wood stuff 073 (Medium).jpg
    50.6 KB · Views: 14
  • wood stuff 074 (Medium).jpg
    wood stuff 074 (Medium).jpg
    54.3 KB · Views: 16
  • wood stuff 076 (Medium).jpg
    wood stuff 076 (Medium).jpg
    44.9 KB · Views: 16
  • wood stuff 077 (Medium).jpg
    wood stuff 077 (Medium).jpg
    50.6 KB · Views: 20
  • wood stuff 078 (Medium).jpg
    wood stuff 078 (Medium).jpg
    39.4 KB · Views: 20
  • wood stuff 079 (Medium).jpg
    wood stuff 079 (Medium).jpg
    45.4 KB · Views: 16
  • wood stuff 080 (Medium).jpg
    wood stuff 080 (Medium).jpg
    47.2 KB · Views: 27
Last edited:
last pics, sorry about the pic of the chess table, I could reshoot it.
Ipe coated with Messmers UV, made for Ipe.(from what Ive read, coat this stuff twice a year, its possible for it to look this good in 100 years from now outdoors)

before leaving this thread till Im done with all chairs and table, I would like to say that although this wood is not available all over at decent prices, Advantage up in Buffalo NY, offers great prices and are a pleasure to deal with.

no more pics for a while, I promise, next one will be of completed set. Ive got my work cut out for me.
Thanx to anyone that offered advice.
 

Attachments

  • wood stuff 082 (Medium).jpg
    wood stuff 082 (Medium).jpg
    64.6 KB · Views: 25
  • wood stuff 083 (Medium).jpg
    wood stuff 083 (Medium).jpg
    53.1 KB · Views: 22
Last edited:
last pics, sorry about the pic of the chess table, I could reshoot it.
Ipe coated with Messmers UV, made for Ipe.(from what Ive read, coat this stuff twice a year, its possible for it to look this good in 100 years from now outdoors)

before leaving this thread till Im done with all chairs and table, I would like to say that although this wood is not available all over at decent prices, Advantage up in Buffalo NY, offers great prices and are a pleasure to deal with.

no more pics for a while, I promise, next one will be of completed set. Ive got my work cut out for me.
Thanx to anyone that offered advice.
Gotta tell ya Allen - that chair looks great!:thumb:
 
thanyou, Im happy with the finish and the quality of the chair now.(only time will show how TB3, Ipe and rain gel together, or for this project, dont gel well together.)
 
Last edited:
as I walked into the house I had a bad thought.
What happens if for some strange reason all that wood Im cutting and all those mortises and tenons(I have a blister on my palm from the drill press after yesterday), dont fit for some strange reason. I tested one or two and just went to to, since theres so much repetition of parts. :eek:
could be a rather costly event for me.
Its like a puzzle, hopefull all the pieces will fit together when Im done.
 

Attachments

  • wood stuff 090 (Medium).jpg
    wood stuff 090 (Medium).jpg
    55 KB · Views: 19
What happens if for some strange reason all that wood Im cutting and all those mortises and tenons(I have a blister on my palm from the drill press after yesterday), dont fit for some strange reason.
:eek::eek::eek:

I've had that nightmare myself a few times.

If you dimensioned all your parts to be exactly the same, and you used stops or a jig, you should be OK. :thumb:
 
I never thought there would be a day when I would actually be hand trimming pieces and hand chiseling mortises to get perfect fits.
Never.
I cut each tenon a drop long, and some are maybe 1/32nd to wide.
I bought this marples trim saw a while back, not too sure why, but now i know.
Chisels and trim saws in my hands, and working perfectly,(for me) man, they must make some pretty good tools cause Im really not experienced at hand doing anything.
Already got the plans drawn out for the slatted table. Ill just finish up these chairs. Moving along.:wave:

(between the lower back and the lousy diverticulosis, Im not getting the time outside to work on this project I thought I would. The weather is fantastic, and I was laid up most of the last 2 days, ya know what, it sometimes really stinks when you start to get old.


and the worst thing is , as usual, I ran out of clamps. I using the few bar clamps, but I can only do the two until I get enough drying time.
 

Attachments

  • wood stuff 093 (Medium).jpg
    wood stuff 093 (Medium).jpg
    56.6 KB · Views: 14
  • wood stuff 092 (Medium).jpg
    wood stuff 092 (Medium).jpg
    57 KB · Views: 21
  • wood stuff 091 (Medium).jpg
    wood stuff 091 (Medium).jpg
    64.7 KB · Views: 21
  • wood stuff 094 (Medium).jpg
    wood stuff 094 (Medium).jpg
    68.9 KB · Views: 21
Last edited:
chairs complete, at least until I finish table and know if I have some leftover to redo one or two slats.
I changed the front seat slat for just some uniformity with the rest of the slats.(I will change the first chair when Im finished with entire project)I also moved the back slats down an inch, just looks better.

*thanx to whoever for the McFeeleys tip. The SS screws are probably best choice, their quality and price are best
 

Attachments

  • wood stuff 101 (Medium).jpg
    wood stuff 101 (Medium).jpg
    56.2 KB · Views: 25
  • wood stuff 102 (Medium).jpg
    wood stuff 102 (Medium).jpg
    44.9 KB · Views: 15
Last edited:
Hi Allen - those turned out nice!

But, if I may, "Do Not Feed the Monkey?"

wow, Im glad Im not in a witness protection program.

The sign on the ground says dont feed the animals.

We had a huge problem one winter with animals feeding off our garbage.

My yard seemed to be the only one getting the pails knocked over and garbage strewn all over the place.

It was referred to as a zoo, since we had so many wild animals running around my yard(hey, this is Long Island, a racoon is considered a beast of the wild), and people would joke, stop feeding the animals so much.
so, when I got the Rockler sign making kit, I practiced a bit.
 
the table top is a bit more invovled than I had figured.

Matching 18 slats to fit into the wider slats, and all come together perfectly, well, its a little work.

I started to dry fit some slats into the ends to see the size compared to the chairs, not as easy to visual until I see it together.(I can only decrease the size)

Sorry about the poor quality, the last shot is almost useless, just wanted to show how Im joining the ends of the table.
My hands arent holding steady after a tough night with a bout of my lovely intestinal disease.
Wanted to cut some tenons before the football buddies roll in, Im hosting today
Ill reshoot some shots tomorrow after I get some serious work done.

(if anyone looks at this post, I do know I didnt cut the opposite ends of the wider slats yet. I wanted to fit it all up and make as close to exact fit as I could)
 

Attachments

  • wood stuff 104 (Medium).jpg
    wood stuff 104 (Medium).jpg
    54.2 KB · Views: 15
  • wood stuff 105 (Medium).jpg
    wood stuff 105 (Medium).jpg
    50.7 KB · Views: 13
  • wood stuff 106 (Medium).jpg
    wood stuff 106 (Medium).jpg
    21.6 KB · Views: 11
Last edited:
Top