Kitchen Cabinets - New Door Stiles & Rails

Looking good Bill. I followed a similar course. My home had an electric furnace prior to being converted to gas by a previous owner. I found a heavy cable coiled up in the attic that came off a 100 amp breaker on the main panel. I pulled that back and used it to power my shop's sub panel. I think I have 12 circuits for the shop. Each of my 220 machines is on a separate breaker - TS, jointer, BS, and DC.

Don't forget that most local codes will require that outlets in a garage (that big door is the give-away) must be protected by a GFI. In my area the dedicated outlets did not need to be, but all of the 110 outlets over the bench, etc. did. Also, I hope you pulled a permit for the electrical work and get it inspected. If you ever have a fire (hope not!:eek:) you might find yourself in a bad way if it can be linked to unpermitted wiring.
 
Don't forget that most local codes will require that outlets in a garage (that big door is the give-away) must be protected by a GFI. In my area the dedicated outlets did not need to be, but all of the 110 outlets over the bench, etc. did. Also, I hope you pulled a permit for the electrical work and get it inspected. If you ever have a fire (hope not!:eek:) you might find yourself in a bad way if it can be linked to unpermitted wiring.

Thanks for the heads up Rennie. Fortunately I did everything right. I should say my electrician did. All the circuits are GFI protected and he pulled a permit on the work. I need to ask him about the inspection though. :dunno:

Garage? What garage, it is a shop...at least that is what I keep telling my wife. She has some vague memory of parking a car in there long ago. I keep telling her that she is hallucinating.
 
Last edited:
...about 2 1/2 years ago (our old house), I spent $2000 upgrading from the 100 amp service to 200 amp, also adding 8 110 quad boxes and 3 220 outlets to the garage, then two months later we decided to move. Had I known we were going to move I would have saved our money and just made do with what I had. Now, you say in a year you are going to move, so why have you decided to upgrade your shop now, and why not just save the money for the shop at the new house. (not critisizing, just curious??:huh:)
Now I do realize the remaining time you will have in this shop will be more enjoyable until you move, so that is a plus. DOing all this xtra work, you might decide to stay.

Ted

No, I understand it does seem a little crazy. The electrical work was not that expensive relative to my own situation. Although we do plan to put the house up on the market next spring, we do not have to sell and if the real estate market will not give me the return I want, we will wait. I will enjoy the benefit of the new power for as long as we stay. If that is only through spring of next year, that is ok and if it is another year then that is better.

I am out of town this week (Oklahoma) and may be a little slow in responding. I worked last weekend on the cabinets, but do not have the photos on my laptop. I will post this weekend when I get home.
 
Part 1

It has been sometime since I have posted about my progress. Just a recap so that you do not have to go back to the first post.

If you recall, a section of my construction grade kitchen cabinets starting sagging down the wall due to the fact that they were made from melamine covered particle board and had some faulty design elements. I took the offending cabinets down from the wall with the intent of repairing them in the shop.
kitchen0001_r1.jpg Kitchen0009.jpg

Once I looked them over and realized how poorly built they were and contemplated how they no longer fit all the improvements we have made in the house, I decided to scrap all the cabinets and make new ones. I am talking about all the kitchen cabinets (uppers and lowers)! In order to minimize the effort and speed the process I set a few ground rules. I would just duplicate what was there (size and configuration) and just upgrade the materials (3/4” pre-finished birch plywood instead of 5/8” melamine particle board). I would also use the existing doors and drawer fronts as they were made from solid wood. I should note that my cabinets are painted. Although the exteriors will be painted (white) the interiors will now be clear coated birch.

My first goal was to replace the existing four upper cabinets that I took down, because it was disturbing the work flow in the kitchen. Personally, it did not bother me that one whole counter, the dining room table and part of the spare bedroom was now home for the contents of these cabinets, but in our household we have a one man, one vote and one women, two vote system. I lost 3 to 0 (hey, I can tell which way the wind is blowing!).
kitchen0012_r1.jpg


The cabinets that I took down were:
2 ea W12x27x42 (Depth x Width x Height)
1 ea W12x42 Corner
1 ea W12x48x42

I decided to replace the W12x48x42 because the 48” width was too wide for shelves. The shelves always sagged. It was a really poor design to put one large cabinet there. I decided to replace this cabinet with another W12x27x42 because the remaining space would fit a new pantry cabinet and increase our storage space. So much for not changing anything! This will cause me to build some new doors.

Here is the new arrangement for this section of cabinets (without the pantry cabinet).
Sketchup 1.jpg

When I went to buy the pre-finished birch plywood, it only made sense to get as much as I could haul, so I managed to buy enough to build all the uppers, not only the ones I took down. As I started to cut the parts out, it also only made sense to cut out for all the uppers and have more of a production line process. Again, I seem to have a talent to not following the Plan. Here are some Sketchup views of the other upper cabinets.
Sketchup 2.jpg Sketchup 3.jpg
 
Part 2

I somehow lost all the photos of cutting up the plywood sheets into manageable sizes before ripping and crosscutting them on the tablesaw, but this photo illustrates how I did it.
Cabinet 25.jpg

Yes, that is a Festool TS 55 Circular Saw with a CT22E Dust Extractor. Yes, I bought this specifically for this project. Once I saw all that beautiful pre-finished clear birch plywood I knew I had to find a better way to cut down the sheets. I do not have the talent to cut 4x8 sheets of plywood on my tablesaw. If I was doing a lot of this, there is no doubt in my mind I would get a slider, but that is not the direction that I want my woodworking to go. In the past I have cut down sheets with my Skilsaw Mag 77 worm-drive with a fine blade, but I still got tearout. Since this plywood was pre-finished, I did not want to deal with repairing the finish so I broke down and bought the Festool. Beside, my worm drive is like walking a wolverine on a leash. It is the right tool for framing a house but not woodworking. Yes, I could have bought a small circular saw, but I had doubts that I could avoid tearout.

I have resisted the purchase of Festool, because of the high price. I could see the quality, but not the value. It worked wonderfully, unbelievable so. I even cut all the sheets face up (what!!!) with no evidence of chip-out or tearout. When I bought the TS 55 there was no competition as there is now (Dewalt).

The worst part of this is I KNOW I will hear from Larry Merlau, because when he was here he specifically asked me what I thought of Festool. I replied I thought there were great tools but overpriced. Now, I don’t know what I think, except I think I will be eating crow. It will get worse, but that will have to wait until tomorrow. I need to fly away on another trip, but will try and post from the hotel.

Below is a shot of some of the components ripped, crosscut and grooved for the 1/4 back. Trust me although I don't have pictures, I had cabinet components all over the place. They do take up a lot of room! I will post tomorrow on further preparing the components and the assembly in the shop. After that it will be the installation in the kitchen.
 

Attachments

  • Cabinet 1.jpg
    Cabinet 1.jpg
    59.7 KB · Views: 21
Bill Satko said:
...in our household we have a one man, one vote and one women, two vote system. I lost 3 to 0 (hey, I can tell which way the wind is blowing!).
Now that's Comedy Gold right there. :rofl:

Sounds like in your case, the Festool gear may very well be paying for itself on this project. ;)
 
Just a word on type of cabinets that I am duplicating. They are euro style frame-less cabinets. They use 5mm shelf pins and euro style hardware. I was very fastidious in duplicating all measurements, especially since I am reusing all the doors and they already have their hinge holes drilled. As you can see from the exploded sketchup drawings they are a simple box made from 3/4" pre-finished birch plywood for the top, bottom and sides. The 1/4" back fits into a groove that has been cut in each of these components.
Exploded 1.jpg

Exploded 2.jpg

Note: I am using the nominal dimensions for the thicknesses of the plywood. As you all know, all the dimensions are somewhat less than that.

The groove had to be made in two passes because it needed to be somewhat less than 1/4". I set the fence up to be the correct distance from the front and ran all the components thru. I then reset the fence and by running several test pieces through the saw (testing by trying to fit a 1/4" scrap piece) established where the fence needed to be for the second run.
Cabinet 3.jpg

All front, bottom and sides are joined together by simple butt joints that will be glued and screwed. (to be shown in a later post).

Now that I have all the components cut out and grooved where applicable, I turned my attention to drilling the shelf pin holes. From the existing cabinet I determined it was based on 5mm holes. I bought from Rockler a template made especially for this purpose. It comes with a self center drill bit.
Cabinet 6.jpg

Cabinet 7.jpg

This did not go well for me at all. In one word tear-out! I was really dismayed and tried altering my techniques and even sharpening the drill bit, but was not successful. The result was not acceptable to me at all and I scrapped the two boards that I ended up drilling. In Goggling for a solution, I came across an old post at SMC that described this very problem and the poster's belief that a router was the only way to do this. He had suggested making your own template. The poster was someone by the name of Tod Evans.

It made sense, but feeling the pressure to produce and already showing a tendency to be reckless with money I decided to buy a router template...which happened to come with a router.

Oh, what has happened to me!?

Cabinet 15.jpg

Cabinet 16.jpg

Cabinet 17.jpg

My next posting will go into the banding of the components and assembly of the boxes. This will have to wait until I get back home from my business trip.
 
Oh man..... You should have titled this thread...."How I used a cabinet project to stock up of some coooool Festool equipment"!!!:rolleyes:

Very nice, Bill!

Uh, the cabinets are looking very nice too! :thumb:

:rofl:
 
Well, even though you're cutting corners and just using whatever you can scrounge up, I'm sure the cabinets will be just fine. :rofl:

I hadn't seen that jig before. Looks like a great idea. :thumb: Congrats on the new acquisition. I'm interested to see what other shop goodies you can milk out of this cabinet build. :D
 
i cant believe i hadnt posted to this bill but i dont remeber seein all the pics that you show now!!1 that tool aquistion is good and bad:) as for the shelf pin holes give us a link here to tods methode if you would.. i would like to see it.. lookun good bill and she is gona like them when your done.. how do you like working with prefinished ply?
 
by the time he gets done building his cabinets, I have no doubt he'll have more money invested in new green tools than the cabinets ended up costing to build.

to say that I'm envious would be an understatement. I've looked at the festool sliding saw and want one BAD!

if you were doing face frames, I'd probably see a dominio joining system purchase coming up too... it's probably good that you're doing the frameless design :D

Congrats on the new tools. I'm sure you'll find some other great projects to use them on in the future.

-J
 
i cant believe i hadnt posted to this bill but i dont remeber seein all the pics that you show now!!1 that tool aquistion is good and bad:) as for the shelf pin holes give us a link here to tods methode if you would.. i would like to see it.. lookun good bill and she is gona like them when your done.. how do you like working with prefinished ply?

Here is the link to the SMC post that Tod made: www.sawmillcreek.org/showthread.php?t=27373

Also here is another link where templates for shelf pin holes were discussed. Some people also mention the difficulty of drilling these, while some others had no problems. :dunno:

www.sawmillcreek.org/showthread.php?t=34016

I liked working with prefinished ply except that my hands were all cut up from handling it. It is very sharp after you cut it and the you don't even know that you have cut yourself until it starts bleeding. That reminds me, I need to get another box of band-aids for the shop.:(
 
Last edited:
Oh man..... You should have titled this thread...."How I used a cabinet project to stock up of some coooool Festool equipment"!!!:rolleyes:

Congrats on the new acquisition. I'm interested to see what other shop goodies you can milk out of this cabinet build. :D

by the time he gets done building his cabinets, I have no doubt he'll have more money invested in new green tools than the cabinets ended up costing to build.


I am hurt that you would think I would take advantage of this build to milk some new tools out of it.:D

Actually I really did agonize over the purchases, but not for the reasons you think. I kept thinking of the high price hand tools that I could buy instead. That is where my love of tools resides. I kept thinking I could purchase a nice infill plane like a Brese, Anderson, Marcou or maybe even a Holtey. OK, not a Holtey...that would be impossible to explain spending all the money required for a Holtey, but maybe a half set of hollows and rounds from Clark Williams.

Just a chilling and disturbing story linked to all this. The wife traveled south to Seattle in order to get the router and shelf pin guide from a Festool dealer there (I was out of town and wanted it for the weekend). When she mentioned that I really did not want to buy it but needed it to complete this project he laughed at her, saying he sure has you buffaloed.:eek: Hey, what happened to the man code about supporting each other in the pursuit of tools...and from a seller of tools! I have to think he was on drugs. I just tried to laughed it off to the wife saying he was just pulling your leg, but I am not sure I have convinced her. I hope she does not start thinking about past projects and all the tools that were purchased in the name of these projects.:doh:My tool purchases may be coming to a screeching halt. If so I will be making a trip south for retribution. :mad:;)
 
Last edited:
you are married to a smart lady bill be careful:):thumb::rofl: that was great story and seeun as i have met her your wize to back off fer awhile.. that does look like a slick tool there//the drill rig and router.
 
Installing Banding.

This posting will be all about installing the banding. Because the frame-less style of boxes do not have a face frame and we are using plywood, I need to apply some type of banding to both the boxes and the shelving (also made from 3/4" ply). I could have used solid wood banding, but chose to use a commercial self adhesive style of banding (both PVC & wood). I used FastCap products www.fastcap.com because they are in all the local stores and are only located (corporate & local manufacturing facility) a couple blocks up from my office. They are a local Bellingham business that has done well in offering innovative cabinet building supplies and tools. It is really nice to be able to walk over to there to purchase something and actually talk to the president of the company, Paul Akers. I did not know who he was at the time because he was dressed in overalls and had just come off the manufacturing floor. They do build some of the items there.

Anyway here is a picture of the tools that I used to do the banding. Small scale here so no automatic banding machine, just me! That is a shelf board clamped in my expensive bench.

Cabinet 11.jpg

It is very simple, you cut off a strip of the self-adhesive banding (in this case actual birch wood).
Cabinet 10.jpg
Remove the paper tape and attach the banding to the edge of the board. Roll with a roller to ensure full contact. Trim the ends. Trim the excess on long edges. That is it!
Cabinet 13.jpg

Here is a little detail on one of the tools. The handtool in red is used cut the banding and trim the ends once you have rolled it out. It is actually somewhat similar to a diagonal pliers but there are differences. As you can see from the pictures the nose is longer and straighter (almost going the other way) than a diagonal plier. I got this from FastCap. This tool worked very well and I highly recommend it.

Cabinet 8.jpg Cabinet 9.jpg

Below is the edging tool. This one is built to trim both edges at the same time. It is also made by FastCap, but I have seen the same style of tool from other vendors. This worked great with the PVC banding, but even when you remove one side (per the instructions) for the wood banding and carefully consider grain directions, I found it difficult to get a clean trim. I used my small bronze block plane to clean up the edges.
Cabinet 19.jpg

I severely underestimated the amount of banding I would need originally. I needed to go back and order bigger boxes of the stuff.
Cabinet 24.jpg

Below is a picture of the off white pvc banding that I used on the face edges of the boxes. Remember the outside of the boxes (where exposed) will be painted white and also the doors.
Cabinet 18.jpg

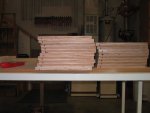
This last photo is all the shelving for the W12x27x42 boxes (3 boxes total).
Cabinet 14.jpg

That is all there is to banding.
 
good job there of posting the method and the ease of it!! so these birch edges are where the back side? if the frnt edge is white. oh maybe they are the shelves huh
 
Now that all the cabinet components are cut out, grooved for the back, shelf pins routed and the banding completed, it is time to assemble it all into a box.

I first needed a flat and level surface to assemble the boxes, so I bought a sheet of 3/4" melamine and cut it down to a reasonable size to allow easy access all the way around the assembly. I set this on two sawhorses and had an inexpensive but great assemble table.
Cabinet 25.jpg

I decided to use some Pinnacle Box Clamps that I have to aid in the assembly. These are really made by Woodpecker tools, but I believe they are repackaged and sold by Woodcraft under the Pinnacle name. I believe Woodpeckers comes out some of the best innovative woodworking products. I have several of their items that they offer for sale. www.woodpeck.com/ I suggest you sign up for their email Club as they have specials each week on their items. It is a great deal.
Pinnacle Box Clamp.jpg

These box clamps are very slick in how they work. They have two metal plates whose edges are two complementary 45° angles that slide together. One of these plates is held up by a spring. As a bolt on one (the one with the spring) is tighten, it slides down the face of the other and wedges against the wood.
Cabinet 28.jpgCabinet 31.jpgCabinet 32.jpgCabinet 44.jpg
It works wonderfully. Usually there is a knob on the top to tighten, but because of how my back is installed on my boxes, I need to install the back while assembling the sides, back and front. I solved this by switching the knob toward the bottom. I then reach under the table to tighten.
Cabinet 30.jpg

Since three of the boxes are the same size, I drilled and bolted the box clamps for these first three boxes.
Cabinet 40.jpg

The photo below is what the four side would look like in the box clamps. I am not able to assemble the box in this manner because my back needs to slide in the groove, but it give you an idea on how it works. For most type of box assembles this would be the way you would do it. In these cases you would have the knob facing on the top of the clamp and then just reach over the top of the sides to tighten and lock the joint.
Cabinet 47.jpg

Tomorrow, I will detail how these boxes are actually assembled on this table using these clamps and some other style of box clamps that I have. I will also be demonstrating Fastcaps screws. They are a little different.
 
Good to see you making some more headway, Bill. :thumb:

I bought some self-adhesive cherry edge banding a few years ago for a project, then ended up using something different. (Don't recall if it was FastCap or not.) I've still got a couple rolls out in the shop waiting for the right project to come along.
 
Top