Latest Goblet

Doug Miller

Member
Messages
277
Location
Hardinsburg, KY
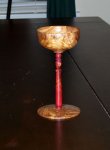
This was turned for a challenge and trade on another site but thought you all might like to see it too. Olive and apple were used for specific reasons. Both the olive and the apple I received in wood trades with various folks. Bottom and top were one piece. Sliced off the piece for the base and then turned the cup. Apple was a pen blank. I wasn't completely happy with the stem as it was so I added some red Rit dye to give it a bit more depth. Goblet is 3" diameter and 6" tall. Finish is Seal-A-Cell and buffed with all three compounds.

I feel like the base is a touch too large in diameter. I just didn't pay attention to it until it was too late to turn it down a bit more. I don't think you can see it, but there is a tool line inside the cup too. I basically got tired and didn't feel like sanding any longer. Other than that, what do you all think? Please share your thoughts so that I can make the next one even better. :cool:
 

Attachments

  • Olive-Apple Goblet (reduced).jpg
    Olive-Apple Goblet (reduced).jpg
    43.2 KB · Views: 71
Last edited:
Doug, I have to agree with you, the bottom is just a little too large, but otherwise, that is one nice goblet, and the story that goes with it and the wood is very neat.

I'd like to hear more about your using the dye....... :wave:

Cheers!
 
I'll agree with everyone else on the base, but I kinda like the color combo. (I'm betting it's a bit more subdued in person.) The olive wood sure has some pretty figure in it. :thumb:
 
Thanks all. The stem color is one of those deals, you either like it or you don't. I can't imagine there's much in between on that.

Vaughn, the red color is not bright. It is strong, but does not stand out like a neon red.

Stu, I went to the grocery store about a year ago and bought several colors of Rit dye, the stuff for dying clothes. Because I was to use it on wood, I made a great concentrate, the whole package in roughly 4 oz. of water. I shook and shook until the dye was completely desolved. For this application, I applied 2 coats, sanded with 600, applied 2 coats, sanded with 600, applied one coat, sanded, applied one more coat. Once it was dry I assembled the pieces together and finished. Is that what you were asking?

Mohammad, the base is not as flat as it looks. It is flatter than some I've done, but not as flat as others. Probably 3/8" from very bottom to the highest point. I'm sure the pic angle makes it look flatter than it really is.

Thanks all for the comments. I do appreciate them all. Your suggestions will only make me a better turner and artisian. I realized after posting that the line I mentioned in the original post is not from my gouge, but from my chuck when I reversed the cup. I remember thinking to myself that I needed to pad the jaws so I didn't get lines. Sure enough, I have 4 seperate lines inside the cup. Maybe I'll listen to that little voice next time. Yeah, right. Like that will ever happen.
 
Top