Trompos! (Throwing Tops)

Kerry Burton

Member
Messages
1,163
Location
Orem, Utah
Five years ago I pulled a Power Puff plastic top out of a box of cereal. Having no children, I gave it to a particular coworker who had kids "the right age".

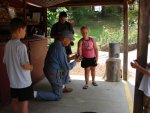
When he saw the toy, he was reminded of some wooden tops that he had watched kids play with in Chile several years earlier. He said they were called "trompos". One thing led to another, and he received the following images from someone he had known in Chile:

PileOfTrompos.jpg


TrompoInHand_DarkBackground.jpg


BoysWithTrompos_SpinningOnHands.jpg

He also received the following diagram:
TrompoDiagram.jpg


====================================

This all looked very interesting to me, so I cut out a copy of the trompo diagram and took it to the lathe. This was my first attempt, from a piece of cedar:
DX4330_0536_FirstTrompo_Cedar.jpg

The grooves were obviously too deep (and too square-bottomed) but my coworker got it to spin just fine. I gave the trompo to him as a gift, and made a few more.


Trompo #2 was made of apple.
DX4330_0539_SecondTrompo_Apple.jpg

It had some problems at first ... the string kept sliding right off the pointy end. This was because:

1) I made it too smooth, and

2) I hadn't provided a good groove to anchor the string into, so it could be wrapped over itself.

After I roughed it up a bit, this trompo became my best spinner:
DX4330_0541_SecondTrompo_WithCarvedGrooves.jpg
The vertical grooves that I carved didn't have much of an effect, but the circular groove near the tip did. If I remember correctly, I also ground the nail down a bit to stiffen it up and reduce internal vibrations.


Trompo #3 was made from ash. Its smaller size made it a little too lightweight to compete with #2.
DX4330_0558_ThirdTrompo_Ash_InTheGrass.jpg


DX4330_0559_ThirdTrompo_Ash_OnWoodenSlats.jpg


Trompo #4 was a little too bulbous and top-heavy. It was pretty much a non-starter. I'm not sure if I want to show pictures of it or not. Oh, what the heck.... :eek:
DX4330_0567_FourthTrompo.jpg


DX4330_0568_FourthTrompo_WithString.jpg

==========================================

SUNDRY PHOTOS


Starting to wind up a trompo:
DX4330_0538_WindingATrompo.jpg


Trompo ready to go:
DX4330_0540_TrompoWoundUp.jpg


I use an underhand throwing position, but I have heard of both overarm and sidearm positions as well.
DX4330_0566_Trompo_ThrowingPosition.jpg
 
Early on in this 2- or 3-week period, I remembered that one of my younger brothers had spent a couple years in Chile. I wondered if he had ever seen "trompos". I asked him via email. Jackpot!

Here is some of the information that I found to be the most interesting:

========================================

From: Burton, Barry
Sent: Monday, September 29, 2003 3:21 PM
To: Burton, Kerry
Subject: RE: I finally turned something!

Man, does this bring back memories! I used to be pretty good with one of those. The kids would play with them out on the packed dirt sidewalks in their neighborhoods. They would use the point of one to draw a circle in the dirt. That was the "playing field". Then they would each throw their tops in turn, trying to knock their opponent's out of the ring. When that got boring, they would actually attack their opponents top, trying to crack and break it (which they were able to accomplish from time to time). I saw a lot of "armor" that had been applied to tops, mainly in the form of flat-headed nails driven all over into the topmost surfaces.

You would sometimes see decorative lines burned into them, but I don't recall seeing grooves in the sides. I think the best kind of string was some sort of natural, probably cotton stuff, about the same thickness or a little thinner than you have in your picture.

You actually start the throw with it upside down in your hand, so that when it finally gets to the end of the string it lands upright. It does take a little practice, but some of those kids could put it right where they wanted it every time.


-----------------------------------

From: Burton, Barry
Sent: Tuesday, September 30, 2003 10:28 AM
To: Burton, Kerry
Subject: RE: I finally turned something!

[...] those are exactly what they looked like! I suppose some did have grooves, though they wouldn't have been very deep. But they all had that "light colored wood with brown lines" type of appearance.

As I recall (it's been a "couple" of years ago now) I gripped the thing like a baseball, with the metal tip coming out between my thumb and forefinger. The critical thing seemed to be the angle of the top (as reference to the ground) when you let it go, and the distance it (the top) was from the ground when the string was at its end. Ideally, the string would come off at the exact point of contact with the ground (or another top!) or a split second earlier, but not later. I think I mainly used an overhand type of throw, like you might make if you were throwing a baseball into the ground to a spot about 6 feet away.

I don't recall ever having the string looped around my finger like I might do for a yoyo (though maybe I did). I believe there was just a knot at the end that you would put between your fingers, or maybe just wrap the string around your middle finger a couple of times. You wouldn't want something that would have to be undone every time you wanted to wind up the top again. In winding one up, I would hold it in my left hand and wind it with my right, like you have in your "how to" picture. So the string would of necessity have been separated from my throwing hand during the winding up.

========================================

I hope this is interesting to someone else out there!

Kerry
 
Cool stuff, Kerry. I used to play with Duncan tops quite a bit as a kid. These look very similar, but with a metal tip. I used a bit different, but similar winding technique where the end of the string was looped a single time around the top of the top.
 
Yeah, I kinda made things up as I went along.

The "metal tip" is a regular (but obviously headless) nail. I drilled a hole and epoxied the nail in place while the trompo was on the lathe ... then used a file to shape the spinning tip after the epoxy dried.

Vaughn, your winding technique is probably the "right" way to go. It is shown in one of the cool videos on this webpage that I found a couple days ago, along with pre-made tops, extra tips, and other stuff. (No affiliation.)

http://www.turnertoys.com/wood_toy_spinning_tops2A.htm
 
I used to play wit them a lot when I was Kid in the same manner that Barry described.
One of the things we did was to replace the ball ended tip they came with with a headlees nail and sharpen the tip as much as possible to make them spin longer but also to crack and split oponent's one.

Apart from this we didn't make any tricks apart from having it on the hand, but it was recently that I found that really fancy tricks can be performed with them.
See for yourselfhttp://www.youtube.com/watch?v=LmmisMSEWMQ
As for holding the other end of the string we used 50cents coins that had a hole in the center, we passed the string through it and made a knot. Eventually we used those 50 cents to buy sweets when we were broke and replaced the coin with a washer.
 
Last edited:
A member of my woodturning club demonstrates turning at an 1800s village near us. He uses a spring pole lathe and turns tops then teaches children how to wind and toss them. He sells a couple thousand each year. But most are turned at home on a modern lathe. He uses a formula for the shape similar to the 'Golden Mean'. Special purchased tips can be expensive. Good alternatives are arrow field tips or cut off masonry nails. These are for outdoors. On inside floors stay with wood tips. Here he is shown demonstrating how to wind a top.
 

Attachments

  • DSC00583.JPG
    DSC00583.JPG
    148.5 KB · Views: 58
Very Cool

Great stuff, I love making tops and have made a few of these kind but I am not very good at spinning them. I think I'll have to try again with a metal point.

Tony-thanks for the link. Some people are VERY serious about their tops !:D
 
Top