
Dan Mosley
Member
- Messages
- 1,169
- Location
- Palm Springs, Ca
Orignally bought the machine from someone going out of buss that had it sitting in a storage room with a dirt floor. Said he bought the machine as a back up and never got it running and it had been just sitting for years and years in storage. The machine would not run,very dirty,filled with old greese and grim,table frozen,guides broke,thrust bearings shot, riser frozen etc...... I paid $150.00 plus $50.00 for delivery.
Decided to restore this old machine - needed cleaning,degreesing, rust removal, paint and a few parts reworked,new electrical etc..
Last post i completed the electrical and it was running well. Parts were sent off for repair and to get new bearings and tires put on.....
Update from last post
Well its been awhile since i had any time to spend on restoration of my Davis-Wells bandsaw. But i had the last several days off work and nothing in my way so i worked on it a little each day for the last several days and late today i finally was able to put the guide blocks back on it and put the blade back into it.
Ill hit the highlights of my experience with the reassmbly, forgive me if i dont know the bandsaw language accurately......LOL
Davis&Wells in Lynwood,Calif (Dan) did all the machine work (balanced the wheels and put new tires and crowned them, Restored and reworked the original guide blocks at my request,reground the shafts,new bearings).
Note: My Opinion and decision was not to use Carter guides- They are No where close to the durability or performance of the original guides and at the Lynwood shop they were able to do a few things to the original guide design that helped enhance them-see pics below.
The Wheels
Putting the uppper wheel back on took a bit of thought - top one i put the shaft on the ground and tapped the wheel back into place - then reassembled the upper part of the machine.
Putting the shaft in the lower part of the machine after i put the pully on that goes to the motor was not bad. Placed it on the ground and tapped it down until i got it in alignment with the motor pully (tapping and holding it up and making sure the alignment was correct and tapping until it was in perfect alignment)
Putting the lower wheel was a bit harder because he had to go back in with the shaft mounted in place. Problem was to put it back on with out putting to much pressure on the shaft and bearings. I called Dan back in Lynwood who explained how i could fasten a 2x4 across the back and over the shaft with clamps and then tap it back on. I did and it worked very well.
Guides
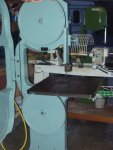
Upper guide simply bolts onto the adjustment bar and was no problem
Lower guide pretty much went on the same way with a spacer that keeps it from hitting into the tilt part of the table.
Turned it by hand and made all the adjustment to get it to ride the crown (Tilt and Tensioning)
Then adjusted the upper an lower guide block and thrust bearing seatings. In playing around with it i found the bolt on top is to adjust the thrust bearing - Like i said i dont know much about bandsaws.....LOL
Placed the saw blade into the machine and tensioned it up and toggled the switch and watched it several times to ensure it was tracking well and that the blade was running in the guides correctly.....all seemed fine after several short trial starts so i flipped the switch and let it just sit and run for awhile...........kinda just stood back and watched it........wife thought i was nuts and wanted to know why i kept watching it...........I told her as odd as it may seem i was just amazed at how the machine was working and thinking imagine how long since its been that this machine was even running.
Question:::::Now looking for a upper wheel guard like a round sheet metal plate looking thing to complete it .......any thoughts?
Ohhhhh and wow does thing cut wood.......wish i could show that to...
Thanks so much for the advice and suggestions everyone has made along the way this has been alot of fun to restore.........Dan
Decided to restore this old machine - needed cleaning,degreesing, rust removal, paint and a few parts reworked,new electrical etc..
Last post i completed the electrical and it was running well. Parts were sent off for repair and to get new bearings and tires put on.....
Update from last post
Well its been awhile since i had any time to spend on restoration of my Davis-Wells bandsaw. But i had the last several days off work and nothing in my way so i worked on it a little each day for the last several days and late today i finally was able to put the guide blocks back on it and put the blade back into it.
Ill hit the highlights of my experience with the reassmbly, forgive me if i dont know the bandsaw language accurately......LOL
Davis&Wells in Lynwood,Calif (Dan) did all the machine work (balanced the wheels and put new tires and crowned them, Restored and reworked the original guide blocks at my request,reground the shafts,new bearings).
Note: My Opinion and decision was not to use Carter guides- They are No where close to the durability or performance of the original guides and at the Lynwood shop they were able to do a few things to the original guide design that helped enhance them-see pics below.
The Wheels
Putting the uppper wheel back on took a bit of thought - top one i put the shaft on the ground and tapped the wheel back into place - then reassembled the upper part of the machine.
Putting the shaft in the lower part of the machine after i put the pully on that goes to the motor was not bad. Placed it on the ground and tapped it down until i got it in alignment with the motor pully (tapping and holding it up and making sure the alignment was correct and tapping until it was in perfect alignment)
Putting the lower wheel was a bit harder because he had to go back in with the shaft mounted in place. Problem was to put it back on with out putting to much pressure on the shaft and bearings. I called Dan back in Lynwood who explained how i could fasten a 2x4 across the back and over the shaft with clamps and then tap it back on. I did and it worked very well.
Guides
Upper guide simply bolts onto the adjustment bar and was no problem
Lower guide pretty much went on the same way with a spacer that keeps it from hitting into the tilt part of the table.
Turned it by hand and made all the adjustment to get it to ride the crown (Tilt and Tensioning)
Then adjusted the upper an lower guide block and thrust bearing seatings. In playing around with it i found the bolt on top is to adjust the thrust bearing - Like i said i dont know much about bandsaws.....LOL
Placed the saw blade into the machine and tensioned it up and toggled the switch and watched it several times to ensure it was tracking well and that the blade was running in the guides correctly.....all seemed fine after several short trial starts so i flipped the switch and let it just sit and run for awhile...........kinda just stood back and watched it........wife thought i was nuts and wanted to know why i kept watching it...........I told her as odd as it may seem i was just amazed at how the machine was working and thinking imagine how long since its been that this machine was even running.
Question:::::Now looking for a upper wheel guard like a round sheet metal plate looking thing to complete it .......any thoughts?
Ohhhhh and wow does thing cut wood.......wish i could show that to...
Thanks so much for the advice and suggestions everyone has made along the way this has been alot of fun to restore.........Dan
Attachments
-
 Angle (450 x 600).jpg65.9 KB · Views: 74
 -
 Back (450 x 600).jpg47.2 KB · Views: 55
 -
 Bottom Guide (450 x 600).jpg43.4 KB · Views: 65
 -
 Front (450 x 600).jpg63.4 KB · Views: 60
 -
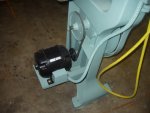 Motor (600 x 450).jpg52.3 KB · Views: 50
 -
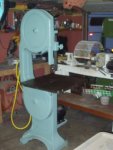 Side-1 (450 x 600).jpg47.9 KB · Views: 82
 -
 Side-2 (450 x 600).jpg44.8 KB · Views: 47
 -
 Side (450 x 600).jpg53.6 KB · Views: 51
 -
 Top (600 x 450).jpg49.8 KB · Views: 54
 -
 Top Guide (450 x 600).jpg36.8 KB · Views: 60
Last edited:


