Frank Pellow
Member
- Messages
- 2,332
- Location
- Toronto, Ontario, CANADA
(part 1 of 2)
At least once a month, a number (that number being somewhere between 12 and 24) of woodworkers mostly from the eastern portion of the greater Toronto area meet for breakfast or lunch. We originally got to contact each other on the Canadian Woodworking forum. But, meeting in person is even better!
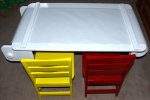
On the first Saturday in December, a group of us met in Leaside for fish and chips and beer. I was particularly fortunate to be sitting across the table from Don McFarland of Markham. Don told me about a table and chairs that he is making for his grandson and I immediately decided that I want to make something similar for my 4 year old granddaughter Jamie. Here is picture that Don later sent me of his table:
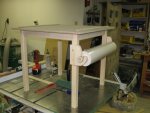
The table supports a role of drawing paper as well as two strips that are held to the table with magnets and keep the paper in position while someone is drawing.
Don found plans for children?s chairs on the Lowes web site (http://www.lowescreativeideas.com/idea-library/projects/Childs_Table_and_Chairs_0507.aspx). I thought the plans were quite good and built a couple of chairs with only very minor modifications. Here is an extract from the chair plan:
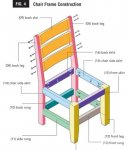
Last week I built the table and two chairs. The rest of this thread shows and describes the steps in the project.
(01) Two of the pieces shown in the photo below form the rear legs and back frame for a chair. They were cut using a jig saw.
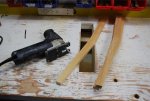
(02) Each chair has three back slats and each slat must have a rounded section cut out in order that the back of the chair will fit the contour of its occupant. I made a template, marked each slat using that template, cut each slat on my small bandsaw, then smoothed the cut using a Festool Deltex sander equipped with 40 grit paper.
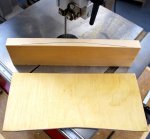


I followed this up with 80 and 120 grit paper using my Festool linear sander.
(03) I tapered the front legs of the chairs and all the legs of the table freehand (but very carefully) on my table saw:
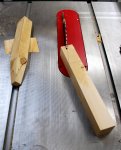
(04) The slats were attached to the chair using glued and screwed butt joints. Here is one of the backs:

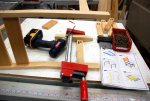
(05) Most of the joints on both the chair and table were made using pocket hole screws. Here the holes are being drilled with a Kreg jig:

And here a cross piece is being screwed into place:
At least once a month, a number (that number being somewhere between 12 and 24) of woodworkers mostly from the eastern portion of the greater Toronto area meet for breakfast or lunch. We originally got to contact each other on the Canadian Woodworking forum. But, meeting in person is even better!
On the first Saturday in December, a group of us met in Leaside for fish and chips and beer. I was particularly fortunate to be sitting across the table from Don McFarland of Markham. Don told me about a table and chairs that he is making for his grandson and I immediately decided that I want to make something similar for my 4 year old granddaughter Jamie. Here is picture that Don later sent me of his table:

The table supports a role of drawing paper as well as two strips that are held to the table with magnets and keep the paper in position while someone is drawing.
Don found plans for children?s chairs on the Lowes web site (http://www.lowescreativeideas.com/idea-library/projects/Childs_Table_and_Chairs_0507.aspx). I thought the plans were quite good and built a couple of chairs with only very minor modifications. Here is an extract from the chair plan:

Last week I built the table and two chairs. The rest of this thread shows and describes the steps in the project.
(01) Two of the pieces shown in the photo below form the rear legs and back frame for a chair. They were cut using a jig saw.

(02) Each chair has three back slats and each slat must have a rounded section cut out in order that the back of the chair will fit the contour of its occupant. I made a template, marked each slat using that template, cut each slat on my small bandsaw, then smoothed the cut using a Festool Deltex sander equipped with 40 grit paper.


I followed this up with 80 and 120 grit paper using my Festool linear sander.
(03) I tapered the front legs of the chairs and all the legs of the table freehand (but very carefully) on my table saw:

(04) The slats were attached to the chair using glued and screwed butt joints. Here is one of the backs:

(05) Most of the joints on both the chair and table were made using pocket hole screws. Here the holes are being drilled with a Kreg jig:

And here a cross piece is being screwed into place:

Last edited:




 My eyes always seem to get me into trouble.

