Buffet-Mahogany and Sapele Ply-planning stages and first cuts

allen, i have cut pieces wrong twice in a row also, so don't feel bad. it happens, especially when you're cold like that...your mind is elsewhere.

just remember, if you could walk out into the shop, and throw this buffet together with no problems or speed bumps, would it be as much fun? prolly not. challenging yourself and learning new stuff is the best part about it.

have fun
chris
 
i told ya allen you would be having dreams:) your hooked so far you will never be the same,,, now that you know what the symptoms are you can stay away from those spinny things and wont be come infected by that dreadful disease:rofl: using planes and hand tools is ok its the spinny stuff that wil make you dizzy:) doing good allen:thumb::thumb:
 
ya know larry, she sold that lathe I had mentioned to you a while back, and she didnt even have the courtesy to tell my buddy after he told her I was interested. I insisted he called her after well over a month and he didnt hear from her.
I would have stuck it in the shed for a while.
 
I thought I cut it right, but I cut the back rail support wrong again, but too long, so its just a recut.

some pics of the framework coming together. I have to cut a curve in the front rail,(wish I had a bandsaw) didnt want to start cursing till tomorrow, so I left it straight for now.(Im going to spray some adhesive onto the wood, put the curve on paper on both sides identical, flipped over ofcourse, and cut with jigsaw, use a drum sander bit on the drill press to smooth out the curve)
 

Attachments

  • wood stuff 572 (Medium).jpg
    wood stuff 572 (Medium).jpg
    54 KB · Views: 39
  • wood stuff 573 (Medium).jpg
    wood stuff 573 (Medium).jpg
    75.8 KB · Views: 53
  • wood stuff 574 (Medium).jpg
    wood stuff 574 (Medium).jpg
    61.3 KB · Views: 49
  • wood stuff 575 (Medium).jpg
    wood stuff 575 (Medium).jpg
    43.9 KB · Views: 45
  • wood stuff 576 (Medium).jpg
    wood stuff 576 (Medium).jpg
    58 KB · Views: 45
  • wood stuff 577 (Medium).jpg
    wood stuff 577 (Medium).jpg
    58.8 KB · Views: 44
curve section

hey allen for your curved section,take and make a pattern outa some plywood, cut to the shape you want and sand smooth then use your router and pattern bit to get final piece smooth after you cut with jig saw unless you got a steady hand on your drum sanding..you stick the pattern on top of your good piece with carpet tape
 
keep going allen! you're past the point of no return on this project, she can't stop you now!!:rofl:

good work going into this one, and i'm happy to see that i'm not the only one who writes the name of the parts in chalk.:thumb:
 
Cutting the same part wrong 2 no 3 times? You'll get no comment from this peanut gallery:D Been down that road a time or two:thumb: If close the shop up early and come into the house and quietly sit down with an adult beverage of choice my LOML knows I've screwed up and doesn't even ask any more:rofl::rofl:

Welcome to the joys of woodworking 101:D

By the way I still measure twice and still screw up on occasion!
 
Great Job Allen, I have also made some of the same wrong cuts on the same piece myself. There is usually a lot of talking going on in my shop when that happens ..... even though I am out there all alone. Also many of the problems I have when doing a build like this one is solved while in bed. The answer comes in the middle of the night. Some times I have to get up and write down the idea so I will remember it when I wake in the morning. Ain't this sawdust making stuff fun.:rofl::rofl::D
 
Great Job Allen, I have also made some of the same wrong cuts on the same piece myself. There is usually a lot of talking going on in my shop when that happens ..... even though I am out there all alone. Also many of the problems I have when doing a build like this one is solved while in bed. The answer comes in the middle of the night. Some times I have to get up and write down the idea so I will remember it when I wake in the morning. Ain't this sawdust making stuff fun.:rofl::rofl::D

Allen, you're starting to amaze me again.

ron thats exactly what i referun too, sometimes what seemed to be a very stubborn obstical just feel in place while tryun to sleep, and so i to either mentioned it to the better half to remeber,,those feamles are better at remebering than us males:) or will write it down as well.. and allen your doing fine,, also for sanding that piece use a piece of the cut out stock to final sand with,, that already has your acrch and will avoid the humps and bumps you can get with the drum sanding...
 
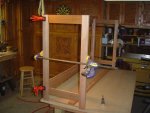
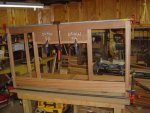
another update. I cut up all the MT joints and cut to size the rest of the face frame and fitted it nicely.
I made another huge error. I didnt allow for the tenon length when I figured out the numbers for the face frame stiles, making the center doors a bit wider than I originally planned. The numbers were right on my paper, I just ignored them and cut the mortises wrong, but cut all on top and bottom rails in the same spot, so although its not what I actually drew, my wife said its fine. I was about to flip over both rails and start remortising, but I cut the center rail accordingly, it all came together.
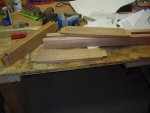
I cut the fake draw fronts, have to figure out what edge to put on them.
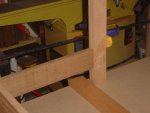
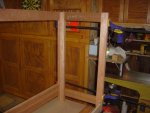
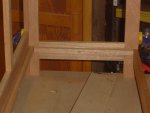
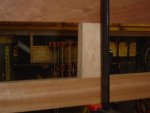
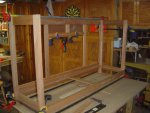
I finally got the back support rail in, and the cleats, (did not secure any of them, other than one screw to hold them up), the base of the cabinet will rest on the cleats, and on top of back bottom rail.
I dont think the bottom will bend at all, its going to be ply with support.
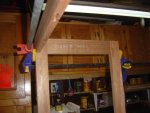
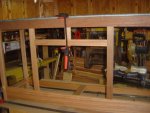
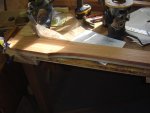
IM up to the front rail, I have to rethink my original cut, but Im not sure I wont ruin it, so I decided to have lunch and think about it.
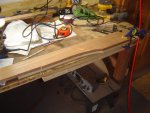
The word is chutzpah, I just dont have the chutzpah to make that cut, Id hate to ruin the piece at this point, and cutting a new bottom rail will set me back a week at least, gotta take out all the other equipment, so Ill sit here and frown over it. some pics where I am....if anyone cares to look.
one more thing , the design was simple, keep it simple stupid, always goes well for me, and Im going to use 1/2 inch overlay non mortise type hinges, probably a darkened bronze color, wraparound or half wraparound,I was going to make inset doors and drawers, but once my wife said she didnt want draws, well, and she thought the cabinet doors overlaying the face frame was beautiful, so thats what I did, made it that much easier for me.
 

Attachments

  • wood stuff 583 (Medium).jpg
    wood stuff 583 (Medium).jpg
    43.1 KB · Views: 28
  • wood stuff 582 (Medium).jpg
    wood stuff 582 (Medium).jpg
    37.2 KB · Views: 28
  • wood stuff 581 (Medium).jpg
    wood stuff 581 (Medium).jpg
    44.8 KB · Views: 34
  • wood stuff 580 (Medium).jpg
    wood stuff 580 (Medium).jpg
    64.9 KB · Views: 34
  • wood stuff 579 (Medium).jpg
    wood stuff 579 (Medium).jpg
    77.2 KB · Views: 34
  • wood stuff 578 (Medium).jpg
    wood stuff 578 (Medium).jpg
    66.4 KB · Views: 27
Last edited:
ok, so larrys idea sounded good to me, I wasnt going to make any drastic curve cuts or anything close, but I wanted something on the front rail.
Cut the pattern and sanded nicely using particle board.
only made a bit more than half the length since its straight in the middle.
Did one side, flipped the board, did the other, hey, it worked, so smooth, dont go accuse larry of just being another pretty face.

I gotta stop taking my camera downstairs, heres the end result, ofcourse, the picture at the end came out blurry,

thanks for the tip larry.
 

Attachments

  • wood stuff 584 (Medium).jpg
    wood stuff 584 (Medium).jpg
    52.6 KB · Views: 30
  • wood stuff 585 (Medium).jpg
    wood stuff 585 (Medium).jpg
    51.4 KB · Views: 29
  • wood stuff 586 (Medium).jpg
    wood stuff 586 (Medium).jpg
    68.8 KB · Views: 32
  • wood stuff 587 (Medium).jpg
    wood stuff 587 (Medium).jpg
    61.2 KB · Views: 35
hey alle n yur safe no and i mean no one will accuse me of being purty:) and as for the tip, i learned it the same way yu just did,, from someone else on here and buy doing it. so just one more time the family forum showed its stuff!!!
 
another tip I got off of someone here, sorry I dont remember who, but when I was running the boards through the tablesaw for tenons, I was dragging the wood against the wood on the fence the entire cut, kept getting hung up and off cuts. Now I push the wood off the fence(with the mitre handle), and the wood is free of the fence when passing over the blade. Simple solution yes, but I didnt have a grasp on this stuff yet.
Freuds 6 inch dado set, dont recall number, the one in the red plastic carrying handle, cuts all my tenons clean.
Deltas mortise attachment on the drill press does all the mortises.
 
Top