Terry Rodecker
Member
- Messages
- 156
- Location
- Oklahoma City, OK
It's been the better part of 12 years since I last built a clock. That one had a lot of scroll saw work in the cabinet but it got dropped while moving. Broke my heart.
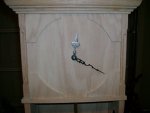
It wasn't built using any plans, just a rough idea I had that I scratched out on the back of a brown paper bag. The design changed as I went through the building process. I hadn't intended on adding the shoulders under the main clock cabinet but I wasn't getting enough stability in the lower portion so I added them in. The mortises where the columns meet the horizontal pieces were hand chiseled, my first real mortises. The columns themselves started out as square but that looked a little too much like mission furniture so my wife asked me to "round them out a bit". I've still got to cut a skirt for it but that won't take too long. My wife is picking out the color of stain then I'll finish it off with a few coats of hand rubbed poly.
I am having a problem with this one though. I can't figure out how I'm going to attach the crown molding. I went cheap and only used a 1x6 piece of red oak for the horizontal pieces. Milled down that's about a half inch. I want a bit of a reveal on the crown molding which leaves me only a quarter inch or so to affix it to the top of the clock. I built a brace for the back of the molding, beveled to match the angle of the molding. I was hoping that would give me a shelf to rest it on while the glue dried. It wasn't enough as gravity weighed in (no pun intended) and the molding kept leaning forward. In the 4th picture you can see where I even tried to put a brad in it to hold it on. My little electric nailer wasn't strong enough to get through the oak though. Right now it's just held on by some tape while I try to figure out a way to get it on there permanently. Any suggestions would be welcomed.


It wasn't built using any plans, just a rough idea I had that I scratched out on the back of a brown paper bag. The design changed as I went through the building process. I hadn't intended on adding the shoulders under the main clock cabinet but I wasn't getting enough stability in the lower portion so I added them in. The mortises where the columns meet the horizontal pieces were hand chiseled, my first real mortises. The columns themselves started out as square but that looked a little too much like mission furniture so my wife asked me to "round them out a bit".
I am having a problem with this one though. I can't figure out how I'm going to attach the crown molding. I went cheap and only used a 1x6 piece of red oak for the horizontal pieces. Milled down that's about a half inch. I want a bit of a reveal on the crown molding which leaves me only a quarter inch or so to affix it to the top of the clock. I built a brace for the back of the molding, beveled to match the angle of the molding. I was hoping that would give me a shelf to rest it on while the glue dried. It wasn't enough as gravity weighed in (no pun intended) and the molding kept leaning forward. In the 4th picture you can see where I even tried to put a brad in it to hold it on. My little electric nailer wasn't strong enough to get through the oak though. Right now it's just held on by some tape while I try to figure out a way to get it on there permanently. Any suggestions would be welcomed.


Last edited:

 What kind of face are you putting the clock?
