
Matt Hutchinson
Member
- Messages
- 438
- Location
- Grand Rapids, MI
Well, just for fun I thought I would give a photo tutorial of sphere turning.
Tools needed:
1.) Roughing Gouge
2.) Parting Tool
3.) Skew or Bowl Gouge
4.) Spindle Gouge
5.) Narrow Scraper/Hollowing Tool
6.) A Pencil/Colored Pencils
7.) Padding/PSA Foam Pads/PSA Sandpaper
8.) Sandpaper
9.) Utility/Spot Light
10.) Dividers
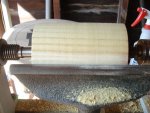
Photo #1:
First, rough out a cylinder between centers. The diameter of the cylinder will determine the diameter of the sphere. The larger the sphere (diameter), the easier it is to approach perfect roundness.
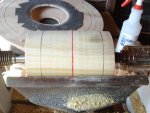
Photo #2:
Approximate the location of the center, and mark a line. This can be done with colored pencils to make it easier to keep track of the axis on which you are turning. Estimate the radius of the cylinder using dividers. Err on the generous side with this measurement, for the rough ball must not be shorter than the diameter marked in RED (that is, the width of the cylinder). Mark the two ends of the ball using the dividers and a pencil.
Photo #3:
Part off the material outside the lines.
Photo #4:
Now rough out the ball. This can be done with a spindle gouge, but in this photo I used a skew. Both work well, but a spindle gouge is always less nerve-racking. Be careful not to turn the rough ball too small, and use a radiused pattern if you have trouble seeing where the outside of the finished ball will be upon completion.
Tools needed:
1.) Roughing Gouge
2.) Parting Tool
3.) Skew or Bowl Gouge
4.) Spindle Gouge
5.) Narrow Scraper/Hollowing Tool
6.) A Pencil/Colored Pencils
7.) Padding/PSA Foam Pads/PSA Sandpaper
8.) Sandpaper
9.) Utility/Spot Light
10.) Dividers
Photo #1:
First, rough out a cylinder between centers. The diameter of the cylinder will determine the diameter of the sphere. The larger the sphere (diameter), the easier it is to approach perfect roundness.
Photo #2:
Approximate the location of the center, and mark a line. This can be done with colored pencils to make it easier to keep track of the axis on which you are turning. Estimate the radius of the cylinder using dividers. Err on the generous side with this measurement, for the rough ball must not be shorter than the diameter marked in RED (that is, the width of the cylinder). Mark the two ends of the ball using the dividers and a pencil.
Photo #3:
Part off the material outside the lines.
Photo #4:
Now rough out the ball. This can be done with a spindle gouge, but in this photo I used a skew. Both work well, but a spindle gouge is always less nerve-racking. Be careful not to turn the rough ball too small, and use a radiused pattern if you have trouble seeing where the outside of the finished ball will be upon completion.


")