
Rob Keeble
Member
- Messages
- 12,633
- Location
- GTA Ontario Canada
Hi All
Time and time again I get to thinking just how much of a role my high school played in my love of woodworking. So I thought as a little tribute to those who influenced me and took the time to get me enthusiastic about woodworking I would post a thread (which I would ask that you all to) that covers the projects you performed and what you gained from it all. Just maybe any "shop teachers" out there that happen to come across this thread might feel that even though it takes years to happen their work will be very much appreciated in later life.
So to give ya all a insight to my education seeing as though I hail from a different continent, let me start by explaining:
High School starts at what is essentially grade 8 in South Africa. Which means we have 5 years of high school not 4 as in Canada.
We called shop Industrial Arts and it comprised of us being taught three subjects through the course of the year.
Technical Drawing ( before the time of cad)
Metal Work
Woodworking.
Now after I think it was Grade 8 or nine you choose to follow either metal or woodworking all the way thru to grade 12.
I choose woodworking and here is a list of the projects we completed.
Strangely enough all the projects were made with the same hard wood called KIAAT. Pretty close to Mahogany.
1) Money box. - Very simple 4 pieces of wood butt jointed together and the sides covered with Formica and an acrylic plastic cover over the hole in the top drilled with a forstner bit.
2) Serving tray - Four sides of a tray cut out to a pattern using a fret saw or coping saw and then all four corners dovetailed together. Base was sheet of around 3/16 plywood to match the side rails.
3) Segmented Lamp - This consisted of 4 short lengths of wood all glued together to form the center column and another few pieces of thick stock glued together to form a base. We had to learn the “spinny thing” and turn the column and the base and put a tennon on the column and a hole in the base to match the tennon. Then drill the hole through the center from each end and put the wire and fitting on the end as well as switch and plug.
4) Small living room side table for holding say a drink. Here we got full boards and had to joint them and join them together and cut out a pattern and then on the underside cut mount a framework that held the legs together. This framework consisted of two pieces of wood crossed over each other with a joint achieved by cutting halfway through each piece. At the end of these cross pieces we had tennons cut to go into the tops of the legs which were cut from a pattern.
5) This was the real test year and we had to produce what was called a telephone table that incorporated much of what we had learnt all through the years. It consisted of a table top with a rebate around the edges. A draw with blind dovetails in the face and a frame that was put together with flat stock about 2.5 inches by say ½ wide using a combination of box joints and tennon joints both blind and through tennons. Then there had to be a seat which we had to upholster to the best of our abilities.
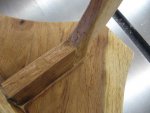
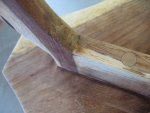
Unfortunately youth being what it is I only have two projects I retained. I gave two ( telephone table and serving tray) to a family members who disposed of them when they got in the way and somehow managed to hold onto the small serving table.
Well recently during the move of my shop from the basement to my new shop, my son dropped the serving table off the top of the workbench. It was on the workbench for repairs but landed in further pieces on the concrete floor. (the wood was now brittle and the legs thin.) We were almost going to throw it out but being the sentimental fool I am and the don’t throw anything away kinda squirrel I am I kept the pieces and have recently rehabilitated the serving table without having to use anything but glue. (I choose to use polyurethane glue to fill the gaps in the tennons that snapped splintering the joints.
So here is a picture I took to prove at least one of the projects and the repair took place.
Maybe you would like to add your own high school shop projects to the list.")
Oh and a big thanks to all the guys out there that teach shop. Without your wonderful influence I would not have this great hobby and all you great woodworking friends.
Oh and one more thing, I know in our society we have come ways away from corporal punishment but I happen to come from a generation that was canned when we did stupid things. One of which was not returning a tool to the correct place after we have finished using it. Another was cleaning up after I made a mess. So if you see pictures in future of my shop, please understand I don’t want my teachers coming and canning me again.
And a last thing, I a still sanding this table intent on putting a new coat on it so dont judge the finish please.
Time and time again I get to thinking just how much of a role my high school played in my love of woodworking. So I thought as a little tribute to those who influenced me and took the time to get me enthusiastic about woodworking I would post a thread (which I would ask that you all to) that covers the projects you performed and what you gained from it all. Just maybe any "shop teachers" out there that happen to come across this thread might feel that even though it takes years to happen their work will be very much appreciated in later life.
So to give ya all a insight to my education seeing as though I hail from a different continent, let me start by explaining:
High School starts at what is essentially grade 8 in South Africa. Which means we have 5 years of high school not 4 as in Canada.
We called shop Industrial Arts and it comprised of us being taught three subjects through the course of the year.
Technical Drawing ( before the time of cad)
Metal Work
Woodworking.
Now after I think it was Grade 8 or nine you choose to follow either metal or woodworking all the way thru to grade 12.
I choose woodworking and here is a list of the projects we completed.
Strangely enough all the projects were made with the same hard wood called KIAAT. Pretty close to Mahogany.
1) Money box. - Very simple 4 pieces of wood butt jointed together and the sides covered with Formica and an acrylic plastic cover over the hole in the top drilled with a forstner bit.
2) Serving tray - Four sides of a tray cut out to a pattern using a fret saw or coping saw and then all four corners dovetailed together. Base was sheet of around 3/16 plywood to match the side rails.
3) Segmented Lamp - This consisted of 4 short lengths of wood all glued together to form the center column and another few pieces of thick stock glued together to form a base. We had to learn the “spinny thing” and turn the column and the base and put a tennon on the column and a hole in the base to match the tennon. Then drill the hole through the center from each end and put the wire and fitting on the end as well as switch and plug.
4) Small living room side table for holding say a drink. Here we got full boards and had to joint them and join them together and cut out a pattern and then on the underside cut mount a framework that held the legs together. This framework consisted of two pieces of wood crossed over each other with a joint achieved by cutting halfway through each piece. At the end of these cross pieces we had tennons cut to go into the tops of the legs which were cut from a pattern.
5) This was the real test year and we had to produce what was called a telephone table that incorporated much of what we had learnt all through the years. It consisted of a table top with a rebate around the edges. A draw with blind dovetails in the face and a frame that was put together with flat stock about 2.5 inches by say ½ wide using a combination of box joints and tennon joints both blind and through tennons. Then there had to be a seat which we had to upholster to the best of our abilities.
Unfortunately youth being what it is I only have two projects I retained. I gave two ( telephone table and serving tray) to a family members who disposed of them when they got in the way and somehow managed to hold onto the small serving table.
Well recently during the move of my shop from the basement to my new shop, my son dropped the serving table off the top of the workbench. It was on the workbench for repairs but landed in further pieces on the concrete floor. (the wood was now brittle and the legs thin.) We were almost going to throw it out but being the sentimental fool I am and the don’t throw anything away kinda squirrel I am I kept the pieces and have recently rehabilitated the serving table without having to use anything but glue. (I choose to use polyurethane glue to fill the gaps in the tennons that snapped splintering the joints.
So here is a picture I took to prove at least one of the projects and the repair took place.
Maybe you would like to add your own high school shop projects to the list.
Oh and a big thanks to all the guys out there that teach shop. Without your wonderful influence I would not have this great hobby and all you great woodworking friends.
Oh and one more thing, I know in our society we have come ways away from corporal punishment but I happen to come from a generation that was canned when we did stupid things. One of which was not returning a tool to the correct place after we have finished using it. Another was cleaning up after I made a mess. So if you see pictures in future of my shop, please understand I don’t want my teachers coming and canning me again.
And a last thing, I a still sanding this table intent on putting a new coat on it so dont judge the finish please.


 I too really appreciated both the regular shop class time and also the many days of afterschool I put into the shop. At the risk of greatly disappointing Larry, I have to confess to having the most enjoyment from playing with the lathe. All I did was make a turned cylinder, but fairly symmetrical - if I can find it (probably stored at my folks somewhere) I'll cut it in half and make a moreorless matching set of candleholders.