
Mike Henderson
Member
- Messages
- 1,405
- Location
- Villa Park, CA
Originally Posted In This Thread.
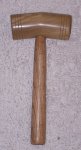
Okay, Rob. Here are a few pictures of the process. There's a back story on this mallet. Tomorrow I'm being interviewed at Cerritos College for the position of part time instructor in the Woodworking Department. For part of the interview, I have to give a five minute lecture on a subject. They gave me four options and one of them was offset turning, which I chose. I'm mainly a spindle turner because I do turning for furniture so I developed the idea for this mallet since it's spindle turning but offset.
Start with a block of wood that's significantly larger than the mallet head you want. I used poplar here because I have to have samples of the steps along the way so I chose a cheap wood. For a real mallet, use a better wood than poplar.

Note that I've squared the ends - cut them off on the miter saw really - then used the ends to draw a line along one side in the middle of the block. I've taken the line down both faces. Then, mark the center on each end, and along the top of the block.
On each side of the center mark on each end, I put two additional marks. These will be your offset centers. I spaced them 5/16" from the center but 1/4" will do. The more the offset, the more "bent" the mallet will be.

Then drill a hole through the top of the block. I think I used a 3/4" drill but 7/8" would be okay, also. This is where your handle will go.


Now, put the block in your lathe, using the primary center marks, and turn it round.

Once you have it round, reset the blank in your lathe on to one set of offset marks. That is, put your headstock point up by 5/16" and the tailstock point down by 5/16". When you turn the lathe on, the blank will be wobbling.

I used a roughing gouge to turn half the head round again. This will reduce the size of the blank quite a bit, which is why I said to start with a fair sized blank. Turn that half straight, not tapered. I used a pair of calipers to check the diameter all along the half.

Then use a parting tool (you could also use a spindle gouge) to flatten the face.

Then do the same on the other side. You will have to sand the faces of the mallet head to get rid of the part you couldn't part off. Also, this leaves the center marks on the mallet face. You could make the head longer and cut the faces on your miter saw when you finish if you want to get rid of those marks. Note that the face is square to the half side of the mallet so when you put it in the CMS just make sure you register it correctly. But it's a mallet and the marks will disappear with any use at all.

When turning half, stop every now and again and see how you're doing in reference to the hole for the handle. I used the "top" hole as a guide and turned to about the middle of the top hole. This overdoes the bottom but you can sand it out.
Next, turn a handle. Just sneak up on the 3/4" part that goes into the hole - you want it tight. I actually did offset turning on the bottom of the handle so it would be an oval but I didn't take any pictures of that.
If you fit the handle into the hole tightly, you won't be able to drive a wedge in without cutting a V shaped notch in the top of the handle. Make a wedge.
Spread glue, put the handle in, put a small amount of glue on the wedge and drive it in. Set aside to allow the glue to set.
When well set, cut the excess of the handle off (the top) and sand smooth.
You now have an offset wooden mallet.

Mike
Okay, Rob. Here are a few pictures of the process. There's a back story on this mallet. Tomorrow I'm being interviewed at Cerritos College for the position of part time instructor in the Woodworking Department. For part of the interview, I have to give a five minute lecture on a subject. They gave me four options and one of them was offset turning, which I chose. I'm mainly a spindle turner because I do turning for furniture so I developed the idea for this mallet since it's spindle turning but offset.
Start with a block of wood that's significantly larger than the mallet head you want. I used poplar here because I have to have samples of the steps along the way so I chose a cheap wood. For a real mallet, use a better wood than poplar.
Note that I've squared the ends - cut them off on the miter saw really - then used the ends to draw a line along one side in the middle of the block. I've taken the line down both faces. Then, mark the center on each end, and along the top of the block.
On each side of the center mark on each end, I put two additional marks. These will be your offset centers. I spaced them 5/16" from the center but 1/4" will do. The more the offset, the more "bent" the mallet will be.
Then drill a hole through the top of the block. I think I used a 3/4" drill but 7/8" would be okay, also. This is where your handle will go.
Now, put the block in your lathe, using the primary center marks, and turn it round.
Once you have it round, reset the blank in your lathe on to one set of offset marks. That is, put your headstock point up by 5/16" and the tailstock point down by 5/16". When you turn the lathe on, the blank will be wobbling.
I used a roughing gouge to turn half the head round again. This will reduce the size of the blank quite a bit, which is why I said to start with a fair sized blank. Turn that half straight, not tapered. I used a pair of calipers to check the diameter all along the half.
Then use a parting tool (you could also use a spindle gouge) to flatten the face.
Then do the same on the other side. You will have to sand the faces of the mallet head to get rid of the part you couldn't part off. Also, this leaves the center marks on the mallet face. You could make the head longer and cut the faces on your miter saw when you finish if you want to get rid of those marks. Note that the face is square to the half side of the mallet so when you put it in the CMS just make sure you register it correctly. But it's a mallet and the marks will disappear with any use at all.
When turning half, stop every now and again and see how you're doing in reference to the hole for the handle. I used the "top" hole as a guide and turned to about the middle of the top hole. This overdoes the bottom but you can sand it out.
Next, turn a handle. Just sneak up on the 3/4" part that goes into the hole - you want it tight. I actually did offset turning on the bottom of the handle so it would be an oval but I didn't take any pictures of that.
If you fit the handle into the hole tightly, you won't be able to drive a wedge in without cutting a V shaped notch in the top of the handle. Make a wedge.
Spread glue, put the handle in, put a small amount of glue on the wedge and drive it in. Set aside to allow the glue to set.
When well set, cut the excess of the handle off (the top) and sand smooth.
You now have an offset wooden mallet.
Mike
Attachments
Last edited by a moderator: