
I saw a cool Japanese hammer on ebay and was lucky enough to have the winning bid. After the hammer arrive, I noticed the hammer head was kinda loose on the handle. 
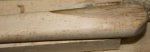
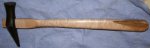
Someone had put a small screw into the top portion of the handle that exits through the top of the head. This did what most of would expect, it split the handle. I thought about it for a while and knew I wouldn't be happy with the hammer as it was. I dug around in my cut-off bin and found a piece of birds-eye maple that was longer than needed and correct width and height.
I laid the original hammer handle onto the blank and just penciled along both sides, from the top and then from the side view so I'd have something similar, as the old one was ok in the hand. I trimmed along the lines on my bandsaw to get the rough shape going. The original had sort of facets running the length of the handle, so I drew in the guide lines freehand so I'd know when I was getting close. I used the verticle belt sander to bring it down to the lines. The upper middle portion of the handle was more rounded on the original so I used some rasps to again get to the shape I was after. I sanded, working my way through the grits until I finished with 600 grit. I applied some wax and buffed to a nice shine. The top portion of the handle was kinda fun fitting to the head. I again used the original as a guide, since it was almost right on for the cheek to cheek dimensions. I trimmed the cheeks on the bandsaw and worked them to the exact dimension using my rasp and sand paper. Once it was showing signs of fitting, from cheek to cheek, I again used the rasp to remove extremely small amounts of wood on the other two faces until it fit like a glove. I left the extra material that protruded through the head as it isn't really getting in the way. I may cut the excess off, in the future, if the head gets a little loose so I can insert a wedge. As of now, there is no sign of shrinkage and the wood had been in my shop for over a year so I'm hopeful there won't be any changes anytime soon.
Thanks for checking out the post.
Attachments
-
 Old vs New handle.jpg33.7 KB · Views: 54
 -
 new vs old neck area.jpg66.6 KB · Views: 45
 -
 Handle end closeup.jpg32.5 KB · Views: 43
 -
 Smoother comparison.jpg50.5 KB · Views: 43
 -
 Smooth handle end.jpg32.4 KB · Views: 39
 -
 handle shaping up.jpg30.5 KB · Views: 37
 -
 smooth neck birds eye.jpg22.5 KB · Views: 34
 -
 all but installed vs old.jpg36.8 KB · Views: 34
 -
 Finished J hammer.jpg32.5 KB · Views: 52
