Longworth Chuck and my intentions Further UPDATE March 2010

Rob Keeble

Member
Messages
12,633
Location
GTA Ontario Canada
So I made my own and here are a few pictures of my attempt.

homemade adapter nut.jpg

1" nut ex HD (was a nylock nut had to be modified)

adapter nut mounter on stand off disc.jpg

Made a extender to get the chuck away from the motor because of this
gap between wing nuts and motor.jpgclose up of gap.jpg

Here the whole thing is mounted onto the rear plate of the chuck
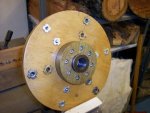
longworth chuck adapter.jpg

The assembled chuck longworth chuck assembled.jpg

What it looks like mounted on the lathe with the clearance to the bedLongworth chuck over lathe bed.jpg

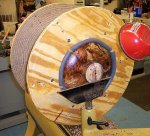
Now what i intend to use it for . A bowl where i have removed the base and have turned an inset to act as a replacement base.bowl mounted.jpg insert  intended for base.jpg

A view inside the bowl with the insert laying loose undeneath.inside bowl view .jpg

Of course with the wobble i get cutting out the bottom of the bowl was interesting but fun.:D

Ok thoughts and comments go to town.

P>S> Still have to put finger holes into each side of the chuck to aid in tightening.
 
Last edited:
Looks good Rob, but I have a couple of concerns.

First, I suspect some of the wobble you're seeing is because the nut is not seating firmly on the shoulders of the spindle. You only have six small points of contact, and there's a good chance they're not exactly the same height. How those two parts mate up is pretty critical, and the more surface area that makes contact, the better.

Rob's Longworth Chuck 1.jpg

I'm also a bit worried about the length of the screws holding that nut onto your extender. From the looks of the pictures, it appears there is no more than about 1/2" of thread going into the extender, and it's a small, fine thread too. Not a real robust hold, especially going into softwood (assuming the extended is pine or fir). I believe most of the folks using the nut and extender approach are inlaying the nut into the extender, then epoxying it into place. You'd need a taller extender to achieve the same standoff, but it'd give you a more secure attachment to the lathe.

Those issues aside, it looks like you've done a fine job on the rest of the chuck. They are very handy accessories. Isn't it cool watching the rubber bumpers move in and out?
 
Thanks for your feedback I appreciate your experience. My engineering brain was sounding every alarm in the book when i built this. I was hoping to use a proper adapter but the article i built it off used the nut so i was bent on trying to do the same. When it came to drilling the nut etc and i realised the thickness of the screws boy I was not ammused. I am a but like Larry (When in doubt build it stout). This designed seemed to go against the grain. But with the number of screws its quiet secure and that is ash by the way. There are screws into the ash from the other side of the first faceplate.

But now you mention the points you have I will revamp it and make a new spacer block and think about countersinking the screws and then expoxy the whole thing into the spacer block. Also maybe make a new spacer on the spindle.

Yup those rubber bobbins moving in and out are cool. I like making goodies like this as much as the woodwork. :thumb::D

Maybe with the mods I will feel more comfortable using it. :D
 
Last edited:
Yeppers, the ash will be more stout than softwood. The skinny screws are still a concern though, since they don't offer a lot of shear strength in the event of a catch. The screws coming into the extender from the back plate of the chuck are probably fine, but the ones through the nut are the weak link in the chain. ;)

For the Longworth chuck I made a few years ago, I used an aluminum faceplate from Don Pencil. Check the link on his homepage for "Seconds & Blems"...he's got 1" x 2" faceplates for $8.00. I've bought several of his "seconds", and they are all mechanically perfect. (The anodization might be munged, but that doesn't affect the functionality.)
 
You are right about those screws Vaughn. Just got back from taking my son to Rugby and on the way i was thinking, :rofl: (yeah i can do that before i get one in the neck) that i will get another nut and this time countersink and use a thicker machine screw with thicker shaft and drop them beneath the nut surface.

I know about the aluminum faceplates, I actuall have one i got from LV.

In this case i was trying to do it all according to the article and "homemade" for the fun of it. :D But thanks alot of pointer in regards the seconds. That sure makes it cheap.

Interestingly when i first drilled through the nut I did not even think the walls were going to be thick enough. Those are number 6 screws.

I would feel a lot safer with something like this if i had variable speed drive. With the reeves drive you start off at too high a speed at the lowest setting for my comfort. :)

Positive side to buying a cheap lathe, you really know what you want in the upgrade and know what to look for. :rofl::rofl:
 
Rob I made some vacuum chucks for my lathe using big 1 X 8 nuts. What I did was draw a outline on the back of 2 X 6 round piece of maple. I use a forstner bit to drill down on the inside of my lines. The depth was about 2/3's of the nut. Then I took a wood chisel and cut the corners out that I traced from the nut just so the nut fit tight in the hole. I epoxied the nut in the hole then mounted it on the lathe once dried. I trued up the maple to run true. I drilled a hole for the vacuum to work but you wouldn't need to. They run as true as they come. I am on vacation with the grandkids. I could take pic's when I get back next week.
 
Brilliant idea Bernie ...Thanks :thumb:why didnt i think of that:bang: Would have saved myself the pleasure of drilling those screw holes.:D

I will get another piece of ash going and try your idea. But first i am going to source a new nut.

You got any ideas like that for my other post on the tailstock movement. Vaughn came up with shims.
 
Hi gents new here although a floater for some time

Rob a question why only 5 hold points not 4 or 6??

Another way would have been to drill from the wood side through to the nut countersink into the wood using screws with thread's not wood screws of course.

Ray
 
Raymond I was going to have 4 but then my geometry did not work out so it became 5. You can have as many as you want.

Don you made the right decision to buy the mounting plate. I have one but was having a go at improvising and being cheap. Funny thing is at HD prices when i was finished with all the wasted bits (you wont believe what they charge here for a 1"x8 nut) I could have bought an nice ali one from LV.:(

I blame it all on Stu.:rofl: He woke me up to the adventure i used to have back in the old days, making my own things. :D:thumb: Its much more fun.

Some day I will grow up but not before i have a welder, milling machine and metal lathe to add to the shop.:rofl:
 
Rob, I presume you have a standard 4-jaw self centering chuck, I fitted a Beech dovetail socket on the back of my longworth chuck, that way I don't have remove my chuck to fit it and the wood to wood joint is strengthened with PVA glue.
 
Thanks Chas now why didnt i think of that. Too busy following someone elses plans.:rofl::rofl: I think thats a great solution and will try that out instead of all the nuts that are driving me nuts.:rofl::thumb:
 
Rob, here is a pic of how I did my donut chuck spindle adapter. The 1" x 8 tpi flanged nut is West System epoxied into the Poplar , which is screwed and glued onto the plywood. Been working fine for nearly 4 years, and I just added a 20" diameter ring of countertop MDF, and a 1 1/4" x 8tpi to 1" x 8tpi PSI spindle adapter, to adapt to my PM3520B. It all works great, and turnings in the donut chuck do not ever try to go into a low Earth (or shop) orbit.
 

Attachments

  • Gils Donut ChuckBack.JPG
    Gils Donut ChuckBack.JPG
    82.6 KB · Views: 42
  • Copy of 100_3712.JPG
    Copy of 100_3712.JPG
    69.5 KB · Views: 41
  • Copy of 100_3710.JPG
    Copy of 100_3710.JPG
    86.4 KB · Views: 42
Last edited:
Update !!!

Well after the idea that Chas gave me I tried out the longworth chuck in the proper chuck jaws.:eek: Wow what a confusing bunch of words.:rofl:

Best use a pictureIMG_3123.jpgIMG_3125.jpg

Well this was a case of one thing led to another so i mounted the cherry bowl some of you will remember prompted the longworth chuck build and managed with the new found reduced wobble to turn the edge good enough to get the walnut blank i have turned to fit into it.

cherry bowl bottom with walnut insert.jpgcherry bowl inside with walnut blank to be reduced.jpg

So next i will take out all the excess in the base of the bowl and finish the project. I am looking forward to seeing how this finishes up. Stay tuned.:):thumb:
 
Uh ... Rob? You might want to shave a good bit off the tenon that's being gripped by the scroll chuck in the first 2 pics. Having the tenon "bottom out" in the scroll chuck is OK, but having the scroll chuck jaws "bottom out" against the face of the Longworth chuck would be even better.

Unless ... is the extra tenon length necessary to keep the wing nuts and threaded rod from hitting the motor or something? If not, the extra length just serves as a "torque multiplier" for your gouge, making it easier to knock the whole Longworth chuck off-kilter if you experience a decent catch.

I like the look of your 5-banger chuck. Something about odd numbers, I guess.... :thumb:
 
Uh ... You might want to shave a good bit off the tenon that's being gripped by the scroll chuck in the first 2 pics. Having the tenon "bottom out" in the scroll chuck is OK, but having the scroll chuck jaws "bottom out" against the face of the Longworth chuck would be even better...

I concur. Here's a rough sketch to describe what Kerry's suggesting.

Tenon Chuck.jpg

Didja get this bowl done yet, Rob?
 
Hi Guys

Well I had a duh oh moment with this chuck. Something of a blindspot. I was not too happy with the wobble so i left the whole thing alone.

Then privately i Pmed Chas and he made me see the light. Just like Kerry and you have done Vaughn. I had been trying to grip the tennon in the chuck rather than using the face of the chuck.

So its the 3rd in line aircraft to land on my shop runway after the Workbench is completed and LOML jewelry chest. Dont want her thinking she is forgotten now do we.:D But the bowl is part of a challenge of being able to do the insert properly.

My lathe just has me a little disapointed with it right now. I even went to Busy Bee Tools to check out the latest shipment and they seem to have improved the quality over the version i bought. I will get over it and then get back to trying to finish the bowl. Did enjoy making the Longworth Chuck and its a great kick to play with rotating those plates and seeing the knobs move in and out.

Thanks for the tips guys. Has been a great learning experience.:D:thumb:
 
Update March 2010

Well like many of you I am working through a list of wanna and gotta and can do's.

So this one finally got on the list after I got over it with my lathe. :rofl: I think I was sulking just a little to let it know i wasnt happy with its performance.

But having being told a bad workman always blames his tools i was determined to be a little different so here is the finally finished article made by using the dangerous longworth Chuck which i fixed according to the assistance i got here but it still wobbles. So someday i might build a completely new one.

Larry the center piece is a piece of your walnut.:thumb:
Cherry walnut 1.jpgCherry Walnut 2.jpgCherry Walnut side.jpg

Well thats one done and complete. My first experience with wipe on Poly.

I know you guys all have different tastes but i had to try this stuff out. I can see why you dont like the shiny spinny stuff but well what the heck it aint no Picasso.
 
Top