
Dan Mosley
Member
- Messages
- 1,169
- Location
- Palm Springs, Ca
With work slow i got the day off today and decided to finish up a couple projects so i thought i would post the pictures and comments. Let me know your thoughts and I always appreciate the advice on here.
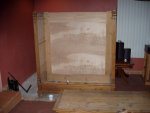
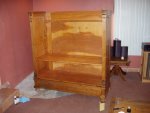
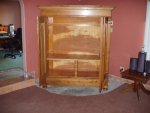
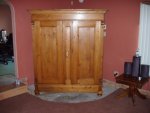
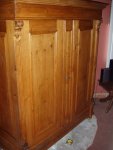
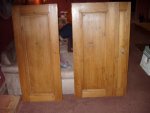
Pictures 1-6 --- I got this antique armoire from a estate sale for $125 in about 8 pc's but all the pc's were there and I thought it would be a fun project. It had its headaches like nothing aligned properly even when you squared it up - I suppose it had warpped over the years and without destroying it by cutting and planning i decided to tweak and play around with it until i got it aligned the best i could then glued it up slowly a couple pc's at a time over several days just to ensure that I didnt screw up the opening and closing of the doors (put them on and off countless times to check). I built a shelf out of lower grade pine board from Home Depot with small oak 2x2's for support (they were on sale), bought some hard wood backing from Home Depot and replaced the original that was severly cracked and missing a section. The wood on the unit was split in different areas - both small and large but i was able to glue them back perfectly using bar clamps (no fillers were used). The doors were the largest challange because they didnt align but i took off the pin type old hinges and saw they were bent up bad so i straighten them back out and replaced them which made the door on the left shut perfectly - the door on the right drags a bit on the base if you shut it all the way-- but ill live with it - I decided not to try to plane it or hand plane etc -because i am not any good at it.
In Picture 3 - I made a Spindle type post for support because now im going to put a big screen in it. I can add another shelf later in the upper portion if i decide or leave it alone.
Pictures 4 and 6 show the unit finished - Thanks to all and the suggestions on the finish work - I rubbed it down with alcohol (assuming shellac was originally used), stained up the pine i bought to match , then touched it up here and there as the wood itself was in good shape, two coats of Danish oil, hand rubbed down and Wallllllllla........Thanks to all for the advice.
probably wondering what does it have to do with turning hugh ? well i did make the spindle support on the lathe .....LOL
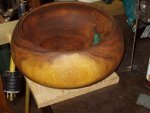
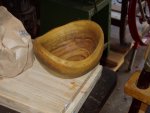
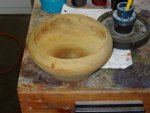
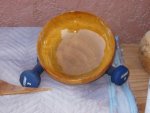
Pictures 7-10 are some bowls that i have just started the finish work on .
Picture 7 - Large mesquite bowl with a small inlay of stone where there was a bad rotten spot going deep into the wood - oil soaked in
Linseed/Mineral/Varnish mixture for 1 week and two additional wet sanded coats of Danish oil - now in drying stage.
Picture 8 small natural edge bowl unknown wood - oil soaked for 4 days and drying out now for a few days ant then whatever i think of next for the
finish.....very dull looking .......any suggestions ?
Picture 9 small bowl unknown wood - oil soaked for 4 days also and drying out. Again not sure how to finish it yet but it seems very bland and dull even
after the oil soaking......Thoughts ?
Picture 10 medium size pine bowl that was soaked for a week in Linseed/Mineral/Varnish mixture - dried for a week and now getting several coats of
spary on Laquer. This one is looking very good with the finish.
Pictures 1-6 --- I got this antique armoire from a estate sale for $125 in about 8 pc's but all the pc's were there and I thought it would be a fun project. It had its headaches like nothing aligned properly even when you squared it up - I suppose it had warpped over the years and without destroying it by cutting and planning i decided to tweak and play around with it until i got it aligned the best i could then glued it up slowly a couple pc's at a time over several days just to ensure that I didnt screw up the opening and closing of the doors (put them on and off countless times to check). I built a shelf out of lower grade pine board from Home Depot with small oak 2x2's for support (they were on sale), bought some hard wood backing from Home Depot and replaced the original that was severly cracked and missing a section. The wood on the unit was split in different areas - both small and large but i was able to glue them back perfectly using bar clamps (no fillers were used). The doors were the largest challange because they didnt align but i took off the pin type old hinges and saw they were bent up bad so i straighten them back out and replaced them which made the door on the left shut perfectly - the door on the right drags a bit on the base if you shut it all the way-- but ill live with it - I decided not to try to plane it or hand plane etc -because i am not any good at it.
In Picture 3 - I made a Spindle type post for support because now im going to put a big screen in it. I can add another shelf later in the upper portion if i decide or leave it alone.
Pictures 4 and 6 show the unit finished - Thanks to all and the suggestions on the finish work - I rubbed it down with alcohol (assuming shellac was originally used), stained up the pine i bought to match , then touched it up here and there as the wood itself was in good shape, two coats of Danish oil, hand rubbed down and Wallllllllla........Thanks to all for the advice.
probably wondering what does it have to do with turning hugh ? well i did make the spindle support on the lathe .....LOL
Pictures 7-10 are some bowls that i have just started the finish work on .
Picture 7 - Large mesquite bowl with a small inlay of stone where there was a bad rotten spot going deep into the wood - oil soaked in
Linseed/Mineral/Varnish mixture for 1 week and two additional wet sanded coats of Danish oil - now in drying stage.
Picture 8 small natural edge bowl unknown wood - oil soaked for 4 days and drying out now for a few days ant then whatever i think of next for the
finish.....very dull looking .......any suggestions ?
Picture 9 small bowl unknown wood - oil soaked for 4 days also and drying out. Again not sure how to finish it yet but it seems very bland and dull even
after the oil soaking......Thoughts ?
Picture 10 medium size pine bowl that was soaked for a week in Linseed/Mineral/Varnish mixture - dried for a week and now getting several coats of
spary on Laquer. This one is looking very good with the finish.
Attachments
-
 Unit-2.jpg43.1 KB · Views: 27
 -
 Unit-5.jpg50.7 KB · Views: 21
 -
 unit-7.jpg54.2 KB · Views: 24
 -
 unit-6.jpg44.6 KB · Views: 26
 -
 unit-10.jpg55.5 KB · Views: 25
 -
 Doors.jpg45.9 KB · Views: 19
 -
 Large-1 (600 x 450).jpg60.1 KB · Views: 27
 -
 Large-2 (600 x 450).jpg54.6 KB · Views: 27
 -
 Large-3 (600 x 450).jpg63.5 KB · Views: 26
 -
 Large-5 Finish (600 x 450).jpg49.7 KB · Views: 28
 Dunno what to suggest on the matte-finish bowls...I don't have any experience with the oil soaking method.