- Messages
- 36,134
- Location
- ABQ NM
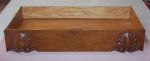
Wow, the repair came out looking great, Rick.  Amazing what a little patience and a few sharp tools can do, huh?
No suggestions on the brass hardware question. Maybe Dave Hawksford will see this and have some ideas.
Amazing what a little patience and a few sharp tools can do, huh?No suggestions on the brass hardware question. Maybe Dave Hawksford will see this and have some ideas.