
Dan Mosley
Member
- Messages
- 1,169
- Location
- Palm Springs, Ca
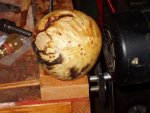
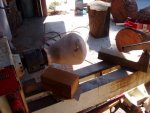
Today was day 2 with the new hollowing rig and i took my lap top to the garage and with the pic Vaughn sent and the directions sent i had it together real fast. The wood i chucked up yesterday was still in the chuck and rough hollowed now. Now on to my first attempt at hollowing with a narrow opening.
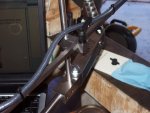
I tightened up everything and taped a buss card to the underside of the cutting tip (see pic) and set the laser out just in front of it about 1/8" at a guess and started hollowing with the straight tip. Started in thirds and roughed as much as i could to the bottom. I could tell right off the bat i need get used to the tool and technique. It cut fine and would let me know when i cut at the wrong angle but jumping a bit but as soon as i lined it back up in the form it would cut but it was a bumpy ride (this was a very dry pc of wood and i should have used a green pc to start but i didnt ..........ohhh well)...taking small cuts i did as much as i could to the bottom where it really got bumpy but still cutting my way along (probably technique and very dry wood).
I was going to give up for awhile and go rest my leg (out of work with injured muscle in leg so i cant stand for long periods of time). My wife asked if i could sit on a old wood barstool we had and that way i could keep playing with it............hummmm not sure but i gave it a try.......perfect height so i put together the angle cutting tip and put it on the rig and started in again.
This is where i ran into trouble - cutting in thirds and starting at the rim and going down the first third was not to bad.
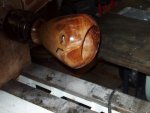
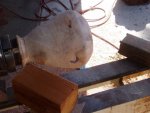
I thought that as long as the laser dot was showing on the wood (showing on the top at first) i was fine and that as it starts to drop off the side is when you want to slow down and be careful.....guess i was wrong....the dot still touching the side but i cut thru the wall just a bit. I stopped the lathe and checked the turning and rechecked the laser and cutting tip and all was ok...
Not sure what im doing wrong any ideas ?????
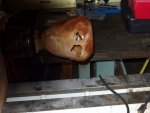
Next i just finihed with the angle cutter and leveled out the inside to about 1/8 inch. Then using my Foredom tool i enhanced the hole and touched up the edges and started sanding. I finished off at 220 for this pc and put a couple coats of antique oil on it and left it on the lathe until tomm.
Pic-8 is the one i turned in the class i took on hollowing that im just now getting around to finish.......
Stay tuned for day three....................LOL thanks Dan
I tightened up everything and taped a buss card to the underside of the cutting tip (see pic) and set the laser out just in front of it about 1/8" at a guess and started hollowing with the straight tip. Started in thirds and roughed as much as i could to the bottom. I could tell right off the bat i need get used to the tool and technique. It cut fine and would let me know when i cut at the wrong angle but jumping a bit but as soon as i lined it back up in the form it would cut but it was a bumpy ride (this was a very dry pc of wood and i should have used a green pc to start but i didnt ..........ohhh well)...taking small cuts i did as much as i could to the bottom where it really got bumpy but still cutting my way along (probably technique and very dry wood).
I was going to give up for awhile and go rest my leg (out of work with injured muscle in leg so i cant stand for long periods of time). My wife asked if i could sit on a old wood barstool we had and that way i could keep playing with it............hummmm not sure but i gave it a try.......perfect height so i put together the angle cutting tip and put it on the rig and started in again.
This is where i ran into trouble - cutting in thirds and starting at the rim and going down the first third was not to bad.
I thought that as long as the laser dot was showing on the wood (showing on the top at first) i was fine and that as it starts to drop off the side is when you want to slow down and be careful.....guess i was wrong....the dot still touching the side but i cut thru the wall just a bit. I stopped the lathe and checked the turning and rechecked the laser and cutting tip and all was ok...
Not sure what im doing wrong any ideas ?????
Next i just finihed with the angle cutter and leveled out the inside to about 1/8 inch. Then using my Foredom tool i enhanced the hole and touched up the edges and started sanding. I finished off at 220 for this pc and put a couple coats of antique oil on it and left it on the lathe until tomm.
Pic-8 is the one i turned in the class i took on hollowing that im just now getting around to finish.......
Stay tuned for day three....................LOL thanks Dan
Attachments


Last edited:

")
