
Dan Mosley
Member
- Messages
- 1,169
- Location
- Palm Springs, Ca
Today i had some time to play in the garage with the hollowing rig again and completed another turning with some of the tips from Vaughn and Bernie.
I mounted up a pc of mesquite ("Dry")and turned the form and reversed, drilled, and roughed out the interior with my Ci1. Then i set up the hollowing rig and this time i wanted to try the angle cutter so i aligned the laser dot with the side of the cutter at about 1/4" away from the tool. i started slowly cutting from the tip in slowly. I stopped just before the shoulder going in checked my laser position, then again at the shoulder going around the curve and down, then again at the start of the walls past the shoulder, then at the bottom curve where it transitions to the bottom.
Without thinking about what i was doing truthfully i finished the entire hollow form without changing cutters. The inside and bottom were very smooth and i was basically done except for some final sanding and finishing.
So here are my observations so far after turning 2 holllow forms with the Monster Rig.
- Checking and repositioning the laser to the part of the cutting tool that is actually going to hit the wood frequently as you guys suggested works great.
- I made the hole in the hollow form just big enough so the ange cutter would fit in...In the case of the angle cutter (see pic) the cutter's bit is long and i was not about to cut it down so i just made the hole a bit bigger so i could get it to go in at a angle.
- Frequent stops to blow out chips or you get alot of chatter and jumps in the cutting.
- After going from top to bottom i made another pass - very lightly to clean up marks and to try to get as smooth of a finish as i could. The bottom curve of the form going to the very bottom was a bit more difficult for me but completed.
- Setting the laser as you suggested kept me safely away from going thru the side wall and i ended with a wall thickness of 1/8 fairly consistent
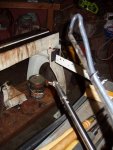
Pic 1 - shows angle cutting tip
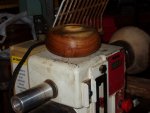
Pic 2 - Second hollow form with just angle cutter
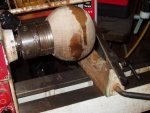
Pic 3 - Tomm. hollow form - Walnut
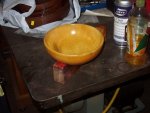
Pic 4 - A finished Holly bowl from past work
Pic 5 - Yesterday's First hollow form i turned now finished
I mounted up a pc of mesquite ("Dry")and turned the form and reversed, drilled, and roughed out the interior with my Ci1. Then i set up the hollowing rig and this time i wanted to try the angle cutter so i aligned the laser dot with the side of the cutter at about 1/4" away from the tool. i started slowly cutting from the tip in slowly. I stopped just before the shoulder going in checked my laser position, then again at the shoulder going around the curve and down, then again at the start of the walls past the shoulder, then at the bottom curve where it transitions to the bottom.
Without thinking about what i was doing truthfully i finished the entire hollow form without changing cutters. The inside and bottom were very smooth and i was basically done except for some final sanding and finishing.
So here are my observations so far after turning 2 holllow forms with the Monster Rig.
- Checking and repositioning the laser to the part of the cutting tool that is actually going to hit the wood frequently as you guys suggested works great.
- I made the hole in the hollow form just big enough so the ange cutter would fit in...In the case of the angle cutter (see pic) the cutter's bit is long and i was not about to cut it down so i just made the hole a bit bigger so i could get it to go in at a angle.
- Frequent stops to blow out chips or you get alot of chatter and jumps in the cutting.
- After going from top to bottom i made another pass - very lightly to clean up marks and to try to get as smooth of a finish as i could. The bottom curve of the form going to the very bottom was a bit more difficult for me but completed.
- Setting the laser as you suggested kept me safely away from going thru the side wall and i ended with a wall thickness of 1/8 fairly consistent
Pic 1 - shows angle cutting tip
Pic 2 - Second hollow form with just angle cutter
Pic 3 - Tomm. hollow form - Walnut
Pic 4 - A finished Holly bowl from past work
Pic 5 - Yesterday's First hollow form i turned now finished
Attachments

Last edited:
") As Bernie said, after a few they'll start getting easier.
As Bernie said, after a few they'll start getting easier. 