
Dan Mosley
Member
- Messages
- 1,169
- Location
- Palm Springs, Ca
I had the day free today and got to spend all day in the garage without interuption. So i completed several projects that have been sitting around. I know how everyone likes pictures so i have them and will explain what i did or what i learned along the way. I do alot of experimenting ")
See Pictures Below:
1). This is a root base from a tree - leveled on top and lightly darkened with a butane torch - 2 laquer sealer coats - 5 coats of Deft laquer and is now drying and complete - ready for glass table top or whatever - - - Done
2). Redwood Burl Slab - Long project - Leveled on bottom with 80grit beltsander and large T square. There were only 2 shops here in the desert where i live that had a drum sander but declined to run it thru for me without charging alot (both stated they would have to make small runs and it would take along time to sand it down totally level. Making larger runs could create the drums to dig in hard into the wood and they didnt want to risk it). Once the bottom was roughed out level I flipped it over and started doing the same on what would be the top. I used the belt sander to 120 then changed to orbital sander and went thru the grits to 320.
The finish went like this - 2 coats of laquer sealer and knocked down each time with 0000. I did not use oil as it would have darken it to much. After the two sealer coats i put on 6 coats of semi-gloss laquer and used 0000 between coats except the last coat. The pictures shows it sitting in a room where it will dry for the next couple weeks.
Question - I have some light spots and areas that although i have covered when i sprayed they dont look it. Should i wait awhile and apply more laquer ? or wait and do some type of wax buffing ? any ideas on finishing from this point ??
3 & 4). Dish that i turned and just never got around to finishing - Antique oil applied x 2 coats - then 3 coats of semi-gloss laquer and now drying. May go 4 coats to fill in the grain more but i think ill leave it with just the semi-gloss and do nothing else to it............opinions?
5). Neighbor gave me this bowl to try to sand and refinish - i glued a block best i could to the center of it on the backside and will attempt to mount it on the lathe to sand. Best idea i could come up with to remount - anybody think of any other way ??
6). Is a green wood hollow form that i sanded to 220 and left it out on accident (to hot for it in the garage) and in the morning it had 4 small cracks around the mouth of the vessel. CA glue and clamp - but the cracks still showed so i thought i would use it to experiment with and try something new. I used CA for the finish and then used 0000 steel wool and buffed with tripoli/WD/Carnuba.
Not such a good idea it has white areas here and there and i may have been better off (and may still) just have put laquer spray over it and call it done or buff it after that...............well I learned anyway
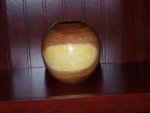
7&8). Large hollow form 8 3/4 " wide and 8 1/4 Deep - This has been my largest vessel i have tried to turn since buying the Monster hollowing rig. Sanded thru 220 and 1 coat of BLO and now sitting inside.
Questions :
I find when I am deep in the vessel hollowing at the very center at the bottom it seems nearly impossible to cut (dead center eye)-I get alot of jerking and jumping with the tooling - any suggestions ?? I finally just used my Ci1 and cut it fast and clean.
When i am hollowing deep like in this vessel i get alot of hard jumping. Example - say im in 4" or more and including the tool rest im easily in at a depth of probably 5" and going deeper still this is when it starts and gets worse the deeper i go. Any suggestions ????? I do not want to end up bending another tool ...............
Alright well thanks for all your comments...........Dan
See Pictures Below:
1). This is a root base from a tree - leveled on top and lightly darkened with a butane torch - 2 laquer sealer coats - 5 coats of Deft laquer and is now drying and complete - ready for glass table top or whatever - - - Done
2). Redwood Burl Slab - Long project - Leveled on bottom with 80grit beltsander and large T square. There were only 2 shops here in the desert where i live that had a drum sander but declined to run it thru for me without charging alot (both stated they would have to make small runs and it would take along time to sand it down totally level. Making larger runs could create the drums to dig in hard into the wood and they didnt want to risk it). Once the bottom was roughed out level I flipped it over and started doing the same on what would be the top. I used the belt sander to 120 then changed to orbital sander and went thru the grits to 320.
The finish went like this - 2 coats of laquer sealer and knocked down each time with 0000. I did not use oil as it would have darken it to much. After the two sealer coats i put on 6 coats of semi-gloss laquer and used 0000 between coats except the last coat. The pictures shows it sitting in a room where it will dry for the next couple weeks.
Question - I have some light spots and areas that although i have covered when i sprayed they dont look it. Should i wait awhile and apply more laquer ? or wait and do some type of wax buffing ? any ideas on finishing from this point ??
3 & 4). Dish that i turned and just never got around to finishing - Antique oil applied x 2 coats - then 3 coats of semi-gloss laquer and now drying. May go 4 coats to fill in the grain more but i think ill leave it with just the semi-gloss and do nothing else to it............opinions?
5). Neighbor gave me this bowl to try to sand and refinish - i glued a block best i could to the center of it on the backside and will attempt to mount it on the lathe to sand. Best idea i could come up with to remount - anybody think of any other way ??
6). Is a green wood hollow form that i sanded to 220 and left it out on accident (to hot for it in the garage) and in the morning it had 4 small cracks around the mouth of the vessel. CA glue and clamp - but the cracks still showed so i thought i would use it to experiment with and try something new. I used CA for the finish and then used 0000 steel wool and buffed with tripoli/WD/Carnuba.
Not such a good idea it has white areas here and there and i may have been better off (and may still) just have put laquer spray over it and call it done or buff it after that...............well I learned anyway
7&8). Large hollow form 8 3/4 " wide and 8 1/4 Deep - This has been my largest vessel i have tried to turn since buying the Monster hollowing rig. Sanded thru 220 and 1 coat of BLO and now sitting inside.
Questions :
I find when I am deep in the vessel hollowing at the very center at the bottom it seems nearly impossible to cut (dead center eye)-I get alot of jerking and jumping with the tooling - any suggestions ?? I finally just used my Ci1 and cut it fast and clean.
When i am hollowing deep like in this vessel i get alot of hard jumping. Example - say im in 4" or more and including the tool rest im easily in at a depth of probably 5" and going deeper still this is when it starts and gets worse the deeper i go. Any suggestions ????? I do not want to end up bending another tool ...............
Alright well thanks for all your comments...........Dan
Attachments


Last edited:
