allen levine
Member
- Messages
- 12,370
- Location
- new york city burbs
Hope someone can give me a new idea on how to fill in the voids and knots of walnut.
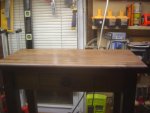
I have some beautiful wolverine walnut that I didnt want to use yet, so only made a small top of it, and I have alot of thick walnut that I bought from my wood guy, even though I knew it was destined for flooring.
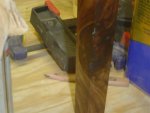
Seems the thick chunks have alot of voids and knots, and as much as I tried to trim around and all, I made 4 tapered legs(28inches), and there are alot of voids with knots Id love to make dissapear, or less noticable.(Im thinking about just spinning most of it eventually)
I purchased some epoxy today, was going to play with coffee grinds and epoxy tomorrow, maybe some epoxy and black paint, unless someone knows something that will be easy to obtain and work great.
Thankyou in advance for any replies.
I have some beautiful wolverine walnut that I didnt want to use yet, so only made a small top of it, and I have alot of thick walnut that I bought from my wood guy, even though I knew it was destined for flooring.
Seems the thick chunks have alot of voids and knots, and as much as I tried to trim around and all, I made 4 tapered legs(28inches), and there are alot of voids with knots Id love to make dissapear, or less noticable.(Im thinking about just spinning most of it eventually)
I purchased some epoxy today, was going to play with coffee grinds and epoxy tomorrow, maybe some epoxy and black paint, unless someone knows something that will be easy to obtain and work great.
Thankyou in advance for any replies.
") That would be my choice if it was just in the legs. You mentioned that with all the different filling materials you have, nothing looks natural. That's because it's the voids that look natural.
That would be my choice if it was just in the legs. You mentioned that with all the different filling materials you have, nothing looks natural. That's because it's the voids that look natural.