Help me, Im slowly destroying my home.

Hey, don't drywall it, wood back (against the stairs) and shelves towards the room, sloping like you have with a nice piece of cherry or walnut, be an eye appealing addition for sure.

my wife has a specific look in mind, and while I wanted to go with raised panels and 2 sunken shelves, she did not want it. She didnt want any eyes to be drawn to that, besides, we have a player piano that sits against that wall, so most things behind it wont be seen. She did tell me last night she wants a mahogany post and railing to match some of the furniture, shell leave the design up to me, but wants to see each step as I progress.
 
I cant make excuses for my lack of woodworking skill.
It is what it is.
Until I get my pink slip from here, Ill keep showing and asking.
I will not give in and hire anyone to do this work.

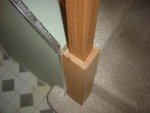
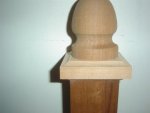
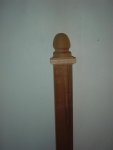
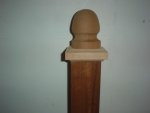
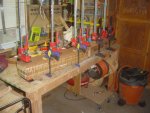
I think I messed up bigtime. The bottom of the post, I think I pulled something other than mahogany out, Im not even sure, since I never worked with apiece of cherry in my life, only seen it finished, and some at the show, but in my garage, and in the cloudy skys today, it looked tan enough, so anything in the sapele/spanish cedar, mahogany family, I mix together.
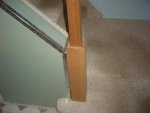
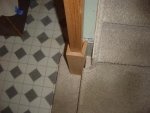
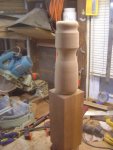
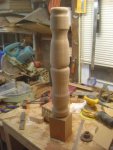
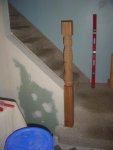
I left it all a bit tall, wont cut final cuts till I take away carpet, and then figure out what to do about that tiny bit of ledge blocking the post installation.
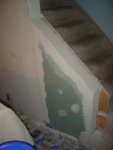
Do I notch out the bottom of the post to fit? Id rather not cut away the staircase landing, might effect the integrity of it all. I can put a piece of filler wood in that space, but then the post wont be centered on the wall and the handrail wont be centered to the upper wall, I have to move that post over around 1.25 inches.
Take a look, all advice and recommendations are read carefully.
I wont be getting back to this work till sunday the earliest, so I have time to look at it.

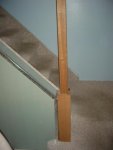
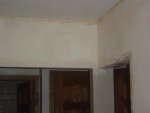
I wanted to flush the post up against the wall and stairs which come down past the wall. Im going to raise the post up 3 inches inside the bottom, secure a post piece to the floor, put the post back down on it, sliding the bottom portion over the center post portion, screw it all in, plug it all up, then was going to put a screw into wall and stairway(plugging all holes)
 

Attachments

  • wood stuff 1505 (Medium).jpg
    wood stuff 1505 (Medium).jpg
    49 KB · Views: 57
  • wood stuff 1507 (Medium).jpg
    wood stuff 1507 (Medium).jpg
    53.8 KB · Views: 55
  • wood stuff 1508 (Medium).jpg
    wood stuff 1508 (Medium).jpg
    58.6 KB · Views: 51
  • wood stuff 1506 (Medium).jpg
    wood stuff 1506 (Medium).jpg
    40.3 KB · Views: 54
Last edited:
Hard to tell with the carpet in the way, but that may be structural. Looks to be a header joist for that platform. The stairs stringers may be resting on one of the joists on the back side of it.

Looking good Allen! :thumb:
 
Measured it all out, I believe Ill only have to cut away a little of the base pieces, not the post itself to center it.
I took the same post, a small piece, spun a top knob for the top of the post, and took the cherry(?), and a cove bit, and made a top of post block(I know it probably has a name). Amazing that the knob and post are the same exact piece, I guess the post will lighten up substantially with sanding.

(on a side note, the Ci1 rougher and finisher have to be the sharpest chisel made. It rounded out that mahogany post in a matter of 20 seconds, no catches. It makes a tennon for the chuck in a few seconds. Its an amazing tool, even in the hands of someone like me, with horrible vision and basically less than 24 hours experience on a lathe.
The finisher, Im not sure why any spinner wouldnt want this tool. Anyone.
You have to try it to understand. Its "mad" sharp, which makes its very easy and accurate to use. Kudos to the guy that designed and made that chisel)

ONce I put the post together with the top cap and bottom pieces, Ill see if I want to add a bit more of trim near the top or middle.
I gotta figure out if Im gonna spin some spindles or leave them square.
 

Attachments

  • wood stuff 1511 (Medium).jpg
    wood stuff 1511 (Medium).jpg
    35.8 KB · Views: 25
  • wood stuff 1510 (Medium).jpg
    wood stuff 1510 (Medium).jpg
    14.2 KB · Views: 27
  • wood stuff 1509 (Medium).jpg
    wood stuff 1509 (Medium).jpg
    26.6 KB · Views: 28
allen I have not read all the post here in regards to this but I would put a wood cap on top of the wall ( instead of the dry wall) and finish it off with some trim that way you can get tight to the carpet with no mess. It will avoid extra mudding and i think it will look way better. Notch the post and drill counter sink holes ( that will be plugged later ) and lag the post to the inside support. That way there is no question if the stairs are connected in a way that make them structural to the stair strength. Not being able to see it all makes a call on that difficult from here.
 
Didnt get too much done today. I had to bring a hall entranceway down to the same height(I planed down a 2x6 till it was right thickness and put some drywall over it) as the one next to it, so managed to get that done,(cant figure out how to put a rosette up with fluted molding around both openings so it will look even, walls meet kinda weird, I tried cutting a rosette scrap at 45 degrees to see how it looked, eh) got mud on the wall I did,sanded a bit off, wanted to see how much comes off so I sanded around the edges till I saw silver, will recoat the corners again, just experimenting, and one other long wall. Taped up the windows and moved some furniture around and pulled a little paper off in the back room.
Im scrapping the post for now, going to build a thicker one from glueups, want it around 4-5 inches thick.
By next week I will be working alot so I wont really get back to any of it until after new years.
 

Attachments

  • wood stuff 1514 (Medium).jpg
    wood stuff 1514 (Medium).jpg
    25.3 KB · Views: 33
  • wood stuff 1517 (Medium).jpg
    wood stuff 1517 (Medium).jpg
    26.4 KB · Views: 30
Last edited:
allen I have not read all the post here in regards to this but I would put a wood cap on top of the wall ( instead of the dry wall) and finish it off with some trim that way you can get tight to the carpet with no mess. It will avoid extra mudding and i think it will look way better. Notch the post and drill counter sink holes ( that will be plugged later ) and lag the post to the inside support. That way there is no question if the stairs are connected in a way that make them structural to the stair strength. Not being able to see it all makes a call on that difficult from here.

this is exactly what I plan on doing. Just going to rebuild a thicker post, but IM not going to put anymore coats on top of slanted portion, Im going to put a piece of mahogany on it with a rounded over edge.(the carpet is being ripped shortly, the entire downstairs is getting new floors , so Im not putting the post in till its all done, but I will make it and the rails, ballisters sometime after the holidays)
 
Last edited:
this is exactly what I plan on doing. Just going to rebuild a thicker post, but IM going to not put anymore coats on top of slanted portion, Im going to put a piece of mahogany on it with a rounded over edge.

If you are doing that Allen then you will not need the drywall or metal corner bead there. Just put the mahogony directly on the wood top plate. Cap the rough drywall with the round over and save yourself a ton of work.
 
I glued up and made a 4 and 1/8th post by 4 and 1/8th. I want to attempt to put a slight curve in its center portion, but believe the entire posts length just wont fit my 1220 and besides, I dont think the little lathe is strong enough to turn that heavy load,(and Im not sure I feel comfortable with such a heavy log on that little machine) so Im doing it in pieces.
This entire newel post and stairway rails, ballisters are all very well out of my comfort zone.
 
Last edited:
if anyone is still following this

I planed and sawed till I had a nice 4.5x4.5 piece of mahogany(glue ups), face plate mounted it onto the jet1220, but it was a bit too much.Even though the lathe table is bolted down, it all shook and rattled and sure enough it broke off the tail stock, whacked the tool rest, and chipped off some off the edge. Not a problem, since I should have sawed off some of the edges to help with spinning.(Im learning this process as I go along, so I realilze what I did wrong right after I did it)
I took the 24 inch piece, cut it down to 12 inches, went to the band saw, sliced off edges to make it a bit more less square, then spun.
I wanted to get the two ends to meet very close so when I attach them with dowel bolts and glue a bit of sanding will make it look like one. Heres what I did and what I got. Not set in stone, I can always redo it all. I still need to make a post cap and top ball.
 

Attachments

  • wood stuff 1526 (Medium).jpg
    wood stuff 1526 (Medium).jpg
    75.3 KB · Views: 35
  • wood stuff 1520 (Medium).jpg
    wood stuff 1520 (Medium).jpg
    41.9 KB · Views: 39
  • wood stuff 1523 (Medium).jpg
    wood stuff 1523 (Medium).jpg
    43.4 KB · Views: 42
  • wood stuff 1524 (Medium).jpg
    wood stuff 1524 (Medium).jpg
    27.4 KB · Views: 47
man allen i take afew days off to get my swap done and your almost threw with your stair project.. looks good and the knew post your making ought to make it come together well..:thumb:
 
You are kidding me aren't you? You have more of a loyal following than you think. I like the post and most importantly your better half put her seal of approval on it!:thumb:. There is always a way to work in shop time time when working on projects around the house.
 
Top