jesper kristiansen
Member
- Messages
- 22
- Location
- Los Angeles, CA
Seems like I got myself a project .
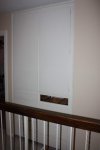
My wife asked me the other day if I can do something about the ‘old house’ smell in our hallway linen closet, and that she had wanted me to do something about the closet for a long time.
When we moved in 5 years ago we of course cleaned the closet, but never did anything else to it, and it does have a funny smell.
First I thought of just clean, prime and paint the interior and make new doors and drawers, but I’m not even sure if that will take care of the smell and I’m not even sure I can install drawer glides, so we discussed it a little and I decided it would be better to just replace it with new cabinets.

Once we decided on that my wife asked if I could make the drawers a little deeper and full width instead, so here is a quick mockup of how I intend to build it.

Lower cabinet is 42” wide, 36” tall, carcass made of ½” good quality plywood (maybe birch from a local hardwood dealer).
Since the drawers will be 40” wide I think I should use ½” ply. for the bottom
#1 - for a drawer this wide do I need a drawer glide in the middle (bottom of course) of the drawer?
#2 - any issues with making the drawer this wide?
Upper cabinets carcass made of ½” birch plywood.
My idea is to have full length stiles for the face frame and then install the complete face frame after the carcasses are installed. Problem of course is how to attach it. Biscuit and glue of course is fine for alignment, but since I am going to paint the frame before it is installed I would rather not brad nail it, so
#3 - how do I clamp the face frame to the installed carcasses
#4 - am I just making it more difficult for myself, should I just attach the face frame per carcass and live with the seam ?
And finally, with the rough opening 1 – 2” larger than the cabinet
#5 - how would I install and secure the cabinets?
I would think the order is
- Make base, toe-kick, make sure it is level
- Install base cabinet, attach to sides and back using shims to get it firmly secured.
- Install upper cabinets, attach upper cabinets to lower cabinets and attach the 2 upper cabinets to each other.
- #6 Now, obviously I cannot get any shims on the back, so would shim the sides and secure the sides into a stud be sufficient ??
Anything else I have missed ?
Any help is appreciated.
Thanks
Jesper
My wife asked me the other day if I can do something about the ‘old house’ smell in our hallway linen closet, and that she had wanted me to do something about the closet for a long time.
When we moved in 5 years ago we of course cleaned the closet, but never did anything else to it, and it does have a funny smell.
First I thought of just clean, prime and paint the interior and make new doors and drawers, but I’m not even sure if that will take care of the smell and I’m not even sure I can install drawer glides, so we discussed it a little and I decided it would be better to just replace it with new cabinets.
Once we decided on that my wife asked if I could make the drawers a little deeper and full width instead, so here is a quick mockup of how I intend to build it.
Lower cabinet is 42” wide, 36” tall, carcass made of ½” good quality plywood (maybe birch from a local hardwood dealer).
Since the drawers will be 40” wide I think I should use ½” ply. for the bottom
#1 - for a drawer this wide do I need a drawer glide in the middle (bottom of course) of the drawer?
#2 - any issues with making the drawer this wide?
Upper cabinets carcass made of ½” birch plywood.
My idea is to have full length stiles for the face frame and then install the complete face frame after the carcasses are installed. Problem of course is how to attach it. Biscuit and glue of course is fine for alignment, but since I am going to paint the frame before it is installed I would rather not brad nail it, so
#3 - how do I clamp the face frame to the installed carcasses
#4 - am I just making it more difficult for myself, should I just attach the face frame per carcass and live with the seam ?
And finally, with the rough opening 1 – 2” larger than the cabinet
#5 - how would I install and secure the cabinets?
I would think the order is
- Make base, toe-kick, make sure it is level
- Install base cabinet, attach to sides and back using shims to get it firmly secured.
- Install upper cabinets, attach upper cabinets to lower cabinets and attach the 2 upper cabinets to each other.
- #6 Now, obviously I cannot get any shims on the back, so would shim the sides and secure the sides into a stud be sufficient ??
Anything else I have missed ?
Any help is appreciated.
Thanks
Jesper