Tablesaw Router Extension

Dan Mooney

Member
Messages
1,920
Location
Portland, Oregon
I posted this picture in a another post:
Router.02.jpg

and one of our intrepid members asked if I'd post some others so here they are.

Router.001.jpg

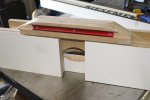
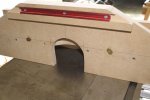
I wrapped the melamine with the oak because it was only 24"wide and the tablesaw was 27" wide.

It was my first attempt at building a cabinet, so it's a little rough, but it works.

Router.003.jpg

Router.004.jpg

Router.005.jpg

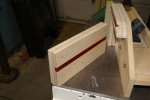
I made the fence so that it clamps to the Tablesaw fence.

Router.008.jpg

Router.007.jpg

Router.009.jpg

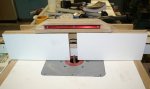
It does what I need it to do

Router.006.jpg

The switch turns on the router and the vacuum.
 
Last edited:
dan one suggestion if its not to late.. i would put a thickness of mdf between the TSaw fence and the RT setup.. your gonna move that fence to close some day and wish you had a backer, back there and mdf is cheaper than a buggered up TSaw fence:D
 
Thanks Dan just what i wanted to see.:):thumb: Funny the Larry made the comment on the fence its exactly what i was thinking before i saw his post. So +1 on the backer.

See you have your own version of the dust deputy. Does this hook up to the router side?

Onw more question, do you have your TS and router combo positioned in the middle of your shop?
 
Thanks Dan for reposting. I've been wanting to do something like that and you just inspired me.:thumb: I would add a piece of extra mdf on your fence to give a little more distance between the bit and your fence. On mine I built a 4" box that attaches to the fence. It gives me room for raised panel bits and for dust collection.

I like your modified shop shop vac. Looks a little like the one I just made.
 
dan one suggestion if its not to late.. i would put a thickness of mdf between the TSaw fence and the RT setup.. your gonna move that fence to close some day and wish you had a backer, back there and mdf is cheaper than a buggered up TSaw fence:D

Actually it's not quite as close as the picture looks, there is 2 layers of ¾ MDF
and I don't have any bits larger than a ½ radius round over. but I am careful setting it up.

Thanks Dan just what i wanted to see.:):thumb: Funny the Larry made the comment on the fence its exactly what i was thinking before i saw his post. So +1 on the backer.

See you have your own version of the dust deputy. Does this hook up to the router side?

One more question, do you have your TS and router combo positioned in the middle of your shop?

The "Dust Deputy" is homemade, I stole the idea from one Alan Bienlein posted awhile back. I used off the shelf borg duct work parts to make the cyclone, it is hooked up to the router table, it works very well.

My tablesaw is pretty much in the center of the shop (it's a 2 car garage)

Thanks Dan for reposting. I've been wanting to do something like that and you just inspired me.:thumb: I would add a piece of extra mdf on your fence to give a little more distance between the bit and your fence. On mine I built a 4" box that attaches to the fence. It gives me room for raised panel bits and for dust collection.

I like your modified shop shop vac. Looks a little like the one I just made.

I stole the idea from your post I've been storing that vacuum/blower head for years trying to figure out what to do with it. when I saw your post I knew why I still had it. Thanks :thumb:
 
Dan I like the way you have made and set this all up , it's also a room saver too :thumb: . It's a lot better like this than having a machine for every machinery mode for sure ...... I'll be glad when I get retierd where I'll have more time for such :dunno: ....thanks for sharing your add on .......Marshall :type:
 
Larry, I took your advice

When I posted this thread last week, Larry pointed out that the tablesaw fence, which supports the router fence, could possibly hit the router bit.

I've been contemplating the thing and came up with this fix without having to rebuilt the whole thing.

This is the original fence without the sliding sections

attachment.php


I cut and fitted a piece of melamine in the hole

attachment.php


Then I tapered the top to hopefully help with the dust flow

attachment.php


I cut and attached melamine to the sliding sections

attachment.php


I also had to put a filler behind the T-Track

attachment.php


attachment.php


and the finished piece. the 4 knobs control the sliding section of the fence.

attachment.php


attachment.php


Thanks for the input Larry! :thumb:
 

Attachments

  • Fence006.jpg
    Fence006.jpg
    141.3 KB · Views: 73
  • Fence005.jpg
    Fence005.jpg
    127.4 KB · Views: 73
  • Fence004.jpg
    Fence004.jpg
    147.4 KB · Views: 76
  • Fence008.jpg
    Fence008.jpg
    124.3 KB · Views: 5
  • Fence007.jpg
    Fence007.jpg
    117.2 KB · Views: 73
  • Fence003.jpg
    Fence003.jpg
    141.7 KB · Views: 71
  • Fence002.jpg
    Fence002.jpg
    134.3 KB · Views: 78
  • Fence001.jpg
    Fence001.jpg
    138 KB · Views: 77
  • Fence013.jpg
    Fence013.jpg
    106.6 KB · Views: 69
Top