- Messages
- 16,586
- Location
- Reno NV
So, made a little progress on the plane out in the shop today.
I can say that this is absolutely dead easy so far.
The parts of the kit are all pre-cut. What could be simpler? I did take Toni's advice and went to the college of the redwoods and downloaded their instructions. A little more detail than comes with the plane.


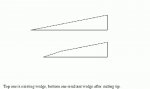
So next step is to position things and clamp it together. The instructions say to position the plane blade so the gap is about 3/16 and that the blade hits about 1/16 up on the inside. This will allow you to fine tune the throat later.


Hi, My names Brent and I'm a glue-aholic. I always seem to slop on glue. Oh well, I'll just deal with the squeeze out the way I always do and let it dry and chisel it off later.

While the body was drying, I decided to sharpen the blade. Now here's my big problem. I've got a real mishmash of sharpening stuff, and no real 'system' or rhyme or reason for the stones. I have a little woodcraft tri-stone I thought I would try and use. After reading part of Ron Hocks Sharpening book, I decided that I should check the stones for flatness first.
Nope. They aren't flat, so I spent about 1 1/2 hours trying to flatten the stones on my DMT diamond stone, and plate glass and sandpaper. Never really did get it flat enough to my satisfaction. The plate glass and sandpaper works pretty good. I may just build my sharpening system around the Scary sharp method, unless I find a good deal on some kind of nice sized water stone system.


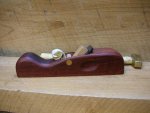
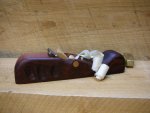
And that's about as far as I got today. Just sanded the excess glue off, and trimmed the excess wood of the ends. The positioning dowel's at the end will get trimmed off once I get the plane tuned up and working properly. At that time I'll go about doing the artsy carving to give it a little more personality than a shoebox with a blade...

I can say that this is absolutely dead easy so far.
The parts of the kit are all pre-cut. What could be simpler? I did take Toni's advice and went to the college of the redwoods and downloaded their instructions. A little more detail than comes with the plane.
So next step is to position things and clamp it together. The instructions say to position the plane blade so the gap is about 3/16 and that the blade hits about 1/16 up on the inside. This will allow you to fine tune the throat later.
Hi, My names Brent and I'm a glue-aholic. I always seem to slop on glue. Oh well, I'll just deal with the squeeze out the way I always do and let it dry and chisel it off later.
While the body was drying, I decided to sharpen the blade. Now here's my big problem. I've got a real mishmash of sharpening stuff, and no real 'system' or rhyme or reason for the stones. I have a little woodcraft tri-stone I thought I would try and use. After reading part of Ron Hocks Sharpening book, I decided that I should check the stones for flatness first.
Nope. They aren't flat, so I spent about 1 1/2 hours trying to flatten the stones on my DMT diamond stone, and plate glass and sandpaper. Never really did get it flat enough to my satisfaction. The plate glass and sandpaper works pretty good. I may just build my sharpening system around the Scary sharp method, unless I find a good deal on some kind of nice sized water stone system.
And that's about as far as I got today. Just sanded the excess glue off, and trimmed the excess wood of the ends. The positioning dowel's at the end will get trimmed off once I get the plane tuned up and working properly. At that time I'll go about doing the artsy carving to give it a little more personality than a shoebox with a blade...
Last edited:
 A guy with your skill could have made one easily.
 ")