Foyer/hall/telephone table/desk

allen levine

Member
Messages
12,368
Location
new york city burbs
I cant figure out what to call what Im building. As usual, I follow no plans, just draw it out and see how it looks.
Im using all the thick white oak I have, to experiment to see if I can build a dining table of similar construction for my son.(my back is stiff from today, I have to figure out how to move around pieces that will weigh hundreds of lbs)
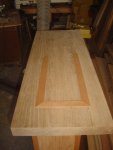
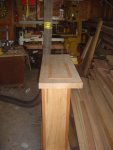
Pedestal legs are WO with Mahogany fronts and backs. About 2 and 3/8th thick. Top is all white oak, maybe 2 inches thick. Ive been hand planing down the top and will work it with the belt sander and orbital sander when Im closer.(Im trying to even it out, seems I glued it up 1/16 or so off, and to get it flat, well, its white oak, and its hard, really hard, for me)
Its 14 inches wide, and my planer only takes 13 inches, so its all by hand.
The table is around 35 inches high.14 inch x 38 inch top.
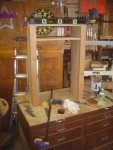
I wanted a hall table but also need something with a drawer for pads and pens, hold keys, and Im going to put the telephone on the top. A working/desk type of table but no chair or stool.
This is what I came up with. Some pics of the build so far.
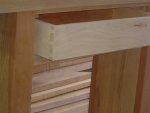
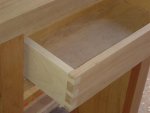
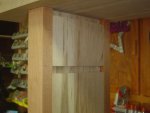
Im going to attempt to inlay a simple 1/2 to 3/4 inch wide strips shaped in a rectangle on the top, maybe inlay some mahogany or walnut. If I ruin the top, Ill flip it over and scratch the idea. Im also going to make my first solid wood dovetail drawer. I have to make through dovetails, so Im going to put a front on the drawer.
I put a piece of striped mahogany in the drawerfronts place to see how it would look completed. I have alot of exotic woods in pen blank form.
I dont think Ill be spinning any pens anytime soon, so I might use one of the exotics to make a handle for the drawer.
After tomorrow, I will not be able to work on this piece for a couple weeks.
I hope leaving it outside in the garage it doesnt move much, but its so heavy and thick, it can do what it wants, I cant stop it.
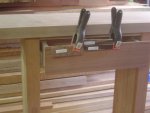
Although very very simple design, this was so difficult getting together for me.
Ill probably rub some oil on it, 2 coats, then a few coats of poly, since its going to get alot of use.
Just to be clear, I wanted foyer/hall table height, but wanted a telephone table type of piece also and its dimensions are dictated by the space against the wall where Im placing it.

*I believe I might have preferred the drawer a bit more narrow, maybe 3.5-4 inch drawer front, but my wife says she likes that large drawer.
 

Attachments

  • bed 217 (Medium).jpg
    bed 217 (Medium).jpg
    42.9 KB · Views: 73
  • bed 226 (Medium).jpg
    bed 226 (Medium).jpg
    42.4 KB · Views: 86
  • bed 225 (Medium) (2).jpg
    bed 225 (Medium) (2).jpg
    44.3 KB · Views: 69
  • bed 223 (Medium).jpg
    bed 223 (Medium).jpg
    43.2 KB · Views: 59
  • bed 219 (Medium).jpg
    bed 219 (Medium).jpg
    42.1 KB · Views: 59
  • bed 218 (Medium).jpg
    bed 218 (Medium).jpg
    28.2 KB · Views: 61
Last edited:
Allen i feel for you not being able to handle that heavy stuff.

Did some research and was thinking about things like that for the future and found these at Northern Tool.

http://www.northerntool.com/shop/tools/product_120327_120327

What about rigging up something like this with a sort of dual strap arrangement and using it like they do when they helicopter rescue someone from the sea.

Its only $100 and given you will do a slab at a time i dont see that you need anything heavier. If you put it on a couple of runners over head in your garage it could do multi duty for a bunch of lifting. Cant think of the name of the channel iron that they use for sliding heavy doors but something like that. There are other heavy lifting devices like the ones used to take an engine out but they in turn take up floor space.

Just thinking aloud trying to give you ideas for the future to handle all your boards. Even when you get to assembly or finishing stage of a heavy assembled piece a hoist like this could come in handy.

Then I was wondering if you want to plane the 14" wide oak with your machine, I would like someone that knows better than me to comment on what i am going to say. Would it not be possible to rip it down the middle, with a glue line blade, then plane it and glue back together again with dowels. Just thinking about you and getting tired with trying to do it all manual.

Thats how carol does it at her place..:thumb:
 
rob, I cut all the 12-13 inch wide boards down to 6 inches so I could edge and face joint them, then plane them separately.
I ran them through the machine at the same time so thickness would be identical.
I cant think of what happenned other than my glue went south, which I checked and rechecked then called it a night and left it clamped.
A lift might work, not sure if Ill work with such heavy lumber that often though.
 
Allen,
Ya might check around for a cabinate shop with a nice wide belt. Thats what I do for wide panels. They charge me $20 for the 1st 10 min and $1.5 for every min. after, I can usualy get by on a table top for 30 or 40 Bucks.

Or take it over to Larry's..;):thumb:
 
I used my belt sander tonight after the hand plane, and I got one side done.
Ill work on the opposite side tomorrow, the winner gets turned up as long as I dont ruin the inlay attempt.

on this note, if I build a top with similar thickness, lets say 40 x72, will there be a problem if instead of cutting each board 6x72 and gluing up, if I cut each board 6x40, and glue up 12 of these with the boards going side to side instead of end to end?
 
Last edited:
i second the motion for keeping your movement on the 40 " way.. and even if i didnt have a drum sander i would glue up the whole thing before, i attempted to flatten it.. and dons idea of glueing up in sections is right on.. better clamp pressure that way and more control.. use cauls to keep the pieces all on the sam plane allen to help you in the flattening process.. and you can do a good job with a belt sander if you use the 45 degree approach method than smooth with your plane.
 
Me and my prazi

So after working on the top this morning, early, I had all the neighbors up at 7:30 with the belt sander, I decided time to make my first dovetail drawer.
Now Ive practiced once with the jig and had beautiful results.
Now I want to make one maple dovetailed drawer.
My maple is buried under a ton of ash. Im still walking crooked from yesterday, (my wife will kill me if she finds out I worked outside today)
so I decided its time to use up all the blemished pieces of my recently installed maple floor.
Tiny blemishes, but the floor guy choose to leave them if he didnt need them.
So at 4 inches, its a little shy for me, but I cut off the tongue and groove, planed down the back side grooves, and left the finished side, since its a beautiful sheen.(use that for the inside of the drawer)
I made my tail boards, then my first pin board. I figured let me tap it in and see how I did.
First tap, the tail board split. I turned it around, Ill just try another side, one light tap, both boards split.Hmmmmm?:huh:
Recut some more tails and pins, (I made extra pieces since I know myself already). Tapped the first two pieces together, better, final tap to bring it home, very soft taps with rubber mallet, it split.I dont remember which piece, cause in a moment of lost composure, I flung the piece and it bounced off the wood pile into my bandsaw.
Went back and started over and realized my problem.
I experimented with pine. I tapped the pine home, gave it some nice raps, its pine, its so soft it just gave way and molded right up, didnt even need glue.
Maple, it doesnt give, it splits or cracks. I had to readjust the thickness of the pins, I didnt realize different woods mean different adjustments. That solved the problem.
I was so excited I glued it up. I ran to pick up my accountant, and when I came home, ooooopsss, had the table saw all set up with a 1/4 inch dado for the bottom, but idiot me, forgot to cut the dado.:doh::doh::doh::dunno:

start over again, dont think so. Ill go out and rabbet out a nice place for the bottom. IM close to just pinning and glueing it right to the bottom of the drawer already.
 
Sorry to see you're running into a few road blocks with the table. I completely sympathize (and identify) with the drawer parts flying across the room. Been there, done that, more than once.:eek::rofl::rofl: Since you forgot to cut the grooves for the drawer bottom (done that too) you might try cutting a bottom to fit snugly inside the drawer and attaching a small cleat (1/4 x 1/4) to the inside bottom edge to support it rather than just tack the bottom on. The problem with this is that you said you will be putting the pre-finished side in. This could complicate things as it is likely that glue will not stick to the finish.:huh:

How thick are the sides? Might a rabbeting bit in your router table offer a way to remove a small portion of the finished surface so a support could be attached? If so, then maybe you could rabbet deep enough to set the drawer bottom in first. Would need a little chisel work in the corners. Essentially rebuilding the groove you forgot.:dunno:
 
round 2, Im taking a beating

If I was in the ring, my trainer would have thrown in the towel.

There are alot of things I believe I should have checked first. For instance, how straight did the flooring company mill the wood.
After the glue up, I noticed the drawer was a bit off, nothing you could see, but once I took a clamp off, it moved.
I clamped it because I cut the dovetails a bit over so I could sand down smooth, which I did.
I took out the rabbeting bit, and that was all she wrote.

:(:(:(

The bit worked fine, but when I started to chisel out the corners, and I went as gently as I could, the maple started to crack near the dovetails. I continued and decided to be even more gentle, crack, chip, crack.
Ive chiseled many corners, I never had one crack like this.
I never chiseled maple. I carefully glued each cracked piece and shot a tiny pin into it to hold it in place, it wont be seen, its the bottom.(but I know its there)
Even before I chiseled and cracked, I noticed I made wood guides, and the drawer was a bit too narrow, so I had to add a thin strip, but its not perfect.
When I used plywood on my sons nightstand and wood guides with kickers? on both sides, the drawers move as smooth as silk in and out.
Dont know, had to give it up tonight.
I showed my wife what an inlay I would put would look like, she did not want it. I explained it would be flush with top, she did not like the look. Scratch that idea she told me.
I then showed her some kingwood, some kind of ebony, and another piece of something for a handle, she told me, nope, hardware.
I wont do the handle she wants, there will be no metal handles.
Ill put a walnut knob on it before I put a steel or brass pull.
eh, its always refreshing to get a wakeup call on just how limited ones talent is. At least I can say a crud day in my woodworking garage/shop is better than any day at work.

(the drawers are 5/8 thick)
 

Attachments

  • bed 228 (Medium).jpg
    bed 228 (Medium).jpg
    38.6 KB · Views: 31
  • bed 231 (Medium).jpg
    bed 231 (Medium).jpg
    36.3 KB · Views: 33
  • bed 234 (Medium) (2).jpg
    bed 234 (Medium) (2).jpg
    49 KB · Views: 25
  • bed 236 (Medium) (2).jpg
    bed 236 (Medium) (2).jpg
    31.4 KB · Views: 27
  • bed 237 (Medium).jpg
    bed 237 (Medium).jpg
    35.1 KB · Views: 29
Allen, unless I am not understanding your pictures correctly (photo's 1 & 2) you have the tails on the front. Normally you would put them on the side so that you have the the mechanical locking of the joint working for you. In other words you can't pull the front off the drawer.
 
Allen, unless I am not understanding your pictures correctly (photo's 1 & 2) you have the tails on the front. Normally you would put them on the side so that you have the the mechanical locking of the joint working for you. In other words you can't pull the front off the drawer.
Yep. Missed that. Good eye Bill.:thumb:
 
Top