white oak dining table-COMPLETED

oh boy, Im taking off plenty.
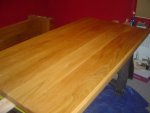
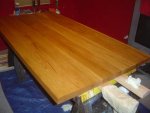
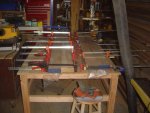
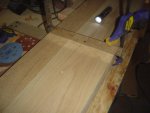
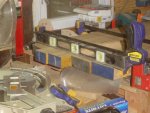
Most of the boards were 3 inches thick rough. There are alot of surface problems, the wood was old and knocked around, and twisted, etc.....
I had to joint off at least 1/4 inch or more just to get a flat surface.
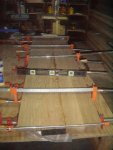
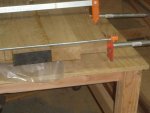
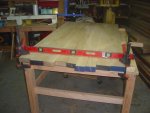
Im bringing the final thickness to 2inches.
Each step I like to take off about an 1/8 or less, so I can flatten out glueups.
Its getting tough for me to handle these heavy boards.
Im due for my IV therapy end of next week, and Im feeling the effects.
My arm strength is completely diminished by mid afternoon the past couple of days, so I have to close up shop or do something else.Id never get these boards up to band saw height and be able to handle them safely at 12/4x6x7feet.
My son asked me to come over tomorrow and put a new roof on the tiki bar, so Ill take a day off from the table top.

larry, I had tried to give these boards away, I thought I wouldnt work with them,and I paid next to nothing for them, less than a dollar a bf, was hoping someone with good use for them might exchange something with me. Noone reallly wanted this Noah's Ark stuff. Im not worried about shaving off and losing some. Total around 6 33 gallon bags full of shavings.
 
Last edited:
he wasnt around sunday, and I did alot of the work yesterday and today. Its too late, they are all planed down. Not a big deal. Ill need him to help me with the glue ups once I have the smaller pieces ready.
 
clamped out.

I cant do more than 2 sections at a time, I dont have enough clamps.

The first section I glued up yesterday came out nice and flat.

One of the two sections I did today I see already one side is moving up. Hopefully a little coaxing with a hand plane and 735 will keep it flat enough.
Thats a reason I like to keep it thick until I do final planing. Anything thats off I can usually take enough off to even things out.Edge jointing on some of these were difficult, and if its off just a degree or two.

when I check for flatness, since my eyes are poor, I usually shut the lights and put a straight edge flat on the top, then see if any light from a flashlight gets through, I can see approx where I have to take it down and how much.You cant see in the picture, this one was very flat with one light pass through the planer.
 

Attachments

  • bed 366 (Medium).jpg
    bed 366 (Medium).jpg
    70.6 KB · Views: 26
  • bed 367 (Medium).jpg
    bed 367 (Medium).jpg
    49.9 KB · Views: 28
i agree with don get that young guy to help!!! i know when i was that young and lookin fer a gal i split wood anything to stick around longer and get on the fathers good side:) ransom is legal if you dont tie them up:):rofl::rofl:
 
well, half of the top came out ok so far. I dropped one piece before glueup twice, and it opened up cracks/checks/splits on one side, and looks like I have hairline splits on other side.
In one picture, after a few hours in clamps, the top lifted the last clamp off the table.It was flat on when I left it all.
Im not too thrilled with any of this top. I should have cut it all down to 2x2 strips, then 6 inch sections till I got them perfectly flat, then glue up 12 inch sections, get them flat, then try to keep it all flat.
this wood had alot of checks, alot of twists, and alot of bruises, chunks missing, I had to do alot of cutting, planing and jointing to get it close to useful.(in the size I wanted)
The final thickness is 1 and 15/16th. At 2 inches, I wanted to shave a bit more off to try to get it all matched thickness.
Its above my ability, but Im going to glue up the final two sections tomorrow, work on it, filling in any cracks, seperations, see how it comes out looking, then if Im unhappy, Ill start over.I have to get help to lift the parts tomorrow, and Im not sure I have enough clamp power to keep the 2 sections cleanly clamped with enough pressure.
 

Attachments

  • bed 373 (Medium).jpg
    bed 373 (Medium).jpg
    49 KB · Views: 23
  • bed 374 (Medium).jpg
    bed 374 (Medium).jpg
    72.3 KB · Views: 22
  • bed 375 (Medium).jpg
    bed 375 (Medium).jpg
    71.8 KB · Views: 23
  • bed 377 (Medium).jpg
    bed 377 (Medium).jpg
    47.1 KB · Views: 24
Give it a day or so Allen As it might settle back. I know with the pecan for my kitchen build I've learned to embrace the splits checks and knots. Keep up the great work!:thumb::wave:
 
Alan you doing well. Great job, gonna be a nice solid top that.:thumb:

How you planning on finishing it. You going to keep it light, i have a large white oak coffee table finished so the wood shows its natural color and its real great at least to me.
 
gonna sand it down a bit, spray some water on it, sand it again.
blo, 2-3 coats, allowing at least 48 hours in between each coat, maybe more.
Then 1-2 coats of poly, sanding with 320 between coats, and one last coat of rub on poly.The white oak is beautiful enough, and I have to keep it simple.
 
uneven clamping pressure gave me a little bow in the center of the completed top. And because I left so much heavy wood piled on the assembly table, the ply center sagged a bit, so Im sure that didnt help.(I tried to correct it all with 2x4s under clamps and all supported with shims to keep flat.I used 7 bar clamps but didnt have any to clamp from other side, when I glued up it all was flat and straight.
the first pics show how the wood bowed up at ends.bed 383 (Medium).jpgbed 384 (Medium).jpgbed 386 (Medium).jpg I can almost use my arms and force it down, so I clamped it down and I want to see if it moves again tonight to straighten itself out. I can screw it in and clamp it down to the base to keep it straight, but Id like it to start off almost perfectly flat.
I put a very narrow strip under the center of tabletop where the table bows in.
dont know if any of this will help.Surface came out pretty flat, so I have somewhere to start as far as final sandings. Its not as heavy as I first thought, I can lift one side and hold it up.

My original sketch was for a 40-41 inch wide by 74-76 inch length.
I have 40.5 inches width left and close to 80 inches length, but I have some bad snipe on two pieces so Im losing 4-5 inches on that side, so I should end up with 74 inches no problem.
I started with 48 inches rough wood width, but alot of problems with wood, then jointer headaches, I had to keep cutting off more, and one mistake cost me another 1/2 inch.

so if IM doing the math correctly, I started with 80 bf of pretty rough and poor condition wood, and my final size will be a bit under 42 bf. Thats 38 bf of lumber I cut/joint/planed off during the course of this top. Wooooooooboy.....good thing it only cost me 90 cents a bf. As compared to the pedestal base, I used mostly shorts and extra pieces of cutoffs from other projects, so I guess it balances out a bit in the end.
I figure the top weighs around 180 or so lbs?(I know the post is long, but its all new to me, Im just sharing my thoughts on it)

ofcourse, ruining the final cuts could be very costly, but Im hoping the plunge saw and track help me get a decent final cut.

on fathers day, my son is coming over and he will help me get the top inside so I can work on finishing it, and then have the space to start on the buffet/server to match the table.
I have just enough thick oak to make one more top for the buffet, but Im putting legs on it, instead of a pedestal style base. I want to make inset doors for the buffet, but I have 8 blum hinges, but I think they are for face frame mount overlay doors, so I might have to change my design a bit, I dont want to buy new hinges.(these were from the entertainment unit and my miscalculations and I had ordered 8 hinges)
 

Attachments

  • bed 390 (Medium).jpg
    bed 390 (Medium).jpg
    42.9 KB · Views: 19
  • bed 388 (Medium).jpg
    bed 388 (Medium).jpg
    60.1 KB · Views: 19
Last edited:
Hey Allen if you can try flipping the top over and let it sit for a day. Could help to balance the miosture content of the top and straighten itself out.
 
alan, it moved back alot without any clamps, I just flipped it like you said.
A little more and it will be there.(almost like when one hurts their back, you tilt a slight bit)bed 403 (Medium).jpg


woodworking has alot to do with chemistry. The chemistry one has with his tools, with his wood, chemistry.

Well, my chemistry has failed. I cant blame my tools, my mess up with this top was my failure to wait for help when I knew the time of day was upon me.
When my acetylcholine tank runs dry, (and I knew I should have made my treatment this week, but work and upcoming parties made me change my plans till the 28th for treatment), my muscles give way, in a kind of just ok, Ive had enough, time to let go.
And so when I dropped that 11 inch section, it split and I thought I could work around it. Seems some of the oak I had was the type of white oak they slip onto trailers as bases, not furniture grade.
I didnt store it the best, never thought Id use it for anything besides maybe a leg or two.

and so, I set up the rails and plunge saw and made my cuts. Again, my poor vision cost me dearly, but like everyone says, its only wood. I managed to get nice squared off straight cuts on all sides, but I took it down to 38.5 or a bit more. The length turned out ok.(74, where I wanted it) I had to trim down width to accomodate that crack that seemed to grow and grow.bed 400 (Medium).jpg
As the picture shows, top and bottom, its in a bad spot.bed 394 (Medium).jpgbed 396 (Medium).jpgand the bottombed 409 (Medium).jpg
I called it a night, I used my compressor and spent a while blowing glue into the cracks, then doing it again, and again.
My wife came over, I told her I messed things up, she said, hey, even with that pasta fazool thing you messed it up? I said, no, its Festool, its a plunge saw, (whatever, at least she doesnt object to me buying tools, and I wont do better in 8 lifetimes).
My next thought is taking a strip of mahogany or sapele and glueing one strip on each side, to bring the width back to 40, and covering that one inch bad spot at the end where the oak split.
As I show in picture, the mahogany strip will be on both sides ofcourse,bed 401 (Medium).jpg not the ends. Not sure yet, going to let my son decide sunday.I Might just plane up some 5/4 white oak and attach a piece to the bad side.
I wasnt going to post pictures of my crap job, but I wouldnt flake out on the one or two that might still be watching this build.Cant type anymore,my hands are done.
 
Don't look at it as a mistake Allen but a design change. Sometimes things happen for a reason and I guess it was meant for you to put mahogany edgeing on to tie it in with the legs. :thumb: Keep up the good work and take advantage of the help this weekend and let them do all the heavy lifting for you.
 
when I get home from work today, Im going to glue a small piece of white oak to the bad side to both cover up the crack and add more width. No mahogany.might have to wait for sunday.
 
Last edited:
pooh!

top didnt come out too good. Not happy with it.
 

Attachments

  • bed 411 (Medium).jpg
    bed 411 (Medium).jpg
    45.2 KB · Views: 35
  • bed 412 (Medium).jpg
    bed 412 (Medium).jpg
    51.7 KB · Views: 37
  • bed 413 (Medium).jpg
    bed 413 (Medium).jpg
    53.3 KB · Views: 33
  • bed 414 (Medium).jpg
    bed 414 (Medium).jpg
    51.5 KB · Views: 32
Last edited:
here is a suggestion allen, i think you might want to add a strip along the other side as well to balance it out..plus give it some more width like you were shooting for originally. and the small holes doesnt bother it ,,makes it look old:thumb:
 
here is a suggestion allen, i think you might want to add a strip along the other side as well to balance it out..plus give it some more width like you were shooting for originally. and the small holes doesnt bother it ,,makes it look old:thumb:

I didn't see that at first glance. Larry's right it would make that top look more uniform/balance.
 
Top