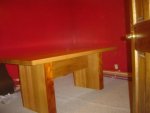
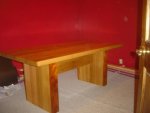
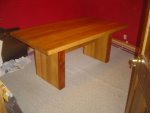
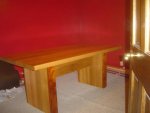
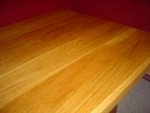
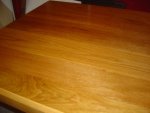
white oak dining table-COMPLETED

+ 1 for the additional strip and take a look at the latest edition of Fine Woodworking. Theres a article on fixing table tops and one that looks just like yours. From what i see it would sort out any future wonderings of the wood. The guy put a long dovetail in under the top where its attached to the legs. Although you have a different leg arrangement i am sure this could work for you and to your advantage.

And for the record there are way more than one of us following your posts.:D
 
I say its got character. Forge ahead. :thumb: The top attachment method Rob mentions could be of interest to you. I am playing with a design to incorporate a shouldered DT attachment after reading that article online. Looks interesting and solves certain problems as well.
 
I appreciate the suggestions.
I will not subject myself to anymore mishaps with this top.
I have to be a bit more careful in my design when I make heavy pieces.
If I cant move something myself, at least to slide it a bit on a table, Im going to have to pass in the future.
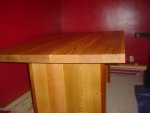
The top will be finished, I did raise the grain , sand it down, oiled it, second coat will go on tomorrow, bottom was oiled, then I will poly until it shines like a mirror, this is what my son wants.
IN the future, when Im in the mood to fiddle, I will laminate white oak boards face to face and build a new top. He needs the table, he wants the top as it is, he loves it, its functional, its almost flat, and Ill attach it with simple brackets with undersized screws so it can move all it wants. It can move from nassau county to michigan, I have to let this one go. I lost this battle, but wont lose the war. Ill post the finished table later this week or next week.
Super busy week coming up, graduation parties in my yard, and my treatment starts sunday, so Im in the pit stop for a few days getting repaired.

Never think I dont listen to or follow advice IM given by you guys.
Im just not willing to put much more effort into this top.
 
the worst part of this top for me is now, after raising the grain and sanding again, then carefully and evenly applying the oil, its has a silky smooth feel to it. A bit of buffing, it will shine without any poly.(I got it to where I wanted it, besides some worm hole damage)
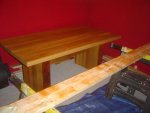
I left it sitting on 2 2x4s in the center only, to see if the wood would move, and sure enough, one side is almost completely flat, but that one end, the far end in the picture, refuses to move, and to insult me, it moved the opposite way, it defied gravity! I figured the weight alone of the top will drag the ends down if I only supported it in the center.
And IM quite sure all the problems(besides me dropping it) were because of the grade of wood I used and mixed. Some of the oak is more like furniture grade, some is just cruddy with knots and stuff.
For me, it was an interesting build as I really learned about how careful I have to be with table top wood selection and wood movement.

There is one positive thing for me with this project. I achieved the exact look I had in my head when I drew it out. Not so much the simple design, but the look I was going for. I guess like a contemporary butcher block style table.
I will keep the chairs very simple, very, very simple.
 

Attachments

  • bed 417 (Medium).jpg
    bed 417 (Medium).jpg
    44.4 KB · Views: 34
  • bed 419 (Medium).jpg
    bed 419 (Medium).jpg
    50.4 KB · Views: 36
Last edited:
Allen i still say you are way tooo hard on yourself. Looks great its real its made of real wood not chipboard or mdf. It can host a dinner party or a poker evening and when the guys put something down hard on it, well it can take it. I think its a fine job.:thumb:
 
Well, it may have some details that weren't what you originally intended, but I think the final result came out great. I really like the design...all kind of stout, and good-looking, too. Your son will get many, many years of service from the table, and I'm sure he'll be proud of its origins every time he uses it.
 
sanded to 220, wet down, sanded with 220, wet again, sanded to 220, blo, 2 coats, then 2 coats brushed on poly, sanding with 400 grit in between coats of poly, then one rub on coat of poly.I must keep it very simple. finished.
My idea and design worked out great from inception to final look, but Im going to have issues with the top until I replace it.
It looks nice, has a nice finish, and will last a long time.
Difficult to get an overall picture or from all sides, the room is hard to use a camera in. When I get it into my sons dining room, Ill post pics of all sides.
It turned out a bit better than I expected, but still under my desired expectations.
My wife loves it, wants to keep it as our dining table.
 

Attachments

  • bed 420 (Medium).jpg
    bed 420 (Medium).jpg
    38.6 KB · Views: 29
  • bed 421 (Medium).jpg
    bed 421 (Medium).jpg
    41.8 KB · Views: 31
  • bed 422 (Medium).jpg
    bed 422 (Medium).jpg
    52.4 KB · Views: 33
  • bed 423 (Medium).jpg
    bed 423 (Medium).jpg
    43.2 KB · Views: 35
  • bed 427 (Medium).jpg
    bed 427 (Medium).jpg
    47.4 KB · Views: 27
  • bed 428 (Medium).jpg
    bed 428 (Medium).jpg
    51.4 KB · Views: 24
Last edited:
Thats a real great table Allen..what was all the fuss about. came out brilliant in my books. He is a lucky boy. I dont remember starting out with anything near as nice and even my first store bought table was not and it had similar legs.:thumb:
 
Allen,
I looked back on your history posting here on Family woodworking and if there was an award for most projects completed you would win hands down. You get more done then the spinney guys and they all look good from where I'm sitting. Keep em comming cause we need guys like you to keep us motivated..:D
 
Ditto what Don said.

I rate productivity in 'Levines'.

My productivity on my projects are about .05 Levines....
 
thanx again for support as usual.
Im going to begin the server/buffet tomorrow I believe.
Thick legs, heavy top also, but I think Im going to mix up a few woods to make the top colorful. Ill keep the side panels oak, maybe the doors mahogany.
Im trying to get input as to whether drawers are wanted or just cabinet doors.

I might have to do a small built in closet, so Ill hop over there sunday and start measuring. Its a simple thing, 6 foot long closet, double pole on both sides, shelves and a few drawers in the middle.(maple plywood with cherry edges and cherry drawer fronts)
 
...Its a simple thing, 6 foot long closet, double pole on both sides, shelves and a few drawers in the middle.(maple plywood with cherry edges and cherry drawer fronts)

I had to smile when I read that. A year or two ago, we'd have never seen you make a statement like that. Back then, a closet insert would have been a pretty big project. These days, it gets a "meh" and a brush of the hand. You've come a long way in a short time. :thumb:
 
vaughn said it well allen you have made some very long strides in your quest for this hobby of woodworking, and your project list like don says is one that non of us here that i know well is close to..you never stop in our eyes and your half way threw the next one before we realize it.. thanks for showing us all your pics and the troubles and the accomplishments in between.. it is an inspiration to all of us that look , listen and learn. well done allen
 
Top