allen levine
Member
- Messages
- 12,368
- Location
- new york city burbs
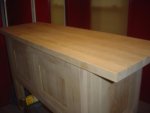
Its 3:30 here on the east coast, I managed to finish construction of the cabinet, install the doors, plane and sand down top and cabinet and now its all ready for finishing.
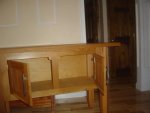
I made a slight error, by not cutting rabbets in the rear of back legs to hold a back, so I glued and pinned in a couple of small strips of maple inside the cabinet, and will attach the back to those and a back support rail I put in.
I used hand planes more on this build than all my other builds put together.
The block plane is a perfect tool for me. It has so many important uses when building rails and stiles and panels with legs.
loved doing the bevels on the bottom of the legs with it.(I bevel the bottoms so the legs dont chip or crack as easily)
Ofcourse, none will be match the other bevel exact, but at least thats a sign its hand made I guess.
I cleaned up the top with the smoother and block plane.
The only problem I ran into was when I tried to take off about a 32nd of an inch on one side of a door, I had a rough time planing the end grain of the stile. I ended up with a bit of it botched up and used the electric and a sanding block to smooth it all out. Lengthwise on the edge of the rail, no problem, slice off just enough till I got to my mark.
I cannot believe how much time I saved today using hand planes instead of taking everything down with belt sanders and orbital sanders then hand blocks.
Since the top is a mishmosh of cheap trailer bed/pallet type white oak, I did my best to get the smoothest and mark free top I could after cutting apart all the thick oak I had.
Then wet it down to try to get some grain up, and sanded it again, then again with 220 grit. Maybe it smoothed it out a bit more.
Overall, it looks good.
My son is coming over for dinner, so Im waiting for his eyes and hands to put my bandsaw parts on, and then I have the extension cord I had to cut apart to use, Im not sure which leads take what color wire.
Hell help me bring the unit into the finishing room, where I will begin the slow rub on process of BLO at least twice with a day or two for drying.
I did not attach the back, so I can work inside the cabinet to finish it easier.
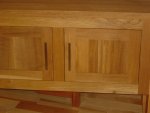
The doors just snap right off, makes that easy enough.
For my tastes, preferred pewter colored elongated ring type pulls, but my wife wants those euro stainless steel long thin handles, like the kitchen cabs have nowadays.
Ill let the kid make the decision. Accomplished a ton today, even though its 94 and very humid.
Tomorrow I start assembly on some adirondack chairs, and a cutting board or two while I start making templates for the chairs for the dining table.
I will have to glue up alot of white oak because I dont have anything thicker than 4/4 and I want 6/4 inch legs when all finished and milled.
Going to be a long tedious process. These will be the last chairs I will ever make.
Ill post a pic later when I get the unit inside.
I made a slight error, by not cutting rabbets in the rear of back legs to hold a back, so I glued and pinned in a couple of small strips of maple inside the cabinet, and will attach the back to those and a back support rail I put in.
I used hand planes more on this build than all my other builds put together.
The block plane is a perfect tool for me. It has so many important uses when building rails and stiles and panels with legs.
loved doing the bevels on the bottom of the legs with it.(I bevel the bottoms so the legs dont chip or crack as easily)
Ofcourse, none will be match the other bevel exact, but at least thats a sign its hand made I guess.
I cleaned up the top with the smoother and block plane.
The only problem I ran into was when I tried to take off about a 32nd of an inch on one side of a door, I had a rough time planing the end grain of the stile. I ended up with a bit of it botched up and used the electric and a sanding block to smooth it all out. Lengthwise on the edge of the rail, no problem, slice off just enough till I got to my mark.
I cannot believe how much time I saved today using hand planes instead of taking everything down with belt sanders and orbital sanders then hand blocks.
Since the top is a mishmosh of cheap trailer bed/pallet type white oak, I did my best to get the smoothest and mark free top I could after cutting apart all the thick oak I had.
Then wet it down to try to get some grain up, and sanded it again, then again with 220 grit. Maybe it smoothed it out a bit more.
Overall, it looks good.
My son is coming over for dinner, so Im waiting for his eyes and hands to put my bandsaw parts on, and then I have the extension cord I had to cut apart to use, Im not sure which leads take what color wire.
Hell help me bring the unit into the finishing room, where I will begin the slow rub on process of BLO at least twice with a day or two for drying.
I did not attach the back, so I can work inside the cabinet to finish it easier.
The doors just snap right off, makes that easy enough.
For my tastes, preferred pewter colored elongated ring type pulls, but my wife wants those euro stainless steel long thin handles, like the kitchen cabs have nowadays.
Ill let the kid make the decision. Accomplished a ton today, even though its 94 and very humid.
Tomorrow I start assembly on some adirondack chairs, and a cutting board or two while I start making templates for the chairs for the dining table.
I will have to glue up alot of white oak because I dont have anything thicker than 4/4 and I want 6/4 inch legs when all finished and milled.
Going to be a long tedious process. These will be the last chairs I will ever make.
Ill post a pic later when I get the unit inside.