G0453Z Arrives

rob i have been fortunate to have met both and they are definatly good folk.. and i am sure that jim done a fine job on making glenn tow the rope:) he might be small but he has a REAL big stick to mold youngsters:)
 
If you don't already have it setup, give me a call and I will come over with the other "James Bradley" and the three of us should have no problem.
 
Well Glen how does that bad boy cut? I have loml convinced on the 15" planer but not quite yet on the spiral cutter head. A few pics of some glass smooth wood thats been run thru it could help me convince her.:wave:
 
First off, thanks to my brother and nephew for offering to come over to help out. My friend was already coming over to pick up some items already . . . he brought his brother so getting the planer on the floor was pretty easy:

G0453Z-off-pallet.jpg

Here's my poor-man's Rotocator; a 1-2-3 block with a HF dial indicator bolted on:

Rotocator-poor-mans.jpg

The bed rollers are looking good at .002" proud right out of the box. I've got to do a lumber run and pick up some more walnut before it vanishes from the face of the earth. I need some other material as well but it won't take long.

WhenI get back I'll do a rough check on the other settings and then get the tables on. I'll run some material and judge how much, if any, adjustments will be required to get it all set. If its anything like my jointer, I won't have much to do.
 
Last edited:
Yeah, the lumber run turned out to be a bust but I have made progress. . . . I learned on my other helical head machine that even though you think you have cleaned everything up, there is always some goo hiding in the nooks and crannies waiting to shoot out and foul that nice piece of birds eye maple.

Cut a board that will fit the width and length of the table and clamp it in place. Pull the top and cover it with a board. Add flaps of cardboard generously provided by Grizzly in the packing crate. Cover openings and add a little tape to cover the small escape routes and fire the thing up for a couple minutes.

G0453Z-clean-up-001.jpg

There, nice and clean.

G0453Z-clean-up-002.jpg

All the last bits if goo go out in the trash.

G0453Z-clean-up-003.jpg

Now to attach and adjust the tables. BTW, it is surprising how easily something this heavy moves around on the built it mobile kit.
 
suggestion glenn, if it moves easily on the rollers you might want it to be braked in some way when running it.. you dont want to chase it around your shop when you start pushing wood threw it..ALSO when you test it, take run a piece threw the right direction for the grain and then run it threw the other way.. and show us the differnce.. i willing to wager there wont be any at all..at last from what i have seen them do..
 
Wow that really is a nice looking machine Glenn. Cant wait to see it perform.

Do you have a built in mobile base on your jointer cause the one on mine from Grizz is also great. Well worth it.


Larry if that mobile base is anything like mine being grizz the one end that lifts drops and has two feet that sit solid on the floor.

:lurk:
 
Three parallel clamps reversed as spreaders make the table setup go pretty quick:

G0453Z-set-up-001.jpg

This 3/4" board started out as a 2x6. I've got a couple more that I'll run down to paneling to warm her up:

G0453Z-set-up-002.jpg

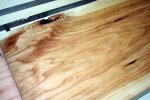
The marks I was worried about when taking small bites only show up if I run the board through twice at the same setting. It seems even the smallest increase in depth eliminates them so that makes me happy. Larry was right, on this 2-by at least there is no difference in surface quality regardless of direction. I'll run some good stuff after some more tweaking:

G0453Z-set-up-004.jpg

There was a bit of snipe on the left side. I re-checked with my poor-man's-Rotocator and sure enough, the leading bed roller was high on that side. I adjusted it down and everything is just dandy. The speed shift is reasonably smooth. At first it seemed hard to shift but I realized there is not real "thunk" from one position to the other. Once I figured that out it was fine.

My modified (oversized AFF filter on top and solid bag on the bottom) 1HP Delta does fine on gathering the chips. I actually seem to get less "blow by" than I did with the lunchbox unit. If I had any issue I would just add a drop to the cyclone which would take care of it I'm sure.

So, all in all, very satisfied; everything showed up and was in good shape. It went together easily except for filling the gear oil chamber; what a pain. The adjustments are pretty straight forward using eccentric bushings or threaded rod with setting nuts for the adjustments; no struggling to hold something "just there" long enough to tighten it down.

It is soooo much quieter than the lunchbox. Runs very smooth. I have a reminder on my calender to check the belts after whatever the interval is in the manual and a note to change the gear oil at the specified interval as well. 30 years ago when I used to split tractors for a living I learned the value of liquid honing and the price for not changing your fluids when you were supposed to ;-)

P.s. the machine stands on two steel wheels and two large rubber feet when the mobile base is "locked". My planer uses the same mechanism and stays put well. You step on the lever activated front wheel to raise the rubber feet up and away you go.
 
Last edited:
Yep. No difference on the 2x material regardless of direction. Once I get her warmed up I'll run some wild grained stuff through and post some pics.
 
As promised, here is some reversing cherry that gave even new knives on my DeWalt fits. I do not look for a planer to give me a finish ready surface but would like it to be close (less work for my card scraper). I ran this cherry one way and then the other, wiped it with mineral spirits to look for problems and snapped a couple shots.
 

Attachments

  • G0453Z-cherry 003.jpg
    G0453Z-cherry 003.jpg
    77.3 KB · Views: 32
  • G0453Z-cherry 005.jpg
    G0453Z-cherry 005.jpg
    103.8 KB · Views: 31
So whats the verdict? Is it less work for your card scraper?

So far, the verdict is: better finish on difficult figure and less work to get to a final surface ;-) I'm trying to figure out how to put a DRO on it. I became so used to my Wixey on my DeWalt but, it has only a 6" range.
 
the range on the new planer isnt any thicker is it?? and so like alan asked, what is your thoughts on the final out come from the planer ?? is it as good as you had hoped for and how would you compare it to the old planers finish..???
 
Looks like it is doing a great job.

If width didn't matter, do you think the Bryd head would get the same results on your 735? Do you feel the investment would be worth it ?
 
Top