glenn bradley
Member
- Messages
- 11,542
- Location
- SoCal
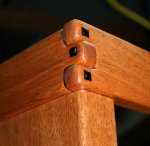
Some stuff at work and life in general have slowed me a bit but, mostly it is just the final shaping and detail work that seems to take so long. There's 40 pegs on this piece in 1/4", 5/16" and 3/8" size. I finished the last dozen or so just now.

I just have to set them and it will be time for a final sanding and then off to the finishing steps.

One more "almost there" shot.

1398
I just have to set them and it will be time for a final sanding and then off to the finishing steps.
One more "almost there" shot.
1398
Last edited:

") It is looking spectacular Glenn
It is looking spectacular Glenn


 or I'm missing something here?