How I make Mallets.

Chuck Thoits

Member
Messages
4,045
Location
NH
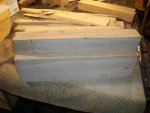
First off I start with some good green Hickory

attachment.php


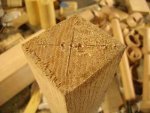
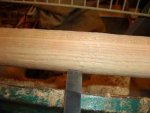
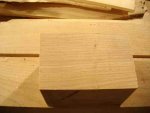
Than cut out the head mine is 2.75 wide by 3.75 tall by 5 inches

attachment.php


It is hard to see in the pic but each end is cut at a 5drege angle.
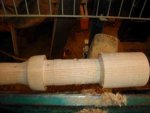
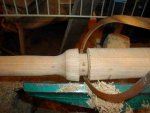
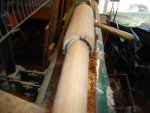
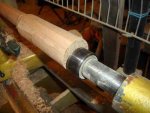
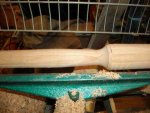
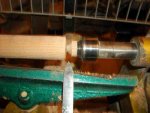
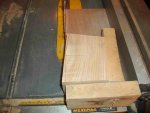
Now that the head is cut to size it's time to drill it. I am using a 1.25 bit for this.

attachment.php


Now to bevel the top. i whipped up this quick sled for the job of putting a 5 degree bevel on the top of the head.

attachment.php


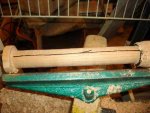
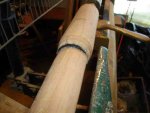
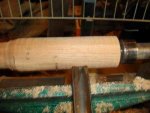
A quick trip around the head with a .25 inch round over bit.


attachment.php

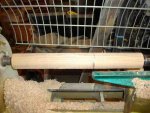
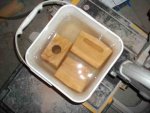
Now it's time to set the head aside in some DNA for a spell.

attachment.php

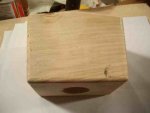
You can see one laying on it's side with a .75 by .5 slot cut into it. I did that with a plug router. That slot will be 1/2 to 3/4 filled with steel shot. To make a dead blow mallet.

attachment.php
 

Attachments

  • tn_mal 001.JPG
    tn_mal 001.JPG
    59.3 KB · Views: 669
  • tn_mal 002.JPG
    tn_mal 002.JPG
    50.8 KB · Views: 671
  • tn_mal 004.JPG
    tn_mal 004.JPG
    50 KB · Views: 668
  • tn_mal 005.JPG
    tn_mal 005.JPG
    59.3 KB · Views: 671
  • tn_mal 007.JPG
    tn_mal 007.JPG
    39.5 KB · Views: 671
  • tn_mal 010.JPG
    tn_mal 010.JPG
    62.4 KB · Views: 671
  • tn_mal 009.JPG
    tn_mal 009.JPG
    73.4 KB · Views: 669
Last edited:
While we wait for the DNA to work. It's time to make the handle. I need to add that for making an oval handle like this you will want either a large heavy lathe like mine or your mindy bolted down to something big. There is a lot of vibration with the out of balance spin.
First off I mark out the handle center and a mark 3/16 to each side of center.

attachment.php

Than I put it on the lathe on the center marks and rough it round to 1.5 inches.

attachment.php


I than lay out the handle and the head tenon.

attachment.php


Now I move it to the first off center mark.

attachment.php


Turn off 3/16 of an inch I marked it with a black marker so it could be seen better.

attachment.php


Now move it to the other off center mark and take off 3/16.

attachment.php


Again marked for better viewing

attachment.php
.

You can see that by taking 3/16 off each side has left a line in the middle where they come together. I marked it for better viewing.

attachment.php


I return it back to the center mark and set the bench mark for the tenon. And finish shaping the handle.

attachment.php


I take the extra off for the tenon.


attachment.php
 

Attachments

  • tn_mallet 030.JPG
    tn_mallet 030.JPG
    48.4 KB · Views: 651
  • tn_mallet 029.JPG
    tn_mallet 029.JPG
    63.6 KB · Views: 649
  • tn_mallet 023.JPG
    tn_mallet 023.JPG
    81.9 KB · Views: 648
  • tn_mallet 022.JPG
    tn_mallet 022.JPG
    58.2 KB · Views: 647
  • tn_mallet 021.JPG
    tn_mallet 021.JPG
    67.3 KB · Views: 648
  • tn_mallet 018.JPG
    tn_mallet 018.JPG
    54 KB · Views: 648
  • tn_mallet 014.JPG
    tn_mallet 014.JPG
    64 KB · Views: 648
  • tn_mallet 011.JPG
    tn_mallet 011.JPG
    68.7 KB · Views: 651
  • tn_mallet 008.JPG
    tn_mallet 008.JPG
    89.8 KB · Views: 645
  • tn_mallet 005.JPG
    tn_mallet 005.JPG
    71.9 KB · Views: 652
Last edited:
Chuck way to go so cool. Here i was last night actually doing research on making a mallet. I just finished my sharpening of all those old chisels and decided I needed a decent mallet to go with them. :thumb:

The pine junk i brought with me from SA just dont cut it. But i think it is made similar to your design so when i go to the shop just now i am gonna take it apart. It aint got any shot though.

You said steel shot, is this gonna just be a slug of steel or you gonna fill it with loose bits. If you do is it gonna be steel as opposed to say lead?

I am thinking of taking some old lead sinkers i have from my childhood days and melting them down to pour into the mallet head. Thoughts on that?

Thanks for the tutorial. BTW forget the races man stick to woodworking cars a waste of time.:D:scram:
 
Hi Rob.

If you melt those lead shots into the mallet, you won`t get a dead blow, you'll get only momentum and a heavier mallet. The pellets or shots need to be loose inside the mallet, so that they kill the bouncing back.
 
Hi Rob.

If you melt those lead shots into the mallet, you won`t get a dead blow, you'll get only momentum and a heavier mallet. The pellets or shots need to be loose inside the mallet, so that they kill the bouncing back.

The reason for the steel bird shot is if I use the 4 or 5 pounds of lead shot I have over time the lead shot will form a mass (being a soft metal) and end up a glop stuck in the head turning it into a heavy mallet in stead of a dead blow.

larry merlau hey chuck, will the shot being on one side only make it hit off target?
And just what makes you think that slot is only on one side.:thumb::rofl::rofl::rofl::rofl:
 
Cool stuff, Chuck. I copied your first post to the Tutorials area, and when you add more pics, I'll copy them over as well. ;)
 
I take it off and check the fit. Looks like a winner.

attachment.php


Return it to the lathe and part the ends off.

attachment.php


Handle end all cleaned up. As you can see this handle is an oval.

attachment.php


Cut a grove in the head end and make a wedge.

attachment.php


Now set it aside and wait for the DNA to do it's trick. Once that has worked and all is dry I'll up date this with the assembled mallet.
The tool I use to get things round.
attachment.php

The tool I use to take things to the size I want them.
Some may ask why and the only answer I can give is this is what works for me.
attachment.php


The tool I use to part things. as you can see I use it a bit different than most. But again this is what works for me.

attachment.php


The tool I use for some shape.

attachment.php


The rest of the pics are just shots at different times.
 

Attachments

  • tn_mallet 039.JPG
    tn_mallet 039.JPG
    41.5 KB · Views: 521
  • tn_mallet 037.JPG
    tn_mallet 037.JPG
    39.7 KB · Views: 521
  • tn_mallet 031.JPG
    tn_mallet 031.JPG
    52.9 KB · Views: 524
  • tn_mallet 027.JPG
    tn_mallet 027.JPG
    77.8 KB · Views: 7
  • tn_mallet 026.JPG
    tn_mallet 026.JPG
    59.3 KB · Views: 520
  • tn_mallet 010.JPG
    tn_mallet 010.JPG
    62.3 KB · Views: 524
  • tn_mallet 009.JPG
    tn_mallet 009.JPG
    63.1 KB · Views: 519
  • tn_mallet 033.JPG
    tn_mallet 033.JPG
    69.8 KB · Views: 1,035
  • tn_mallet 028.JPG
    tn_mallet 028.JPG
    67.7 KB · Views: 7
  • tn_mallet 025.JPG
    tn_mallet 025.JPG
    95.4 KB · Views: 8
Last edited:
Cool stuff, Chuck. I copied your first post to the Tutorials area, and when you add more pics, I'll copy them over as well. ;)

Thanks Vaughn:thumb::thumb:
Thought I would toss this in. I am not going to sand these a lot and put a fancy finish on them. They are users not lookers. If I sand them to much and get carried away with the finish people will want to hang them on the wall to look at.:rofl::rofl::rofl:
 
Last edited:
Top