
Bernie Weishapl
Member
- Messages
- 4,834
- Location
- Goodland, Kansas
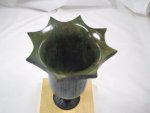
Jonathan asked that I post how I turn these. I hope it explains it well enough for all and for the kids to understand. Basically I took snap shots as I progressed. Anyway here is a green one I did today. I was going to try different colors but found out india ink and transtint dyes don't work well together so went green till I can order some other colors of transtint dye in.
Also on this one I messed up and wasn't paying attention. I parted off the vase before I made a detent for the lid so it will be like the red one with no lid.
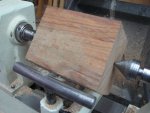
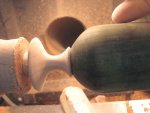
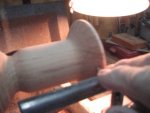
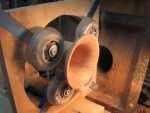
Well here goes. As you can see I mount a blank which this one is 4 1/2" X 4 1/2" X 5 1/2" long. It is then turned round. From there I start shaping the outside profile. Once I get it pretty much where I want it I mount a steady rest as when I hollow the inside profile it cuts down on the chatter a bunch. Once the profile is where I want it I remove the steady rest and go thru with sanding. I start here at 120 grit up to 400 grit. Once this is all done and I am satisfied I then take the tool rest to center height. I then begin to mark a mark for each detent. Once this is done I find something round that will give me a quarter circle. This happens to be for me a solder wick container. Once these are marked and I am satisfied I then move to the oscillating spindle sander and sand away all the quarter circles to form the scallops. Once this is done it is returned to the lathe and sanded one more time to remove pencil marks with 320 and 400. I then apply the dye to the piece and use a sharpie for the blackening of the scallops. It is then parted off leaving a short 3/8" tenon with will be glued into the base and makes it solid.
From there I take a piece of 2 X 2 X 6 maple, poplar, etc and start making the knob if I do a lid and the base. I just keep working the opening for the vase to sit into the base until it fits snugly and has a good seat. Both the knob and base are dyed with black india ink. Couldn't get all the pictures on this thread so you will see them in the next one.
Also on this one I messed up and wasn't paying attention. I parted off the vase before I made a detent for the lid so it will be like the red one with no lid.
Well here goes. As you can see I mount a blank which this one is 4 1/2" X 4 1/2" X 5 1/2" long. It is then turned round. From there I start shaping the outside profile. Once I get it pretty much where I want it I mount a steady rest as when I hollow the inside profile it cuts down on the chatter a bunch. Once the profile is where I want it I remove the steady rest and go thru with sanding. I start here at 120 grit up to 400 grit. Once this is all done and I am satisfied I then take the tool rest to center height. I then begin to mark a mark for each detent. Once this is done I find something round that will give me a quarter circle. This happens to be for me a solder wick container. Once these are marked and I am satisfied I then move to the oscillating spindle sander and sand away all the quarter circles to form the scallops. Once this is done it is returned to the lathe and sanded one more time to remove pencil marks with 320 and 400. I then apply the dye to the piece and use a sharpie for the blackening of the scallops. It is then parted off leaving a short 3/8" tenon with will be glued into the base and makes it solid.
From there I take a piece of 2 X 2 X 6 maple, poplar, etc and start making the knob if I do a lid and the base. I just keep working the opening for the vase to sit into the base until it fits snugly and has a good seat. Both the knob and base are dyed with black india ink. Couldn't get all the pictures on this thread so you will see them in the next one.
Attachments
-
 Vase Step 1.jpg59.1 KB · Views: 41
 -
 Vase Step 10.jpg46.9 KB · Views: 43
 -
 Vase Step 9.jpg55.3 KB · Views: 42
 -
 Vase Step 8.jpg63.4 KB · Views: 47
 -
 Vase Step 7.jpg59.3 KB · Views: 46
 -
 Vase Step 6.jpg40.8 KB · Views: 45
 -
 Vase Step 5.jpg48.9 KB · Views: 40
 -
 Vase Step 4.jpg56.7 KB · Views: 43
 -
 Vase Step 3.jpg57.9 KB · Views: 42
 -
 Vase Step 2.jpg59.9 KB · Views: 38


 If it is to dark when I get it on I will use 320 or 400 grit to sand it back some. I have some DNA in a spray bottle and will spritz/wet the piece to get the dye to blend. Hope this helps.