Sprayed Lacquer Turnings update

Dan Mosley

Member
Messages
1,169
Location
Palm Springs, Ca
I called Mohawk the other day and talked to a technical rep about their product and the problems I was having spraying it. He explained to me that Mohawk is Acetone based and to spray it effectively you have a 2-3hr window of time to add additional coats that should burn in. After that there will probably be layering issues.

Also said that it would be best (for woodturning and art objects etc..)to use one of there string instrument lacquers because of a higher solids content ( 90 or something like that ) whereas the others do not. The string instrument lacquer would produce the glass like finish (less durable but nicer finish achieved easily). I was complaining about not being able to get with the Mohawk WW.

Further, I probably should have not bought this type of lacquer - and that not all lacquers are made equal <----------no kidding
Comment:::: "Geeeee....you think they may have wanted to educate your sales people on this information before selling it with alot of false promises........
His final suggestion after I said that i guess ill probably get rid of it because the Campbell is working well was to use it for dipping.
Comment:::::Nope, I think ill just dispose of it and chalk it up to a hard lesson learned.............


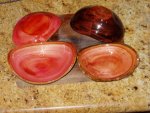
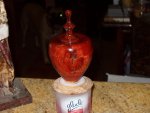
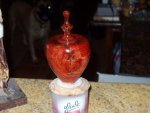
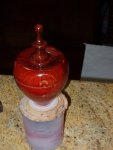
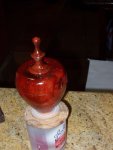
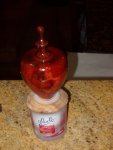
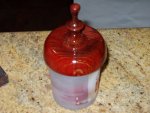
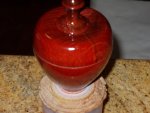
Below are some smaller projects I used to try out my spraying ability. They turned out well and I figured out a way to correct some flaws when you spray. If you get some sag or pinhole bubbles or whatever you call them I just let it dry for a bit and they spray it with lacque thinner and watch the magic..............
 

Attachments

  • Campbell-1.jpg
    Campbell-1.jpg
    85.2 KB · Views: 49
  • Campbell-2.jpg
    Campbell-2.jpg
    73.1 KB · Views: 49
Wow Dan, They sure do have a gloss, don't they? Is that the "as sprayed" finish, or did you sand and rub it out to get that gloss? Looking good there buddy. And, this was with your new spray gun system?
 
Yes I notice the gloss builds fairly easy, the pictures in my post are with about 4-5 coats on which seems to work well to cover without anything showing thru. The finish is sprayed as is like you said - I am going to let one of them dry well - sand with 600 and buff with Ren wax....just for fun.......
After noticing that I can spray the thinner on it to get rid of imperfections I do not see the need to buff really (unless its to level out a bad error or dust etc...)

I sprayed it with the system I built with all of your comments and help and its working very well right now.

I have a longer hose attached to the filter with a inline filter so I can spray it outside in the driveway. I found spraying inside the garage creates a cloud. So far I am on the learning curve but experimenting my way along with tones and dyes has added another creative aspect to the turnings........
 
Dan, what pressure are you spraying at? Maybe if you experiment lowering your air pressure you won't experience as much of the "cloud" of spray mist. You are using lacquer, which should be pretty thin and not need a great deal of pressure to atomize for good application. I spray small things at as low as 18 to 20 # with good results, using thinned product. And, I don't even own a gravity feed gun. YMMV.

Keep us posted. And glad I have been able to help.

Aloha, Tony
 
Tony - Vaughn.......... I sprayed today and was using close to 20psi but it didnt seem to spray well so I up'd it to 28 and that maybe a bit to high. So tonight im going to spray some more coats on a few projects I have and im going to try betwen 20-25psi to see how that works. Your right on the higer pressures creating the cloud or snowy look so I lowered it but for the ML Campbell im thinking between 20-25.

Below is a picture of a small box that I made today - I dyed the wood with ruby red and sanded lightly - let it dry for a hr or so - the box is dried old pc of walnut - I then sprayed on a couple very light coats and knocked it down after about a hr -then applied several more coats one after the other with about 15min set time between coats - I than lightly sprayed the pc all over with lacquer thinner to even things out. It looked good but I got called away and left it sitting in the garage - temps here are in the mid 100's and im sure the garage is a oven. When I returned there were pin dots on it in different areas - I have had it happen before and im not sure what is causing it..........could it be the spraying of lacquer thinner ? but on the other pc's I didnt use lacquer thinner....or the heat in the garage ? or to many coats in to short of time ? or to thick of coats ?

See the pictures below if you look close you can see the needle dots im talking about.....................thoughts ???


Side note - 1). I mixed some powder dye analine with lacquer thinner and it sprays on fairly good - just playing around to see what works and how well.......but sprayed it
outside in the drive way.......ie...well ventilated and wearing a mask.
2). I picked up some artists oil this evening to see how well it can be mixed in with lacquer for tone........more to come
 

Attachments

  • P1010016.jpg
    P1010016.jpg
    53.1 KB · Views: 17
  • P1010015.jpg
    P1010015.jpg
    52.2 KB · Views: 18
  • P1010014.jpg
    P1010014.jpg
    70.1 KB · Views: 17
  • P1010013.jpg
    P1010013.jpg
    67.9 KB · Views: 18
  • P1010012.jpg
    P1010012.jpg
    68.4 KB · Views: 21
  • P1010011.jpg
    P1010011.jpg
    67.5 KB · Views: 19
  • P1010007.jpg
    P1010007.jpg
    58.4 KB · Views: 19
  • P1010006.jpg
    P1010006.jpg
    58 KB · Views: 18
  • P1010001.jpg
    P1010001.jpg
    58.4 KB · Views: 19
  • P1010024.jpg
    P1010024.jpg
    51.5 KB · Views: 21
Last edited:
Bernie...........i bought one of the harbor freight cheap units and it didnt work right so they sent me another one that worked ok at best. The Badger 250 model I bought online is about $18.00-$20.00 and works great, I got the repair kit with it just incase......no regrets on this one for a single action sprayer. Easy to clean and cleaned in seconds - literally. I just detach the bottle of lacquer and attach the thinner and spary it and wipe it down - thats it..............

I also got the critter sprayer on sale from amazon and you can attach mason jars filled with fluid to that one. I have not used it yet but I bought because it was on sale and in case the badger did not work out. At the moment Im having fun with the badger.............LOL hope it helps
 
I have not used a Critter sprayer, but my understanding it that it uses the siphon technology of old bug sprayers, like was offered as an accessory to vacuum cleaners in the 1940s and 50's. Bottom line, it works, but nobody pretended that it had an even atomization of the material, nor an even distribution of the droplets (whatever size they were). So, unless something has changed, I'm not going there.

The $25 guns from Harbor Freight are okay, at best - they look a lot like the $100 Porter Cable PSH-1, but aren't a good knock-off. Be sure to get a pressure reducer ($5-$10 extra) at the gun. In order to get enough volume through a 1/4" ID air hose, you need to run fairly high pressure on the hose - I use about 100+ psi. Then run a reducer at the gun to bring it down to 20-40 psi as it enters the gun. The air will then expand as it drops to 5 psi on the way to the tip - if you cut the pressure to 1/5, you get 5 times the volume by Boyle's law - so you need the large air chambers in the HVLP gun to get the volume up. I use my $25 Harbor Freight gun for Shellac seal coat, since I am not concerned with how smooth the finish is - I am going to sand it smooth. But I don't find that gun good enough for finish.

If your lacquer is too thick, it doesn't flow evenly (orange peel surface), but if it is too thin (or you spray thinner by itself that will dissolve the lacquer finish then evaporate), you get skinning on the surface, before the under layer drys, and therefore as the part under the skin dries, it gives off gas and busts holes in the surface. I have never had any luck spraying Nitrocellulose lacquer that was more than 50% thinner, even when I was trying to dissolve sins like cloudy finish or pinholes in earlier layers. I am not sure what the issues are on the pieces in the pictures, but I suspect it is related to a too-thin coat of lacquer/thinner.

Fish eyes can also create holes somewhat similar to those on your pieces. They are caused by contamination on the surface - often from dust, or worse, from dust created with a stearate or silicone sanding process, or some other contamination. (Stearate is a problem with water base finish, but not with solvent lacquer, but silicone contamination is universal). The finish refuses to flow evenly over a contaminated spot and creates a void. (I gave away all the silicone spray lubricant in my shop - it was supposed to be good to lubricate metal without collecting dust, but it is poison to your projects that will later be finished, even elsewhere.)

I have often sprayed solvent lacquer at well over 100 degrees. Use thin coats, since the surface drys so fast, but with lacquer it doesn't matter how many thin coats you use - it blends to become a single final coat. Humid (cool) weather is a problem for solvent lacquer - it can become cloudy if water vapor condenses in the finish as the solvent evaporates (since evaporation cools the finish). On the other hand water base lacquer requires a chemical reaction to cure, so it works fine (but slowly) in very high humidity, but the high (120+) surface temperature may interfere with the chemical reaction.

The optimum air pressure used in a gun will depend on the type of finish, thickness sprayed, outside temperature, compressed air temperature, humidity, thinner used, any retarder, gun, and lots of other factors. Look for good atomization (tiny, even droplets of finish), even spray pattern, and modest over-spray - then you will be able to adjust the pressure as required... there is no magic number someone else can give you.
 
For automotive finishes, there is an additive you put in for elimination of "fish eyes or orange peel". Is there something or is this something he could add to his recipe?
Dan, that is top notch and greatly enjoy learning from your experiences.
 
For automotive finishes, there is an additive you put in for elimination of "fish eyes or orange peel". Is there something or is this something he could add to his recipe?...

If you have silicone contamination, you can hide it (get rid of the fish eyes) by adding a lot of silicone to the finish... so much that the finish treats the contamination as "normal" and doesn't create fish eyes. Of course, you have now contaminated your gun and spray area completely. I haven't tried it, but listened to the horror stories from someone who did, quite a few years ago, on a different forum. I will not try that approach.

An additive to get rid of orange peel is called lacquer thinner.
 
Yessir Charley, "Fisheye eliminator" was one of DuPont's helpful fixes. "Better things for better living through chemistry", but that one only created bigger headches for us painters later on. I have to admit using it, but learned pretty quick. Don't use the stuff. It's better to keep what you are going to spray from getting contaminated in the first place.

Lacquer thinner does a lot of good things, when used right.

Aloha, Tony
 
Charlie-Tony-Johnathan and all..................

Thanks for all the comments this is one heck of a learning curve (experience) for me so I enjoy the comments and suggestions.

Last Night, I went out to take a closer look at some small bowls that I had sprayed and saw the same pinholes I was talking about. I do not thin down the ML Campbell at all as it sprays fine right out of the can.

What I think happened.....is Charlie is right and I may have added the coats to quickly - every 10 min or so....multiple coats...either that or it was because i sprayed lacquer thinner on them after the several coats of lacquer and did not allow drying time for the lacquer coats. The lacquer thinner seemed at the moment a great way to level things out "immediately" -They sure looked fantastic at that moment until later when they dried more and the pinholes surfaced. It may be possible that if I would have let the pc's dry for several hours and then sprayed the thinner that it would not have happened.....drying time could have been the key............

Thats what I get for experimenting all the time hugh ? LOL ahhh well

I poured lacquer thinner into each bowl and wiped them down clean back to the sanded surface. Ill try again tonight and spray on just a thin initial coat of the lacquer uncut and let it dry overnight (no rush anyway).
The other thought is that maybe by washing down the bowls with Lacquer thinner that i may be able to get out some of the silicone out that is mentioned but I realize probably not all of it (locked in the grain of the wood) but wondering if it will create a better surface to lay the lacquer down on..........hummmm another experiment..... Im guessing that MS or Alcohol washing would work just as well to clean the surface allowing for good amount of drying time on both.

Final thought----Im going to spray a couple of the bowls tonight with a light coat on each and let dry overnight.........no lacquer thinner....spray straight out of the can.........
 
Last edited:
Dan, what is the consitancy of the lacquer "right out of the can"?

I have most always thinned to a ratio of 100%, (that's about 50/50 mix) or even as far as 125%. Of course, that is for sparaying the nitrocellulous or acrylic lacquers I used.

Charley? How bad was I doing? My results were good.
 
Dan,

I don't know the exact numbers, but the percent solids in Nitrocellulose lacquer is around 25%. Therefore the other 75% of what you buy evaporates, and makes the government bureaucrats mad. (The stuff that evaporates is similar to car fuel, not like the banned fluorocarbons that were killing the upper atmosphere).

Nitrocellulose lacquer gets caught in a regulatory war. If they say "spray out of the can" (as most do), then they only have to count the solvent in the basic can as VOC - Volatile Organic Compounds - which means every gallon has 3 quarts of VOC - a lot. However if the instruction says to thin the lacquer 50-50, that means adding 4 more quarts of VOC, so the vendor has to report a total of 7 quarts of VOC for each gallon they sell. It would probably be banned in more places than just California.

I don't know anyone who successfully sprays NC lacquer straight out of the can. You may have a setup that can atomize it enough to look good initially, but you are getting strange side effects that most do not get. For your next experiment, I suggest you thin the NC lacquer before it goes into the gun. If you have a gravity gun, I found that the lacquer was a good thickness when it would shoot most of the width of the gallon can, when I pulled the trigger over the can with no air hose attached. Most of the time, I would end up with 30-50% of the total material in the gun was "additional" thinner.

I think you will find the finish is dry to the touch in just a few minutes. Since with lacquer, the next coat partially dissolves the earlier coat no matter how long you wait, if it feels dry in 3 minutes, I would spray the next coat in 10-15 minutes. The beauty of lacquer is that you can quickly apply multiple thin coats, for ease in spraying, and they blend (the term used is "burn in") to become a single coat on the final piece.
 
It sounds like Charlie knows much more about lacquer than I do but I would like to add a comment about lacquer retarder. It is a thinner that slows down the drying somewhat. It can be helpful on high humidity days to reduce problems with cloudy finish. I thin my lacquer with a mix of regular thinner and retarder, the mix ratio depends on weather conditions. For me it is more of "a dash of this and a dash of that" than a precise measurement.

Lacquer retarder is readily available (at least in my area) at paint stores, not so much at big box stores.
 
Top