G&G Inspired Chest of Drawers - Build Thread

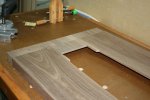
well done glenn ,, so the shooting board was used to final fit the center pieces then you done the shoulder cut on the table saw right?

Correct. The dado cuts were done after I got the final fit but, prior to assembly. The rail tuning controls the final width of the frame so that was done to fit the web frame. Then I cut the shoulders and then the M&T work is done allowing the glue up. Once assembled the shoulders get tuned with a plane to accept the top and base wrap-around style "frames".

On the book case you had recommended not making the shoulders as deep as I had originally planned. I took your advice and it worked out well. Building on that experience, these shoulders are even shallower (1/8" rough). Once cleaned up (a skinny 3/16"), the upper and lower wrap-around parts will be sized from this final dimension.

I was getting fatigued I guess and didn't have quite the grip on a piece of rail as I should have. I picked up a bit of chatter at the end of a cut and knocked a little chip out at the shoulder.

CoD Rail Repair 001.jpg

To repair it I square out the ragged chip and find a piece of material that matches pretty well.

CoD Rail Repair 002.jpg CoD Rail Repair 003.jpg

I glue a bit in and leave it oversight. Now I have this nice wart to work with.

CoD Rail Repair 004.jpg CoD Rail Repair 005.jpg

I pare it down with a butt chisel. Given it's location, the repair should be all but invisible once the finish is on.

CoD Rail Repair 013.jpg
930
 
Last edited:
The Mortise Pal earns it's keep again. Two by 1-1/4" x 2-1/2" tenons per joint.
 

Attachments

  • CoD Mortise Pal 002.jpg
    CoD Mortise Pal 002.jpg
    61.8 KB · Views: 66
  • CoD Mortise Pal 001.jpg
    CoD Mortise Pal 001.jpg
    61.4 KB · Views: 49
Someone PM'd about the Mortise Pal method so here's some more on that. I faced the vise and a small handscrew with leather (thanks Dad).

CoD Mortise Pal 3.jpg CoD Mortise Pal 4.jpg

I grab the end to be cut in the vise. A shimmed piece of hardboard is compensating for the wide rabbet already cut in the part. The handscrew acts as a deadman.

CoD Mortise Pal 5.jpg CoD Mortise Pal 6.jpg

The MP clamps on, aligning with the layout lines I have applied. I pop a small motor in one of the plunge bases and go to work. Once the mortise is cut I have a vac hose nearby for clean up between mortises (mortisi?) operated by a foot pedal on the floor nearby.

CoD Mortise Pal 7.jpg CoD Mortise Pal 8.jpg CoD Mortise Pal 9.jpg

Here's a dry fit:
 

Attachments

  • CoD Mortise Pal 11.jpg
    CoD Mortise Pal 11.jpg
    81.4 KB · Views: 39
  • CoD Mortise Pal 10.jpg
    CoD Mortise Pal 10.jpg
    81.6 KB · Views: 42
  • CoD Mortise Pal 12.jpg
    CoD Mortise Pal 12.jpg
    106.8 KB · Views: 43
Last edited:
Thanks for all the pics Glenn, i get way more than just the project from them.:D

Perhaps you should look at updating your shop tour sometime but with a little emphasis on the little non obvious features like the convenience of those rules hanging on the bench and where you put the power bar. :D:thumb::thumb:

I am overdue for a shop tour. I try to do one every year but am tardy now. Maybe I'll ask the old man up to provide an outsider's input on a tour. He's about due for a visit ;-)
 
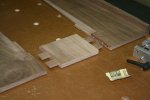
glenn, do you think there is an advantage as far as alignment or strength using a mortise pal setup vs. a typical biscuit cutter and large biscuit?

allen, in my opinion the strength of those tenons is far above the biscuit setup. as for alignment of boards goes, then a biscuit is probably equal but not for strength in the apron useage.. this is just my opinion and i amnot trying to step in frnt of glenns work.. or expertize:thumb:
 
What Larry said. Biscuits are great for alignment but, don't add the strength of a tenon. Biscuits do add some amount of shear force resistance. The numerous wood joint strength articles show this pretty well. The large long grain glue surface of the tenons and the fit are key to preventing racking fatigue at the rail to stile joints as drawers are opened and closed every day for years on end.
 
Last edited:
Glenn, do you make your own tenon stock or are you purchasing it? It looks pro made either way. I am thinking about going the loose route myself, now that I have the M-Pal. Too easy not to.
 
I whipped off about 5 feet of it in about 5 minutes this morning before work. Its a no-brainer and you can use like or dissimilar stock as you feel is appropriate. I make a bit more than I need each time so I am starting to get a good collection of various sizes. Another good use of scrap material ;-)
 
Last edited:
Worked late and almost didn't hit the shop tonight. I realized I won't get much time until the weekend so I powered through the other side.
 

Attachments

  • CoD Mortise Pal 13.jpg
    CoD Mortise Pal 13.jpg
    107.4 KB · Views: 40
You may or may not have noticed from the time stamps on some of my recent posts that I have been working some odd shifts lately. I tell you this as an excuse for my lousey output for tonight :eek: 
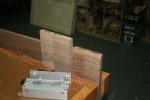
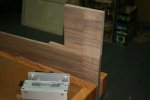
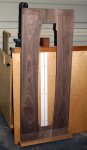
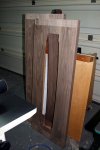
The webframes will act like a kind of rib cage for the carcass. They will also have walnut strips along the front edge that provide the horizontal drawer opening dividers. I'll go into the strips next post but they will glue into a slot to provide vertical strength and a greater glue area.

This is a procedure many of us use to assure things (slots, tenons, whatever) are cut centered in our stock; that is, cutting from one reference surface and then the other. I set a 3/16" slot cutter 1/4" off the deck. I use a featherboard as usual to keep things tight and chatter free.

CoD Web Frame frt slots 001.jpg CoD Web Frame frt slots 004.jpg

First run gets me part way there. Flip the piece and run it again and I get a perfectly centered slot. I do this for all the webframes, front edge only.

CoD Web Frame frt slots 002.jpg CoD Web Frame frt slots 003.jpg CoD Web Frame frt slots 005.jpg

1183
 
Last edited:
Am I boring you guys yet? The front trim for the web frame / drawer dividers is about all I have time for tonight. I set a 5/16" spiral 1/2" from the router table fence. I set the depth to leave me 1/4" after a pass on each face. I joint the edge before each of these pair of cuts.

CoD Web Frame frt trim  (1).jpg CoD Web Frame frt trim  (2).jpg CoD Web Frame frt trim 0.jpg

I rip off the result, joint the edge and repeat. It fits like so. The trim goes on much later in construction and will be trimmed to fit after the carcass is assembled.

CoD Web Frame frt trim  (3).jpg CoD Web Frame frt trim  (4).jpg CoD Web Frame frt trim  (5).jpg

For fussy pieces like this I make an extra in case of shop gremlins :rolleyes:.

CoD Web Frame frt trim 6.jpg CoD Web Frame frt trim 7.jpg


1241
 
Last edited:
Top