big box with legs, gameboard cabinet

allen levine

Member
Messages
12,361
Location
new york city burbs
as per my sons needs/wishes, (I thought Id be putting in a built in), in a tight space in an already crowded finished basement, Im currently making a low box/credenza? type unit for him to store his most used board games. Its not enough he has 13000 computer things, he also enjoys old fashioned board games, and he needs something to store them in, at least the ones he uses the most(hell have to put the others in the attic so I can finish off his bar wall area)
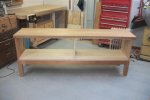
The spot its going is tuff, under a flat screen, next to the stairs, so it cant be very deep, and it has to be no more than 72 inches long.
He asked me to make it 28 inches high, so it wont interfere with the flatscreen since theres already a low drop ceiling down there.

I didnt draw up anything, Im just figuring it out as I go along. Very simple. Im using pocket screws for the entire unit(Please dont throw me off the website for that, and I apologize to the flatworkers here, but this is a toy box)
Im using spanish cedar, mahogany(leftovers) and sapele, all mixed in.
I have no clue what the top is. Its the same stuff I used for his bar top and table top in the same room, so it will all match nicely. Its extremely heavy, and very smooth wood. Reminds me of ipe or something in that family.(it doesnt make that yellowish/greenish dust when tooled though)

My son is coming over noontime sunday so he can help me run the top through the drum sander as I cannot handle it myself. Getting it from the house(glued up inside) to the garage almost gave me a hernia.

Knocked out 4 adirondack chairs last week, 2 to my new neighbor, and 2 to someone else. I needed to make 6, but didnt have enough wood for the last 2, so Im figuring the person I gave 2 chairs to will probably give me a gift certificate(standard thing I tell my wife when someone wants to recipricate since I dont charge for anything) and Ill use that for the extra lumber I need.

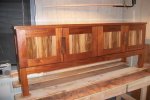
few pics, where Im at, doors will be simple panels exactly like the sides, 4 doors. IM using that mystery wood for the panels(flat panels, keeping it simple)
The top needs to be cut to size and sanded up.

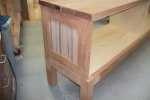
*design note-the unit is high off the floor because his baseboard radiator is along the wall and the unit will be in front of it, so I didnt want to block the heat. I will line the bottom of the unit with that silver stuff I line my radiator covers with to deflect the heat and the bottom wont get hot.

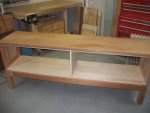
Its difficult to build units this length in a crowded garage. Im very unhappy it doesnt look good for my new shop space, noone can sell a home and noone is moving, so looks like Im stuck where I am for now.
wish I had some width on my shop so I can move around a unit this size comfortably.
 

Attachments

  • cabinet 171 (Medium).jpg
    cabinet 171 (Medium).jpg
    49.3 KB · Views: 55
  • cabinet 172 (Medium).jpg
    cabinet 172 (Medium).jpg
    52.3 KB · Views: 51
  • cabinet 173 (Medium).jpg
    cabinet 173 (Medium).jpg
    57.1 KB · Views: 43
  • cabinet 174 (Medium).jpg
    cabinet 174 (Medium).jpg
    56.4 KB · Views: 45
Last edited:
this morning I learned just how finicky a drum sander could be.
The heavy top proved to be a tough job to run through sucessfully to get a nice even sand across its surface.
The shear weight of it made it difficult to keep it flat all the way through and I kept getting drum marks from gouging out the surface where it slightly tilted.
This was with my sons assistance. It took us both a bit until we finally got the hang of how to lift the ends to avoid any marks.
Id love to have infeed and outfeed tables long enough to support heavy tops but it wouldnt be practical and theres just no room for them.
 
Allen think of having some that can be added or removed when needed. There is a company that makes a in feed and outfeed system that is basically steel tubing with rollers that you could have attach a detach when needed and store in your shed.
The tubing has roller balls fitted to its top.


Ok just had my brain kick in and the name of company is Ezee-Feed they also do kits but the idea is also easy to replicate in wood, steel or aluminum.

www.ezee-feed.com


Sent from my MB860 using Tapatalk
 
Last edited:
I had 3 10 foot sections of rollers, the kind that are used to unload trucks, the tracks hook together so you can make a 30 foot unloading ramp for cartons, and roll them down into the basement, and I had all the framework, but it just seemed so large to have to store it all assembled.
I gave some thought to keeping it all, but after I sold my business and was just disposing of all the shelving and stuff, someone offered me nice money for all that stuff so I figured better to put the cash towards equipment.

My son says anytime I need help handling large or heavy panels I just have to give him a call and he is more than happy to help me.

Im not going to waste space, time, effort and money to build infeed and outfeed for the drum sander.
If I had room, Id make a permanent station, but I have to move that monster around and just cant store the set up for infeed/outfeed.

I appreciate the links, Ive made roller systems for myself out of pvc and closet poles for the planer but then just bought the extensions.

things are going along well with the build, besides one major brain poop, I tried to undo what I did, but it was impossible, so Im working around it.
I cut the hardwood face for the plywood edges a bit long, as I always do. I like to size them down bit by bit till I get a nice tight fit.
Unfortunately, for some dumb reason, I made them a bit too snug, and the glue wasnt totally dry on the sidewalls, so not realizing what I had done at the time, the cabinet was a bit off since the hardwood forced it to move around 1/64 or so. Not a big deal, but it didnt line up exactly with the apron of the base, this is after I carefully checked all corners for squareness while gluing it up.
Its spanish cedar, and I tried to remove it all, but realized I was only going to damage the plywood case and that could not be repaired.
mistake, no, change of design is more like it. A little hand planing and sanding will correct it to make it acceptable.
I gouged out a piece, so I had to repair that, and after it dries, Ill post a picture if anyone is reading this.
 
Last edited:
top is not cut to size, unit needs alot of sanding, and I havent decided what type of pulls Im using, but construction is basically finished.
Blum 120 softclose hinges. I prefer the self closing snap type hinges, thought Id try these softclose once.
All pocketed and plugs, nothing to brag about, nothing to be ashamed about.
Will use waterlox original and gloss for finishing. 3-4 coats. Top came out ok, still needs orbital sanding to get out some light drum sander marks.(I never get marks with the smaller panels since they dont tilt)


I love woodworking. Who the heck needs golf.(Ill never be great at either)
 

Attachments

  • cabinet 175 (Medium).jpg
    cabinet 175 (Medium).jpg
    53.4 KB · Views: 23
  • cabinet 177 (Medium).jpg
    cabinet 177 (Medium).jpg
    49.3 KB · Views: 22
  • cabinet 178 (Medium).jpg
    cabinet 178 (Medium).jpg
    48 KB · Views: 24
  • cabinet 179 (Medium).jpg
    cabinet 179 (Medium).jpg
    49.6 KB · Views: 22
Looks great Allen! Man your son is gonna be the envy of all his friends when his basement is complete! I can hear them saying it already..."Yeah all the furniture is great but his dad made all of it too!" :thumb:
 
He has his regular fulltime job, and does alot of house calls(computer repairs), nights, weekends and when hes off from work, and also has a third job teaching a class around twice a month.
He hasnt progressed much in the basement, and I keep nudging him to finish off the walls so I can finish off the cabinetry for him and we can finally finish it all. Im still waiting on him to purchase a sink so we can install it behind the bar and finish that wall.
 
just about finished....

working with a large unit in confined space, once again, nicked a piece in 2 spots.
Nicked out a piece at top of door frame, and right above the handle on door when I knocked the door off the table(moving unit during cabinet construction)
I had to resand the last door on the right, so now I need to apply a couple of coats of oil to darken it up to meet the other doors. I will reapply some gloss to it after that then let it cure for a week or so, sand with wet 400grit, then buff it out, especially the top to get a nice sheen on top.
The left door on the right side, the panel tension proved a bit too strong, and seems the movement from cold and damp garage into warm house, the panel actually warped the door a tiny bit. Never had such a flat door move from the panel, especially a thin panel. gonna leave it for now, see how it settles out after the finish cures and we move it to final home. Can always recut a new door.
I havent adjusted the doors, so they look a bit off, easy to adjust with the blum cup hinges.
I couldnt find the handles I wanted in brushed brass look, and I wasnt about to spend 40 dollars each for handles, so I made some simple walnut handles. One handle on one door.Gets the look I wanted, might change the handle once I get my scroll saw and I can cut more intricate lines.(I screwed the handle in and it will be simple to replace, but I found out Im not getting the scroll saw for at least 3 months, so I didnt want to wait.)
I will attach the back before I schlep it to my sons home, and once in place, Ill attach the top. Leaving it in pieces makes it very easy for me to lift into my truck without help.
Getting it into his basement is his job.
 

Attachments

  • cabinet 185 (Medium).jpg
    cabinet 185 (Medium).jpg
    62 KB · Views: 18
  • cabinet 186 (Medium).jpg
    cabinet 186 (Medium).jpg
    49.6 KB · Views: 15
  • cabinet 187 (Medium).jpg
    cabinet 187 (Medium).jpg
    85.6 KB · Views: 15
  • cabinet 189 (Medium).jpg
    cabinet 189 (Medium).jpg
    70.3 KB · Views: 14
as many doors as you are making allen i would check out the rail and stile set for your router and use it .. its fast and holds well. you are so far ahead of the rest of us in projects completed that we will never catch up, good thing your done having kids.. or the trees would be running for cover:) nice table allen great top finish..
 
Lovely Allen and your son man you gotta be proud of a guy with a work ethic like that. Guess he takes after Dad.

As Larry said you so far out ahead on the projects man leave some for us to catch up to.;)
 
as many doors as you are making allen i would check out the rail and stile set for your router and use it .. its fast and holds well. you are so far ahead of the rest of us in projects completed that we will never catch up, good thing your done having kids.. or the trees would be running for cover:) nice table allen great top finish..

I hear ya. I have a cheap set, its time for me to buy a red or orange set.
 
Top