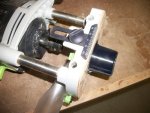
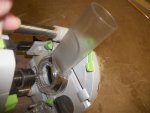
the festool router I purchased recently, has a piece like that and when its hooked up to the vacuum, the dust hitting the floor is almost not noticed.
I purchased it after watching the guy at woodcraft rout an edge on a step stool.
Ofcourse, I havent purchased the vacuum yet, still trying to hook up a vac to my mitre.
what I like best about the festool, is that everything attaches easily, no wrenchs, just snap and lock or snap and twist the locker into place. Very easy, very quick operation. The dust chute just snaps in and you lock the lever. I used it when I routed out dados in plywood, I taped my shop vac hose to it. worked fine, but I will eventually get my hands on another vac.


 Chisel & hand plane was required to alter the joint a 1/16 on one. I got some glue on it quick before they moved.
 ") Roll top is a lot of work, especial flying by the seat of my pants on this project, without any instructions to go by. I was too cheap to pay $30 +or - for a plan
Roll top is a lot of work, especial flying by the seat of my pants on this project, without any instructions to go by. I was too cheap to pay $30 +or - for a plan  .
.