Here we go again buy or build? Pics added 4/12/13

Since I know nothing about building cabinets and my wife is bugging me for new ones I would sure like a picture or two to help me along. (or maybe an estimate for you to build us new cabinets:wave:)
 
Since I know nothing about building cabinets and my wife is bugging me for new ones I would sure like a picture or two to help me along. (or maybe an estimate for you to build us new cabinets:wave:)
Can do that Bob but you'll have to talk to KaLea the kitchen designer first.:thumb::thumb:
 
Ok so here is the first batch
Well I'm not big on router tables so most all of my router jigs are made to run the router by hand. After all it is a hand tool.:thumb:
So this jig is screwed to the table and the piece is slid in I have it set so that the cut is 4 15/16th from the edge of the table. When I am doing an end one I have to back it up and run it again to clean up the end.
 

Attachments

  • tn_DSC01624.JPG
    tn_DSC01624.JPG
    24.2 KB · Views: 62
  • tn_DSC01625.JPG
    tn_DSC01625.JPG
    13.9 KB · Views: 62
  • tn_DSC01626.JPG
    tn_DSC01626.JPG
    15 KB · Views: 60
  • tn_DSC01627.JPG
    tn_DSC01627.JPG
    17.8 KB · Views: 59
  • tn_DSC01628.JPG
    tn_DSC01628.JPG
    21.8 KB · Views: 59
  • tn_DSC01629.JPG
    tn_DSC01629.JPG
    14.1 KB · Views: 57
  • tn_DSC01630.JPG
    tn_DSC01630.JPG
    24.9 KB · Views: 56
  • tn_DSC01631.JPG
    tn_DSC01631.JPG
    13.5 KB · Views: 55
  • tn_DSC01632.JPG
    tn_DSC01632.JPG
    13.8 KB · Views: 53
  • tn_DSC01633.JPG
    tn_DSC01633.JPG
    13 KB · Views: 55
Last edited:
First two are finishing up the cutting jig. Third one is just to prove cabinets are getting made. Four and five are of the jig used to drill the holes for the shelves. That board is not the one I used but the theory is the same. And the block on the drill bit is the depth gauge.
Now it's on to setting up the pocket jig I put a piece of tape on the jig to mark the edge of the board. There is a jig on the bench model to set the drill bit depth with. (Pic 7 ) Pic 8 same jig to set the drill depth in the box.
9 holes drilled Pic 10 clamped to the bench and screw together. Once I start assembling the fronts I will have a table to clamp them to but for a test I took a short cut.
 

Attachments

  • tn_DSC01633.JPG
    tn_DSC01633.JPG
    13 KB · Views: 51
  • tn_DSC01634.JPG
    tn_DSC01634.JPG
    18.7 KB · Views: 50
  • tn_DSC01635.JPG
    tn_DSC01635.JPG
    16.6 KB · Views: 49
  • tn_DSC01637.JPG
    tn_DSC01637.JPG
    14.2 KB · Views: 47
  • tn_DSC01636.JPG
    tn_DSC01636.JPG
    10.3 KB · Views: 48
  • tn_DSC01638.JPG
    tn_DSC01638.JPG
    24.8 KB · Views: 46
  • tn_DSC01639.JPG
    tn_DSC01639.JPG
    19.8 KB · Views: 48
  • tn_DSC01640.JPG
    tn_DSC01640.JPG
    15.6 KB · Views: 47
  • tn_DSC01641.JPG
    tn_DSC01641.JPG
    18.6 KB · Views: 47
  • tn_DSC01642.JPG
    tn_DSC01642.JPG
    19 KB · Views: 50
Last edited:
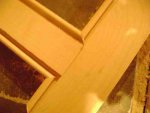
well i would say you beaded that just fine chuck:)

That bead is run on the shaper it's just the joint I am doing with the router.
That router bit is way faster than the old school way of cutting the 45 both ways with the table saw and cleaning out the center with a chisel.
 
There be some tear out in them pieces that's what made em test pieces:thumb::rofl::rofl:
Over all I think I lost 5 boards to tear out on the bead. :doh: and lost a couple to tear out on the jointer :doh: but was able to save them for other spots unlike the beaded ones that could not be ripped down for another use.
 
One face frame left to assemble but I have to wait until the sink gets to my house to build it. The sink is at least in the same town it's just a matter of catching Stu the plumber at home so I can pick it up. It looks like the sink base may need to be reworked. I can find 2 different size cut outs for the same sink on line but didn't notice that before I went looking for the size to build the base and went with the first size I found and it is looking like I went to big. But I wont know for sure until the sink is in my hands.
 
There all the face frames are done and yes the sink base cabinet is going to have to be rebuilt.:doh::( Wiggled and cheated and still ended up with 3/8" that I just can't make go away so rebuild it is.
 
Another 222.78 worth of maple was captured today.
Than a few pics of some of the face frames.
Pic 4 is what it looks like under my saw after a day of ripping out door stock.
5 the door stock before sizing also in this pic is the bathroom sink.
6 all them doors fit in my chair and 7 is what is left over for the 2 funny shaped cabs and 2 end panels that I don't know the finish size of yet.
 

Attachments

  • tn_DSC01644.JPG
    tn_DSC01644.JPG
    25.1 KB · Views: 55
  • tn_DSC01645.JPG
    tn_DSC01645.JPG
    20.9 KB · Views: 59
  • tn_DSC01646.JPG
    tn_DSC01646.JPG
    18 KB · Views: 60
  • tn_DSC01647.JPG
    tn_DSC01647.JPG
    22.5 KB · Views: 64
  • tn_DSC01650.JPG
    tn_DSC01650.JPG
    22.1 KB · Views: 61
  • tn_DSC01651.JPG
    tn_DSC01651.JPG
    22.6 KB · Views: 63
  • tn_DSC01652.JPG
    tn_DSC01652.JPG
    17.6 KB · Views: 60
Last edited:
Well I over estimated the amount of beaded ply for the job by 50%. So Do I get to subtract that from the job? Why yes I do I can not return it but in my line of work I can sell it to the next job that needs beaded ply.:thumb::thumb:
I found this out by roughing out all the panels tonight. :thumb:
 
Top