closet pullouts

I cleaned out the closet today, got all the old boards nailed in out, took off the door and all hardware, ripped up the carpet, will level the floor(simple), and the rain finally stopped so I ran over and picked up a few sheet of ply, 3/4 and 1/4.
Since Im looking to save every inch of space I can, Im keeping the face frames no wider than 1.5 inches, and I wont dado out the back, Ill just glue and staple a back on since the back wont be seen.
I am trying to keep this simple.
I wont work with pine, to match the other hallway doors and frames. Im going to use ash and stain it the same color as the doors.

I thought this would be a simple, cut some 2x4s, attach the slides, and be done. No cost, since I have the slides, and they are only 18 inches, but that translates into 3/4 extension, good enough.
The 5mm screws, a centering bit for it, and Id need a jig, eh......I promised myself not to spend any more money this year on woodworking projects, so Im going to keep it simple, non adjusting slides.
(perhaps in the future, but I havent moved a kitchen shelf or a shelf in any other closet for 30 years, so Ill let my wife set the heights, and live with it)
I didnt expect to buy plywood either, so now Im in 100 bucks already

alan, I appreciate the offer of screws, but it isnt necessary for this closet. thanx buddy..
 
Last edited:
I made the box today, leaving the top open so I can access the upper area of the closet, just for additional storage.
I also put a couple of shelf pin holes up on top with a half width shelf so the upper cabinet is still accessable.
Not thrilled about leaving the top of the cabinet open, but when you have a tiny house, every sq foot of storage counts.

Im just happy it fit nicely into the space.
I will have to take down the casing molding, hopefully will be able to reuse, just cut down the top a bit, and Im hoping the walls dont look that bad underneath the molding. thats another job, another day.
Time to move on to the face frame,doors, and drawers.

I have a pretty busy weekend planned out, going to look for a countertop, and we are having a birthday celebration for my sons 30th this weekend, so I wont be doing much woodworking.
 

Attachments

  • kitchen reface 160 (Medium).jpg
    kitchen reface 160 (Medium).jpg
    27.2 KB · Views: 35
  • kitchen reface 162 (Medium).jpg
    kitchen reface 162 (Medium).jpg
    42.4 KB · Views: 30
I have had the same exact thought on this subject that you have. I only wish I would have gotten around to it so you could see how it worked in my case. I was going to make a two piece cabinet. the bottom was going to be drawers and the top was to be doors. Then i would just slide them into the closet and then trimmed in the same wood (If I went with a stained wood) or painted to match the rest of the doors in the house. I think its the best way to go even though I have not gotten arund to it yet.

but some day I will do it.

Im looking for an idea here.
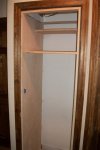
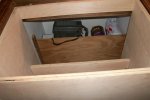
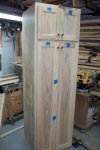
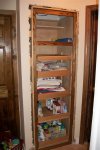
this small hall closet, is a mess constantly, and we can never get anything off the back of the shelves.View attachment 70874

I really need a project, Im going through woodworking withdrawal, spent the last few days making toy cars and cutting boards.View attachment 70875

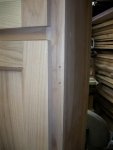
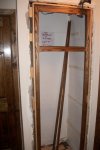
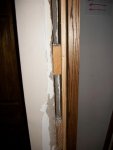
The walls are 60 year old plaster walls.

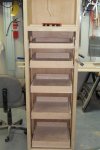
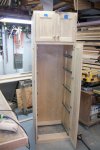
so I got to thinking, instead of just trying to attach wood to attach full extensions slides, why not just build a plywood cabinet and insert it directly into the closet. My thoughts being, the walls in that closet are so uneven, not plum top to bottom, bumpy, lumpy, making an insert cabinet will eliminate any frustrations I might have trying to hang drawer slides evenly. Besides, I wont have to paint the bottom part where I put the sliders, as the plywood would look much better.
Im only installing pullout drawers the bottom 5 feet of the cabinet, higher wont make sense.

any thoughts?
 
was kinda hoping this little project kept me busy for a month or so, at least until I got to woodcraft next month in allentown to pick up some pen kits and try to make a few gifts before I forgot everything I was shown.

I finished all the pullout drawers. dovetails on the PC, I used a mix of ash, oak, and maybe a piece of maple or birch.
I made sure all the fronts matched, looks like oak to me.
I have a small pile left of second use boards, alot of knots, shorts, cracked boards, etc.....so I picked through alot of it to get just what I needed.
Ill start the doors tomorrow or friday.(all the doors and frames come from my primo ash)
Heres a shot how it came out. My wife chose the spacing, and I found no reason to make curved drawers or anything fancier than just a box. (dovetails in oak and ash is enough work)
the top pullout is narrower than the rest.
I had a wide board, and that was the left over after I trimmed it down, so why not.
I needed 20 inch slides, but I only have 18 inch, so its not exactly full extension, but its far enough to make getting anything in the back comfortable. Certainly better than having to dig through and knock over everything that was in front of it as we have been doing.
 

Attachments

  • kitchen reface 169 (Medium).jpg
    kitchen reface 169 (Medium).jpg
    32.2 KB · Views: 34
  • kitchen reface 171 (Medium).jpg
    kitchen reface 171 (Medium).jpg
    36.1 KB · Views: 37
Last edited:
Wow very nice draws there Allen that should really spruce up the storage space. Never expected you to put in dovetails and go to that much effort. Mrs is going to be very happy i would guess. Well done.
 
Im not sure whats going on in my brain, but its become obvious to me I have a few loose screws.
I dont think Ive worked any slower on any project, taking my time, making notes for myself, doing each step in the process I set up for myself, even though I realized this is not such a difficult build.(actually, just another big box with doors)
So after making the doors, I arranged them on the table the way I wanted to drill them out for hinges.
Making sure I had the grain on the panels running the same way.
When I went back in the garage to drill them out, after getting too many cell calls,(I left my cell in the house after that)
none of which were important, I managed to flip the doors and drilled the hinges so now ofcourse, the panels grains run opposite each other. My wife didnt notice, and said it makes no difference to her, so I decided not to remake the doors and just let it slide.
But that wasnt my biggest poo poo error I ever made. After attaching the hinges to the door, I drilled the holes on the face of the face frame, and I cant even explain why I made such an error, as Ive installed 75 doors at least with the same hinges. Sometimes I amaze myself at my own carelessness, stupidity, lack of concentration, etc.........
I didnt get too angry. Too many distractions and my mind was not there today, so I started to plane down some more wood, figured Id just make a new frame.
And then my brain kicked in, and I realized if I bring the casing molding over 1/2 inch on the frame, not the 1/4 inch I originally planned, the holes wont be seen.
Saved myself a few hours work.
I called it a day, seems 2 huge errors in one morning is more than I can explain to myself.
Heres pics to show just how careless I am.(Im really better than this, just having a bad day I guess)

*its all ash, faceframe and doors. Use simple shiny brass door knobs/pulls to match the brass handles on all the doors in that hallway.(it will be stained dark, walnut color)
 

Attachments

  • kitchen reface 172 (Medium).jpg
    kitchen reface 172 (Medium).jpg
    40.5 KB · Views: 35
  • kitchen reface 173 (Medium).jpg
    kitchen reface 173 (Medium).jpg
    35.8 KB · Views: 39
  • kitchen reface 175 (Medium).jpg
    kitchen reface 175 (Medium).jpg
    27.7 KB · Views: 35
If you move the casing over 1/2" will your door be able to open all the way? Can't tell from the pic but is there enough room from the edge of the casing to allow the 3/4" thickness of the door to fit??

I'm probably not explaining myself clearly :doh:

Beautiful job on the doors :thumb:
 
no, you are explaining yourself crystal clear.
we think alike, right after my brain kicked in, the first thing I checked was to make sure the doors would open and clear the molding.
1/2 inch overlays, and faceframes is 1.5 inches, so Ive got a bit more than 1/2 inch if I just cover the holes.

karl brogger: thanx for posting the picture. I wont get same results as you, but you made my choice of design simple by just giving me the right path.
 
Last edited:
Another success. Looks great Allen and the increase in usable room will be a treat. When I first put pullouts in LOML's pantry she thought she was losing shelf space. It didn't take long to realize that once you can use all the space all the way back, stuff gets used instead of lost back there ;-) I swear there was a can of pineapple back there from the Nixon years when I was cleaning it out to get started.
 
Last edited:
you could have put it on craigs list and listed it as vintage canned food.

but I know what you mean. Ive already disposed of alot of stuff I "liberated" from my store over the years, most of it long since expired, but it sat in the back and noone every went to the back of the shelves.
 
Looking good, Allen. :thumb: We have pullouts in our pantry cabinet and for pot and pan storage, and I can see how they'd be a great addition to a hall closet.

Also, just because people will be able to get to the back of the shelves, don't bet on not having things go past the expiration date. They'll stiull get forgotten about. ;)

LOML is well-practiced at buying food and then not touching it until she throws it out. (And the real kicker is that if something is one day past the "Best if used by" date, she tosses it. I've gone blue in the face trying to convince her that things like salt or bottled water can go past that date.) :rolleyes:
 
help......help...........so as Ive proved, Im not the best when it comes to hanging moldings.
And now, very carefully, first cutting through the caulking then painstakingly removing the case molding, I have a big problem.
I will repair the walls as best I could, but 2.25 case will no longer cover the gap between frame and wall.
I wont be able to reuse molding as planned. Not a big deal.
but the left side has a huge gap, and the right side will not fit larger molding(the wall comes in at an angle)
And there are 5 other identical doors with 2.25 case moldings in that small hallway, if I increase the molding size, how strange will that look, not that I have much of a choice it seems.

My idea, go with 3.5 inch case moldings, and cut it down from the outside side on the right side so it lays flat on that side, I dont think I will get more than 3 inches, even with the new reveal. I noticed the 2.25 case in there now was cut at an angle on the back side to squeeze it in. I need to add at least 3/4 of an inch now to cover the other side.

Or, Im thinking, just cut some ash and stain, cut it just flat, no edges, and just frame it out simply around the door frame, making it look different than the other doorways, but it is different, its a closet with 4 doors.
And cutting flat pieces will be simple for me to fit in nicely.

some help, I will repair the walls as best I can, and repaint it. But the moldings will not match on both sides, I dont see how, one will be larger.

I clipped the faceframe of the cabinet in so it can be a bit clearer.

I like woodworking, I hate molding on uneven, really uneven 65 year old plaster walls.

I can finish off the cabinet, install it all before I need to apply molding, so Im good for a few days, but any idea that might solve my problem, I appreciate.

the first pic, shows just how much gap there is to cover, and I tried not to damage the walls, but the paint and caulking were stuck underneath the molding, and me cutting a line didnt seem to help, it came right off.
 

Attachments

  • kitchen reface 177 (Medium).jpg
    kitchen reface 177 (Medium).jpg
    31.6 KB · Views: 29
  • kitchen reface 179 (Medium).jpg
    kitchen reface 179 (Medium).jpg
    27.2 KB · Views: 27
I got my answer.
My neighbor, the contractor, explained to me just now how to mold it out.
I saw him pulling into his driveway and he came over.
seems easy enough, Im off to get the new molding, 3.5 inch case, and will rip the right side as needed, and will cut the end off the top piece on the right side to match the width of the right side vertical piece.
off to the lumber yard.
 
installed the cabinet this morning.
Molding and doors still need another day to dry enough for me to handle.
Not sure if I like the molding after stain. I might have to make my own casing out of ash, but the wife says it will be fine.
she loves her new pullouts, dont take much to make her happy.(she did marry me)
I threw a bunch of stuff onto the shelves. Im sure shell be thrilled when she sees I posted pictures of our junk cabinet.
Just wanted to see how things will fit in.
I didnt center the cabinet, I secured the cabinet as far left as I could, so I make sure the molding covers the gap, and needed more room on the right to fit the molding on the slanted wall.
If I feel ambitious tomorrow before football starts, Ill cut the molding and work on some more finish coats on the doors.
 

Attachments

  • kitchen reface 181 (Medium).jpg
    kitchen reface 181 (Medium).jpg
    39.7 KB · Views: 19
Top