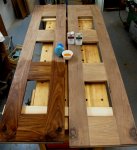
Walnut doors with stained glass inserts -COMPLETED

Darren thanks for the offer. I might take you up on it some day but, at this point, I don't even know what the Pro features are and whether or not I will want to make use of them.

Mostly it has enhancements for printing and printing out material lists. Can also export autocad files if you need them for having scaled drawings in your wood/metal projects.

Descriptions are on this page: http://www.dfly.com/editions.html
 
Week Ending November 11th:

I spent about 10 hours working on the doors this week, but it is the stage of the project where there is not a lot of progress to show.

Walnut plugs were glued into all the screw holes then trimmed using my very impressive Veritas flush cut saw.

Kitchen to Dining Room door project 23 -My Veritas flush cut saw came in handy -small.JPG

As with most of my Veritas tools, the does exactly what it is intended to do, it does the job well, and is a joy to use.

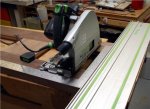
Both doors were trimmed on all four sides using my Festool track saw:

Kitchen to Dining Room door project 22 -I trimmed all four sides oif the doors with my Festool t.JPG

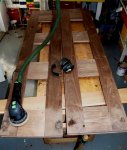
Next followed at least two hours of sanding with grits 80, then 120, then 150, the 180, then 220, Most of this sanding was done with a Festool Rotex sander, but a Festool Linear sander, and even hand sanding was employed as well:

Kitchen to Dining Room door project 24 -At least two hours of sanding (mostly with Festool Rotex.JPG Kitchen to Dining Room door project 25 -Festool Linear sander was utilized a little bit -small.JPG

Finally, I applied a coat of tung oil sealer, followed a day later by a coat of 2 parts tung oil mixed with one part sealer:

Kitchen to Dining Room door project 26 -Applying Tung Oil Sealer -small.JPG
 
Week ending November 18th:

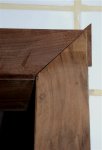
I was too busy this week to spend much time on the new doors. Actually, I spent no time at all on the doors themselves, but I did complete the installation and sanding of the trim around the doorway. The trim in front of the kitchen tiles was not a perfect fit in a couple of places, but I managed to make it look OK by inserting custom-made shims:

Kitchen to Dining Room door project 27 -Inserting a custom-made shim behind a portion of the tri.JPG

On all the doorframe trim, I used two different sanders as well as some hand sanding. With all, I used a series of grits: 80, then, 120, then, 150, then 180, then 220:

Kitchen to Dining Room door project 28 -Sanding the new door trim -small.JPG
 
Week ending November 25th:

This was another week in which I made very little progress on the doors between the kitchen and the dining room. I’ve now got to move fast if I am going to meet my goal of completion by the end of November. I did put a coat of sealer and one coat of tung oil on the door frame trim. I also got my Carey Mortising Template set up (after much searching for the parts which had become separated) and used to install one of the two doors.

Template on door: Kitchen to Dining Room door project 29 -Routing mortises in door using Carey template -small.JPG

Template on door frame: Kitchen to Dining Room door project 30 -Routing mortises in door frame -small.JPG

Door installed: Kitchen to Dining Room door project 31 -One door installed -small.JPG
 
Walnut doors with stained galss inserts -COMPLETED

Week Ending December 2nd:

I had wanted to complete the kitchen to dining room doors by the end of November and I almost made it. In fact, I completed them this afternoon –which is two days late. Here are two photos of the completed doors, one taken from each room:
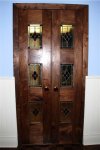
Kitchen to Dining Room door project 38 -Completed doors taken from dining room.JPG Kitchen to Dining Room door project 39 -Completed doors taken from kitchen -small.JPG

I was slowed down because of three separate mistakes. The first of these was that I must have been dozing when I cut the mortises for the hinges on one of the doors, because I cut then into the trim and not into the jamb. :eek:

Kitchen to Dining Room door project 32 -Mortises on the wrong face -small.JPG

It took considerable time to custom cut little pieces to glue into the holes, glue them into place, sand, and re-finish the trim piece:
Kitchen to Dining Room door project 33 -Gluing a thin custom-made peice into one of the eroneous.JPG

I noticed the second problem as soon as I hung the second door. :eek: The gap between the doors was between 12 and 13 millimetres whereas the gap between the two sets of door that I made last year is only 3 to 4 millimetres. I solved this by temporarily removing one of the doors and inserting a lip along one edge. This can been seen in the completed picture taken from the Kitchen side.

Thursday night when I was attempting to re-hang the doors, I encountered a BIG problem. :eek: :huh: I had installed the door stops on the door jamb about 3 millimetres to close to the doors. I tried removing this with a cabinet scrapper, with a chisel, and with sandpaper. But, this was taking far too long:
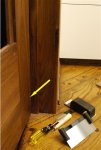
Kitchen to Dining Room door project 34 -Door jamb stop strip too close to the door -small.JPG

So, I decided to remove the stop strips. They were only “tack” glued and were mainly held in place with screws covered by wood plugs. One problem was that I had no more walnut of sufficient length, so I decided to attempt to remove the stop strips very carefully so that they could be reused. I f
first carved out the wooden plugs:

Kitchen to Dining Room door project 35 -Carving out the wood plugs in the stop strips -small.JPG

Any doubt that I had about how completely the plugs filled the holes and adhered to the adjacent wood in the jambs and lentil was soon dispelled. It took me a little over two hours to carve out the 13 plugs.T

he utility of Robertson screws was proven yet again. I had used 1 inch #6 screws and, once the plugs were mostly removed it was easy to extract the screws. :)

Kitchen to Dining Room door project 36 -Removing screws from the stop strips -small.JPG

Once that was done, the strips came off quickly with the gentle prying of a chisel:

Kitchen to Dining Room door project 37 -Removing a stop strip -small.JPG
 
Last edited:
Thanks Bob, Jeb, and Mohammad.

Bob, I am sure that I make as many mistakes on my projects as I ever did. The good thing that I find now is that I have sufficient insight, experience, and tools to recognize my mistakes and to deal with them. I no longer dread making mistakes and that means that I can tackle more things (and that doesn't only apply to woodworking).
 
Beautiful end product, Frank. :clap: Thanks for sharing the photos and the narrative. :thumb: I've often said the true mark of a craftsman is how well he handles his mistakes.
 
Top