
Rob Keeble
Member
- Messages
- 12,633
- Location
- GTA Ontario Canada
Background
I need power in my shop. Did not want to put in panel since i am renting this house and garage temporarily while we search for a piece of land in the country. Also practicality of adding panel just not possible or viable.
So having always wanted a decent size generator for electrical backup anyhow (furnace runs on nat gas no use if no power to run fan etc) so i decided just to bite the bullet and kill two birds with one stone.
Got a great deal on the generator now to build the enclosure. Was supposed to be done before the cold set in but Xmas and birds nests etc got in the way.
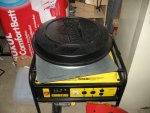
Well with the temps down at -6 (~21 F) celcius today i decided got to get er done. Had to improvise on heating used the burner from my deep fryer without the pot on.
Worked as a redneck heater enough to get some chill off the garage to work. Had previously cut all the lumber so i could get a bit done without the need for loads of space.
In this thread i had asked for some design help and now i would like to show you how i implemented it.
So here are the pics
First i started with a base using a heavy plastic skid i fell in love with for this purpose and got for free. Trimmed it out in 2x8 pressure treated lumber.

Then i supported the bottom of the skid to the sides with 2x8

Now you can see where generator outline is by the cardboard cut out

Then based on advice from our generous members in this thread i used some weld mesh and Navy logic to make sides with vents at the bottom.


So in the last pic if you can make it out i cut strips of 1/4 acrylic i have loads of it and used it in a groove i routed in the PT lumber and caulked it in to form a barrier for any rain that may get sucked in when its raining and fan is on. There is a top and bottom piece staggered apart so as to prevent any rain getting through but keeping air flow.
Thanks for the advice guys.
So this is the first finished wall with insulation in place

I plan on making all the walls as stand alone components then fitting together in a manner which will allow disassembly if neccessary.
Oh one thing not shown is the legs that will be attached to this structure to keep it above ground out of snows reach.
This is the progress to date

Gotta cut some more lumber to make cavities for the insulation then osb to match frame and insulate and cover with vapor barrier which is going on the outside more to act as a protection to the insulation from rain.
more to follow
I need power in my shop. Did not want to put in panel since i am renting this house and garage temporarily while we search for a piece of land in the country. Also practicality of adding panel just not possible or viable.
So having always wanted a decent size generator for electrical backup anyhow (furnace runs on nat gas no use if no power to run fan etc) so i decided just to bite the bullet and kill two birds with one stone.
Got a great deal on the generator now to build the enclosure. Was supposed to be done before the cold set in but Xmas and birds nests etc got in the way.
Well with the temps down at -6 (~21 F) celcius today i decided got to get er done. Had to improvise on heating used the burner from my deep fryer without the pot on.
Worked as a redneck heater enough to get some chill off the garage to work. Had previously cut all the lumber so i could get a bit done without the need for loads of space.
In this thread i had asked for some design help and now i would like to show you how i implemented it.
So here are the pics
First i started with a base using a heavy plastic skid i fell in love with for this purpose and got for free. Trimmed it out in 2x8 pressure treated lumber.
Then i supported the bottom of the skid to the sides with 2x8
Now you can see where generator outline is by the cardboard cut out
Then based on advice from our generous members in this thread i used some weld mesh and Navy logic to make sides with vents at the bottom.
So in the last pic if you can make it out i cut strips of 1/4 acrylic i have loads of it and used it in a groove i routed in the PT lumber and caulked it in to form a barrier for any rain that may get sucked in when its raining and fan is on. There is a top and bottom piece staggered apart so as to prevent any rain getting through but keeping air flow.
Thanks for the advice guys.
So this is the first finished wall with insulation in place
I plan on making all the walls as stand alone components then fitting together in a manner which will allow disassembly if neccessary.
Oh one thing not shown is the legs that will be attached to this structure to keep it above ground out of snows reach.
This is the progress to date
Gotta cut some more lumber to make cavities for the insulation then osb to match frame and insulate and cover with vapor barrier which is going on the outside more to act as a protection to the insulation from rain.
more to follow
Last edited:


 but here i only have myself to blame.