Experiment with Vertical Pouring for Pen Tubes

Dan Mosley

Member
Messages
1,169
Location
Palm Springs, Ca
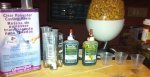
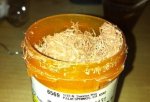
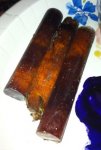
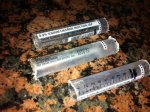
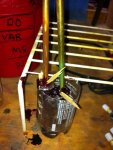
I decided to experiment around with some vertical tube pouring this evening - Before I had used PVC 3/4' tubing which works perfectly fine but I did not like the idea of not being able to see the colors in the tube or being able to make swirls in the resin and be able to see it. So, I hunted around and tried something a bit new - I got some used syringe tubes (from the Vet for free) which are fairly see thru and they seemed to be a perfect size to pour a few tubes with - 2 tubes will make up a two pc pen which was the only downside rather than one pour and cutting the tube in half - In 2 seperate measuring cups I put 1 drop of amber transtint and 1drop of purple transtint and mixed with the cuttings - 3 of the tubes were poured with redwood bandsaw cuttings (very fine) - 1 tube had just the resin poured
How will they turn out ? well we will see in the next couple days and ill post - below are the pics
 

Attachments

  • EXP-1.jpg
    EXP-1.jpg
    78.1 KB · Views: 76
  • EXP-2.jpg
    EXP-2.jpg
    100.3 KB · Views: 79
  • EXP-3.jpg
    EXP-3.jpg
    106.4 KB · Views: 78
  • EXP-4.jpg
    EXP-4.jpg
    37.6 KB · Views: 79
Dan, what do you use for the color and do you pour them together to get a swirl or do you poke a toothpick into the mess to create a swirl? This is very interesting and looks doable with my students.
 
Ok took the blanks I poured over to the bandsaw and cut the ends on the syringes - then i pinched the outside all around the cylinders with my fingers to help loosen them up form the inside (which was waxed prior to pouring) - then with a small blunt tip pc of steel i tapped them out - broke the end on one of them on accident but it should be ok because I poured it longer to begin with - Next time it would be better to tap them with a small wood dowel - They slide right out easily - see pics below - these are only two color pours and is being done as a test - you can of course use multi colors and other objects if you wish
They were still a bit tacky though so ill leave them another 24hrs before drilling out the centers - probably why the end broke a little also

First Pour notes:::: I used transtint dye - 1oz small medicine cups - castin resin - a wood starbucks stir stick - 10cc syringes - and paperclip bent in a swirl to dip into the pouring to slowly twirl to move the colors in and out of eachother in the tubes - I learned that one drop in one oz is alot and will really darken your resin - Redwood cuttings mixed in

Second pour notes (this evening) - I did not use any wood shavings - just resin colored with transtint dye and I put the drops in by dipping my wooden stick into the dye on a paper plate - adding it in slowly and stiring in the 1 oz cup - stir slowly or you will get air bubbles in it

Ill update again tomm after they dry and I do the drilling - but so far the pouring in the syringes seems to work very well and you can see into the tube unlike PVC - you can even reuse the cut tubes if you wish - just coat with wax and stop up one end and you can use them over and over - see last photo
 

Attachments

  • Post-1.jpg
    Post-1.jpg
    36.6 KB · Views: 70
  • Post-2.jpg
    Post-2.jpg
    77 KB · Views: 64
  • Post-3.jpg
    Post-3.jpg
    66.8 KB · Views: 68
  • post-5.jpg
    post-5.jpg
    62.4 KB · Views: 67
Last edited:
Tried to drill out the tubes shown above and two broke during the drilling - possibly to thin or I needed to let them dry longer - have a couple left and will wait a couple more days and then try drilling those - the 3/4 pvc works well and no problems on drilling they are thicker to of course - ill post more as i see if the other tubes will work
 
dan, would it be possible to have a tube in the center to make the drilling easier? another words cast it with a removable center piece or one that is easy to drill? think of it like a core in a mold to allow a recess after the mold is poured.
 
I found out this evening if I leave the syringe on and drill first it adds a bit of additional support and the drillling goes easier without the breaking

Larry =====Below you will see another round of pouring for the fun of it where i put the tube in first (plugging the one end with wax), painting the tube - putting in the syringe and pouring around it with the tube in place - I could have done something better to center them other than some broken sticks but its all I had and was rushing - ohhhh well we will see tomm evening when i take them out...........................thanks for following
 

Attachments

  • New pour.jpg
    New pour.jpg
    94.2 KB · Views: 47
If you are handly at flatwork Dan, try making your own silicone mold with the tube plugs build in...from what I see on-line, real easy! When drilling, you must go slow!! PR gets brittle with a little to much catalyst. A fun trick is to mark the tube length on the blank and add 1/4". Drill to the tube length and glue in the tube. Once set, cut on your bandsaw to the mark just past the tube length. Works good.
 
Part of day off Finally - So I used syringe tubes to pour into and they worked but with some notes or thoughts :

1 - Brad points drill bits is what I had to use - not the best choice on acrylic and probably should have used smooth pointed - the drilling was much better if I drilled first while still in the tubes and then push them out after drilling - and yep I used the brad point both ways and split some when I did not leave them in the tubes.
2 - As everyone says - paint the tubes - even if you use a sharpie - I sprayed some in different colors for the fun of it and let them dry and used them
3 - Make sure you wax the inside of the tubes - they will slip right out easily
4 - Used medium CA - works but im sure Epoxy would be better holding - I did blow a few because of to aggressive turning - take light cuts and slow down your accent and things
seem to work out much better on acrylic
5 - I agree easiset way is to just buy the blanks but it is fun to experiment around with making your own

I notice all videos i see turners use Hut plastic polish of some sort - I do not have any so ill figure out something when I get that far - ill post when i start turning the acrylic and let you know - for now im making some out of wood for some people at work (Olive wood) - ...............thanks
 

Attachments

  • New pour.jpg
    New pour.jpg
    94.2 KB · Views: 25
  • PENBLANKS.jpg
    PENBLANKS.jpg
    64.4 KB · Views: 27
Following up on what Larry said, if you know what pen you are going to turn from the casting, couldn't you cast around the proper tube and not have to drill at all.... you could plug the ends of the tubes and then just have to poke through the thin layer of resin at the end of the tubes.... a friend of mine uses play dough to plug his pen tubes when he glues them in... he also uses little rubber stoppers from a chem lab supply house on some of his molds.
 
Yup...you can make your own or get from one of the vendors on IAP...those guys do amazing work with molds!! You can put lead shot in the tubes and cork the ends in "Sign box". Now I gotta tell you how to do that! Go to the BORG, get some of that corrigated sign material for yard sales and so on. Cut to size and hot glue together. Surround that with foil so any leaks will be contained...and yes, there will be a small leak or two! Make a small wood mount for the corks so the tube is in the center of the mold. Pour, cure and enjoy!!
 
Top