bedroom, getting there,

my son didn't show up until noon today, but we finally got the floor laid and eventually Ill get to transitions and base moldings. (theres no rush, I want to have all cabs installed first)

he purchased all the wiring and outlets, junctions, etc....we need to do the electrical work, but it was 7:30 when we finished the floor, and Im sure he wants part of his weekend for himself.

He'll be here next week for fathers day, so we'll start prewiring some of the stuff.(he doesn't want me to leave any old outlets in the wall, he wants to replace all of them plus were adding 2 more in the cabs)
 

Attachments

  • 100_1436.jpg
    100_1436.jpg
    40.3 KB · Views: 67
still moping along on this one.

I got all the drawer fronts cut, glued together, and sanded a bit.

I attached them to one cabinet to see how it will look.

Not sure why I made the design with the two bottom drawer fronts 1/8 inch apart, and the face frame exposed on the top drawer.

somewhere along the way, I had to change the design, just another moron mistake, seems Im making more and more of them, but I wont change anything at this point.
My wife picked out the pulls, to match the color of the lights(the lights I really don't like, as I don't like these pulls, but don't tell her I said that)

Shes the boss, its her world, I just live in it.

I stained the face frame before I attached it. Makes my life a little easier.

I don't care how many times I make drawers(btw, these are just 1/2 plywood draws with butt joints, brads and glue, sufficient for built in attic knee walls), seems the hardest thing for me is to line up the drawer fronts properly and straight. I should not have attached the backs before I did all this, plus, it makes it easier to spray, but that was my second moron mistake. Maybe I need a V-8 or something.

The bottom 2 drawers are identical, 18 inch depth, 6 inch walls. the top drawer is 14 inch depth, and I think 5 inch walls. cherry frames, plywood panels, the same set of bits I used to make my sons kitchen cabinets, but I made the rails a bit narrower for aesthetic reasons.

The top part, is open with an electrical outlet so we can plug in an alarm clock, phone charger, whatever.
 

Attachments

  • 100_1437.jpg
    100_1437.jpg
    57.4 KB · Views: 48
  • 100_1439.jpg
    100_1439.jpg
    51.2 KB · Views: 42
scratch my post, the answer is yes bart, I just realized, I can remake the top drawer fronts as they are 1 and 1/8 shorter in height, and I can make 2 new ones for the top and leave the same 1/8th gap.

my wife says leave them, but Ill ask my son and bil what they think, they'll give me an honest opinion.(my wife doesn't want me to do any extra work)
 
Last edited:
so I left it alone, and moved on to the panels.

I have not been feeling 100%, so Ive been moving kind of slow on this.

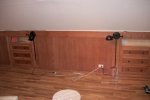
Its just plywood and cherry frames and some pocket screws.

took my time, made sure everything was measured at least 5 times. Im careless like that, and I know if I just keep rechecking as Im going along, it makes for less mistakes later on.

There are 3 sections of panels. One on each side with an opening for each cabinet, and a center panel where a bed will be.
Nothing fancy.

first mistake I made this morning, was I made each end panel identical, meaning I attached the panel on one on the opposite side, needed a mirror of each other, I made identical, but I was lucky enough to take out screws and bang it apart before glue was cured.
I did a bit of damage, but nothing that cant be touched up.
reglued it all.
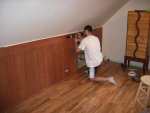
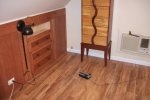
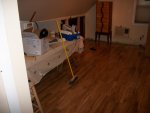
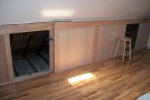
Brought it upstairs to just see how it will all fit. Moment of truth.

ofcourse, since I lack experience, and really don't know what Im doing when it comes to construction and working in a home, I got bit.

the panels are approx. 1 inch too long total length. I couldn't figure it out, I measured 5 times, then measured each panel 5 times, then checked my math on all the pieces 10 times. No way I could have made an error. No way.

but since I lack the kind of knowhow that most guys that do this kind of work and installation have, I saw what happened.

first, first rule, as larry pointed out, make sure the pieces get up the attic stairs, make sure nothing is too big. (that's why theres 3 panels)

second, measure the walls top and bottom, using the shortest measurement so nothing is too wide, fill in gaps later on with molding, or just leave them.
but........being an attic bedroom in a 65 y/o house, the walls tricked me.
The left wall, is not plum. The right wall is not plum. And they are not tilted the same way, the left tilts out near bottom, the right tilts in near bottom, so ofcourse, when I measured, I got the same measurement top and bottom. Tricked me into thinking I had 187 and so inches.
Now, seeing Im almost one inch too wide, I see the walls aren't plum, and are crooked opposite ways. Live and learn.

Im going to set up the panels starting from the right, so any gap will be at the far left side, where cabinets will eventually be, so not be seen.
Im going to have to move all the studs I put in to secure the cabinets and for nailing, as they are each 1/2 " too far over.
Im going to let the glue cure overnight, then trim off equal amounts, approx. 1/2 inch on each side of the center panel.
Not a huge setback, but I will move all the studs and do any other work like that the day my son is here to do the electrical so we can set it all in one panel and cabinet at a time, moving right to left.

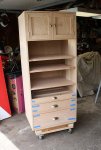
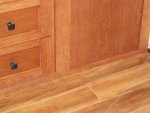
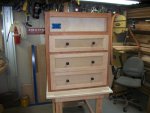
Heres a picture of the simple panels I made, (need to be sanded, stained, sprayed ofcourse)
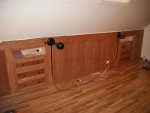
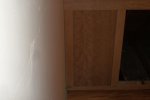
May be hard to see, but the wall on the left side is approx. 1/2 inch off plum.

eh, I learn new stuff everyday when I undertake projects in my crooked old house.
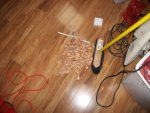
( we had a short blackout today, so that didn't help my shop time, Im done for the day now)
 

Attachments

  • 100_1440.jpg
    100_1440.jpg
    38.5 KB · Views: 38
  • 100_1442.jpg
    100_1442.jpg
    18.3 KB · Views: 32
Allen sorry to hear you aint been well. Hope things get a bit easier as the days pass.

As to your gap, how about a bit of finishing trim like say quarter round down the side on both edges to hide any gap. That's what I understood it was for. :)
 
yep, the gap is the easy part, figured Id have to use some trim in the end, just didn't expect the walls to be off plum opposite each other.
Not a big thing, kind of figured I wouldn't sail through this without something snagging me.

my neighbor the contractor just took a minute peek at it, he told me to trim each far end on the end pieces.
If I have any problems cutting the center panel, it will be too noticeable, the end pieces wont be seen with molding over them. Makes sense.
Ill have to move the studs anyway, 1/2 inch either way wont make a difference once I install the cabs.
 
Last edited:
Im set up in the garage to spray tomorrow. not sure where Im going to hang or put all the pieces, as the panels are huge, and I just don't have the space, but Ill figure something out. Id like to get 4 coats on , all of them tomorrow.(I need to be finished, as my son is coming sunday to help me install it all so I can move on to the moldings and wall cabinets)
 
well, the first coat of semi gloss lacquer was a nightmare.

seems I just couldn't get the gun adjusted right, and I guess I didn't see the coating, as I oversprayed almost every piece!

a lot of milky drips.

Im sure the heavy humidity and high dew points aren't going to help me much today.(I was told wb lacquer, humidity wont effect much)

Ill be patient, wait for first coat to dry, then do a little sanding with 400grit to smooth out the over spray.

I might have to stick with hand applied finishes after this project. I don't have enough light nor space, and limited knowledge with spray guns, I don't need to ruin finished projects. I never claimed to be that talented.

trust me, the first coat is disastrous, and I just kept trying to adjust things,I believe there is a lack of light since I had to hang tarps and block off some lights.
oh well, one step forward, 2 steps backwards.
 
Last edited:
(this ought to get him moving folks!) hey allen! all sanded and waiting for my sister to stain and varnish. keep up the good work young man!
 

Attachments

  • 039 doors with knobs.jpg
    039 doors with knobs.jpg
    111.7 KB · Views: 26
all sprayed, 4 coats, waited over an hour for each coat to feel bone dry, but I don't think humidity really made much difference with water based stuff.
One drawer front has a bad drip mark, last coat, even though I tried to go light, so Ill sand it out tomorrow, if I need to, another coat.
Panels look ok, I sanded them before I put on final coats, 600 grit.

for someone with years and years experience, Im sure the HF gun works ok, but everytime I purchase a quality brand product,it seems my work quality goes up, and my life becomes a lot easier.
Im going to look into one or two quality spray guns.
I tried to get my body shop buddy over this morning to help me spray, but I found out he was busy working on his boat, never answered his phone.
 
Last edited:
it went, not too well, but I learned I should have made the panels 1/2 inch less in height and raised everything else to allow for horribly unlevel floors.
The rise in the floor at the right end threw everything off. I attached the panels starting at the left.

I used a hand plane to shave off as much as I could to fit the panel better to the rise of the floor.

It was borderline acceptable for me, but my wife and son thought it was fine.

Initially, I was going to make some small fluted molding to cover the 2 sections where the panels met, so if anything was off a bit, no one would know.

But the cord cover for the lights my wife picked out, did the trick where I needed it on the right side.(where the floor rise killed me today)

live and learn. (but I wont be doing this kinda stuff any more.)

I haven't used a hand plane to form fit anything so Im glad the blade was sharp.

some pics,

I will cut and make some cap molding to run across the top of the panels, and install all the base moldings around the walls later this week.

The center panel will have a king size bed backed up to it

Challenging for me, Im learning a lot about how to deal with problems in old houses.

my son wired in all the outlets.

I really don't like the reading bedside lights, but I didn't pick them out. I wanted one slimline light fixture mounted in the center.(as well as I wanted maple colored floors, but I was given one choice, her choice)
 

Attachments

  • 100_1461.jpg
    100_1461.jpg
    67.5 KB · Views: 42
  • 100_1462.jpg
    100_1462.jpg
    44.8 KB · Views: 47
  • 100_1463.jpg
    100_1463.jpg
    45.4 KB · Views: 47
  • 100_1465.jpg
    100_1465.jpg
    55.4 KB · Views: 46
  • 100_1467.jpg
    100_1467.jpg
    36.4 KB · Views: 45
Last edited:
interest had faded in this thread, but woohhooooooo for me(the back breaking cruddy work I hate), got the 2 transitions in, and the base molding is just about finished.(will need to caulk above moldings to meet walls)

a few more pieces of base today, then I have to let this project wait for the next phase, the built in drawers on the left wall.
I have to make some Adirondack chairs I promised out for july 1st, and people are getting antsy, since I haven't even picked up their lumber yet.

I planned on being at this point sometime in august, so Im 4-5 weeks ahead of the build schedule I set in my head.

Its just way too humid to work up here, and Im reluctant to turn on all the AC's since no one is living up here.(I guess Im just cheap?, or maybe thrifty)

anyway, with temps expected in lower 90s later this week, humidity up near 95%, dew points at 75, I believe Ill spend a few days in the garage with the ac trying to help, cut up some parts for the chairs, then just take a break until the heat and humidity let up a few points.
 

Attachments

  • 100_1468.jpg
    100_1468.jpg
    46.3 KB · Views: 32
haven't don't anything yet since I installed the paneled back wall.
been trying to figure out the angle of slope, how to make the cabinets fit it, and how to allow for unplumb walls, crooked walls, and unlevel floors.
Im thinking laying a small base first, leveling it all off, then put all the cabs on top of it so they are all even.
PUt some 1/2 spacers along wall to I can shim the cabs plumb.

gonna work on the first cabinet this week see I can figure out angle cut and how to build this thingl
 
It's looking real good, Allen. :thumb: But for Pete's sake, turn on the air conditioner. It's not worth being miserable in the heat just to save a few bucks on the electric bill. :D
 
Top