Master Bedroom Closet and Storage

Thanks guys, but not moving as fast today...lol.

We purchased flooring for the entire basement friday night. Its supposed to be in two weeks from now, so have to at least have the lower dresser unit done by then.

○|||||||○
 
Good to hear you back at it and over the cold. :lurk::lurk:

Not quite, went to the dr today and they think I have strep throat, so on some medication for that now.

Anyway, at least got them out of the clamps and test fit them. As you can see, I kept all the pieces from the same boards together and in order to make the grain flow. All except the top board, I think I had it flipped over or something. :doh:

2013-09-30 19.07.13.jpg2013-09-30 19.07.36.jpg2013-09-30 19.07.25.jpg2013-09-30 19.07.31.jpg
 
Brown visited yesterday with a delivery from WWHarware. Have all the hardware, just need to get some drawer boxes knocked out and sanding done. May go see if I can find a marble top remnant this next week from the Restore.

2013-10-03 18.10.47.jpg2013-10-03 18.10.52.jpg
 
Last edited:
Yesterday's progress...drawer boxes...DONE!

2013-10-06 18.03.15.jpg2013-10-06 18.59.31.jpg

Today, I ran to the re-store over lunch and found a piece of Sillstone for $20, need to cut it to size, but will do so after the base is in place. May go pickup a cheap skilsaw for this job.
2013-10-07 12.37.42.jpg

Also found some casing material for the upcoming basement project for a doorway/opening I need to create.
 
A diamond blade (fairly inexpensive, even at Home Depot) and a 4" angle grinder will easily do the job.

I have the diamond blade, but burnt up my old skilsaw shortly after using it on the last pieces of sillstone I cut for the shower (mostly due to it's age). I've bought a new skilsaw, but it is a nicer/more expensive one that I'm not wanting to use for this purpose. :)
 
I have the diamond blade, but burnt up my old skilsaw shortly after using it on the last pieces of sillstone I cut for the shower (mostly due to it's age). I've bought a new skilsaw, but it is a nicer/more expensive one that I'm not wanting to use for this purpose. :)

If you've got a grinder, a 4½" blade for it is only around ten bucks. Cheaper than even a cheap new saw.
 
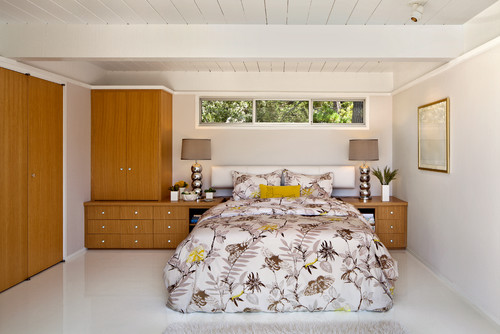
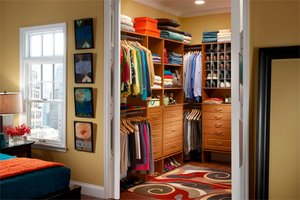
I like the designs of the storage but I have some more designs for you, I hope you like them, please share your views about them.

midcentury-bedroom.jpg


master-closet-layout-closetmaid_b950d6a1697ba57453c072db50fff661_3x2_jpg_300x200_q85.jpg


styles-master-bedroom-closet5-interior-closet-storage-ideas-800x600.jpg
 

Attachments

  • styles-master-bedroom-closet5-interior-closet-storage-ideas-800x600.jpg
    styles-master-bedroom-closet5-interior-closet-storage-ideas-800x600.jpg
    71.5 KB · Views: 6
Kelvin, welcome to the forum. Your work deserves a new thread in the Flatwork Project Showcase rather than buried in a thread of someone's work in process

Awesome design and craftsmanship. You have apparently done it before - little things like extending the divider between the upper bars lower to help keep the clothes separated - I would not have thought of that. Do you do this professionally?

The first picture (white carpet) puts a lot of storage in the bedroom. One trick I have come to like (suggested by my son) is a shelf in nightstands just below the top (and now with outlets at the back of the shelf) since the top of nightstands get over crowded - the shelf provides space for phone chargers, kleenex boxes,etc, beyond the usual nightstand junk.

The second picture (wild closet carpet) shows the user (customer) making very good use of the space. My shoe rack has shelves 27 inches wide and 5 inches high which (by luck rather than careful design) hold four pairs of my wife's shoes, or three pairs of mine, on each shelf. We like the flexibility of the shelf, rather than individual compartments.

In the third (beautiful) example, what are the stainless steel/nickel/chrome brackets in the floor on the right?
 
So today I installed all the drawers/drawer glides and finished the sanding on the face frame and drawer fronts. The drawer fronts and face frame got a coat of sealer.

2013-10-13 12.21.15.jpg2013-10-13 13.03.13.jpg2013-10-13 18.11.30.jpg2013-10-13 18.11.41.jpg
 
Thanks guys! Patched up the wall that I had to cut into for electrical also. Have one more coat to do, then can paint and clean up for installation. I didn't worry about the left over wall paper as the new cabinet covers it and it leaves some archaeology for a future owner to find down the road of the house's past. ;)

2013-09-01 20.59.51.jpg2013-10-13 20.40.49.jpg

I also picked up a cheap skilsaw to use to cut the top. Decided to go with the skilsaw since I've got a long edge to cut and can use my guide bar/clamp with it, would have been too hard to keep straight line with a grinder. Will hot glue a template once the base cabinet is installed to cut by.
 
So I got the first coat of poly on last night.

I have a question for you all. When I attached the drawer fronts on the master bath vanity, I dabbed some glue on the back, held it in position and tacked it with a couple of brads from my brad/pin nailer. I then drilled the holes for the handles and between the glue and the handle it's pretty much held in place, but I had to go back and putty the holes.

How would you go about attaching them if you were doing them?
 
Last edited:
Top