wine rack

allen levine

Member
Messages
12,363
Location
new york city burbs
this is a continuation of the thread in general woodworking.
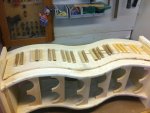
Today was the first day in weeks I was able to stand erect without much back pain, so I started up again on this unit.011.jpg

Heres where Im at now. Worked 3 hours today, limiting my time so my disks don't repay me.
Its also one of the first decent days to work without heating on.

I sanded down to 120, obviously, the curves need more sanding, but I need to fill in some areas with wood filler before I paint anyway.
Its assembled, did not attach the keyboard sides yet. I want to paint those separate, but each black key has to be cut and then shaped to fit in.
I scored the white keyboard sides to look like keys. I will fill in the ambrosia maple holes with filler to paint. All I had in stock.

I did not have any measurements, only that poor picture to go by, but I think its coming along close enough.

My new router lift is worth its weight in gold to me. I cannot believe I went 5 years without a real router lift.

(this unit is made of hard maple, soft maple, yellow pine, and top and bottom are poplar, like I mentioned, using what I have in stock)
 

Attachments

  • winerack 001.jpg
    winerack 001.jpg
    66.5 KB · Views: 51
  • winerack 002.jpg
    winerack 002.jpg
    44 KB · Views: 48
  • winerack 003.jpg
    winerack 003.jpg
    65 KB · Views: 48
Very clever design, and looks very good so far. Just a suggestion. The wine bottle will sit better if the neck sits in the scoop you have in the front. If you installed the same structure in the back, the bottle will sit at the correct angle to keep the cork wet. IOW, it fits the wide part of the bottle, and props up the bottle.


MikesMasterLogo2.gif
movingplane1.gif

.
 
, I will install a piece on the back of each shelf to raise the back of the bottle a bit.
it isn't my design, it was in a wine store in Caesars Atlantic City, that's where the picture is from. Im just trying to copy it.
 
getting in a little more time today, still resting out the back, so enough to cut all the black keys, used whatever, pine, maple, mystery wood.
22 black keys each side.
I used a chamfer bit(45 degree) to cut 3 sides of the black keys to give it a little more realistic look, wont know if it does anything once painted.
I made an error, I cut each key individually. Then I had to use a clamp to chamfer each of the 48 keys I made, it was time consuming to say the least.
Every piece is now finished. When I get back next week Ill start filling in brad holes and anything else. Hopefully, I should be finished sanding and ready to prime by end of next week.
Heres both sides of unit, nothing is attached yet, need to paint first.

the unit is on its side just for the pic.

(Im holding on to the template. Im thinking about making a chair rail type molding to put around my sons walls where he has his piano and guitars(he collects guitars, no real expensive ones), thought it would make unique molding, would do it in maple and walnut for black keys.
future project.
 

Attachments

  • winerack2 002.jpg
    winerack2 002.jpg
    51 KB · Views: 21
  • winerack2 003.jpg
    winerack2 003.jpg
    49.4 KB · Views: 22
  • winerack2 004.jpg
    winerack2 004.jpg
    51.5 KB · Views: 21
Last edited:
I had no clue the primer wouldn't dry overnight. It was very damp here all day yesterday and rained all night.
It also dropped down into the low 40s.
the unit is not tacky, but feels freshly painted, so its not ready to be sanded and certain parts reprimed.
sets me back, but I played with one of my new purchases at the show.(easy woods detailer)
I made a few wine bottle stoppers, and Im in the middle of a thread ripper, but seems the tubes done fit snug on the bushings.
Cant do much else work with paint drying. I miss my finish room.
 

Attachments

  • unit 001.jpg
    unit 001.jpg
    59.3 KB · Views: 31
  • unit 002.jpg
    unit 002.jpg
    66.5 KB · Views: 32
  • unit 003.jpg
    unit 003.jpg
    56.4 KB · Views: 31
I'll say it's not tacky! It also has the advantage that if it looks straight to you, you'll know you've had enough wine!

I disagree with my friend above; it's OK to store the bottles level, as the wine is in contact with the cork in that position, and the cork will remain moist. With the increasing use of plastic corks, you'll soon be able to store a bottle any way you want, which might lead to some interesting wine racks.
 
Hopefully Allen you saved your templates so you can do a short run of a 100 of these! :thumb:
That is sweet, if I were a wino errrr wine drinker, I wouldn't mind one in my home. But I'm not so won't. Great job!!!!!!!!
 
worked on some thread pullers today, one got ruined, the other ok, continued polying bottle stoppers, only 2 were ok, seemed the wood color on one faded bad, didn't like it, wont waste a stopper on it.(my turning skills are limited. I keep thinking Im decent, then I see real turners work. But today, it was really relaxing for a couple of hours.I love the oldies music, and my cable TV station offers a golden oldies channel, but I don't have a box in the garage. My son purchased a device for me(for my birthday) along with a ridgid radio, and Im able to listen to any tv channel through the ridgid radio in the garage. Aint technology wonderful. I bop and turn and for the first time in 4 months I feel good, winter blues gone.)

on the wine rack, everything is painted, tomorrow I will do final assembly of keyboard side and add black keys.
Theres no way for me to add black keys strong enough, so I will put 2 pins in each key. If the pins are too noticeable(this isn't fine furniture, as Id never paint wood, it just doesn't look right for me), Ill try to touch up the pin holes with a touch of black paint.

the wiggle board worked out great for the back, no need to veneer it. Inside looks fine, back I used staple gun, then resprayed it so staple heads aren't too noticeable.

jon-I refuse to build anything out of hardwoods again and paint it. And I don't like working with all those little pieces, (black keys), you can have the templates for the walls if you want them.

* my cows are shy, while holding the camera phone, one tried to duck behind the tree, the other one hid her face behind some 4x4s.
 

Attachments

  • 41014 001.jpg
    41014 001.jpg
    90.4 KB · Views: 24
Last edited:
Top